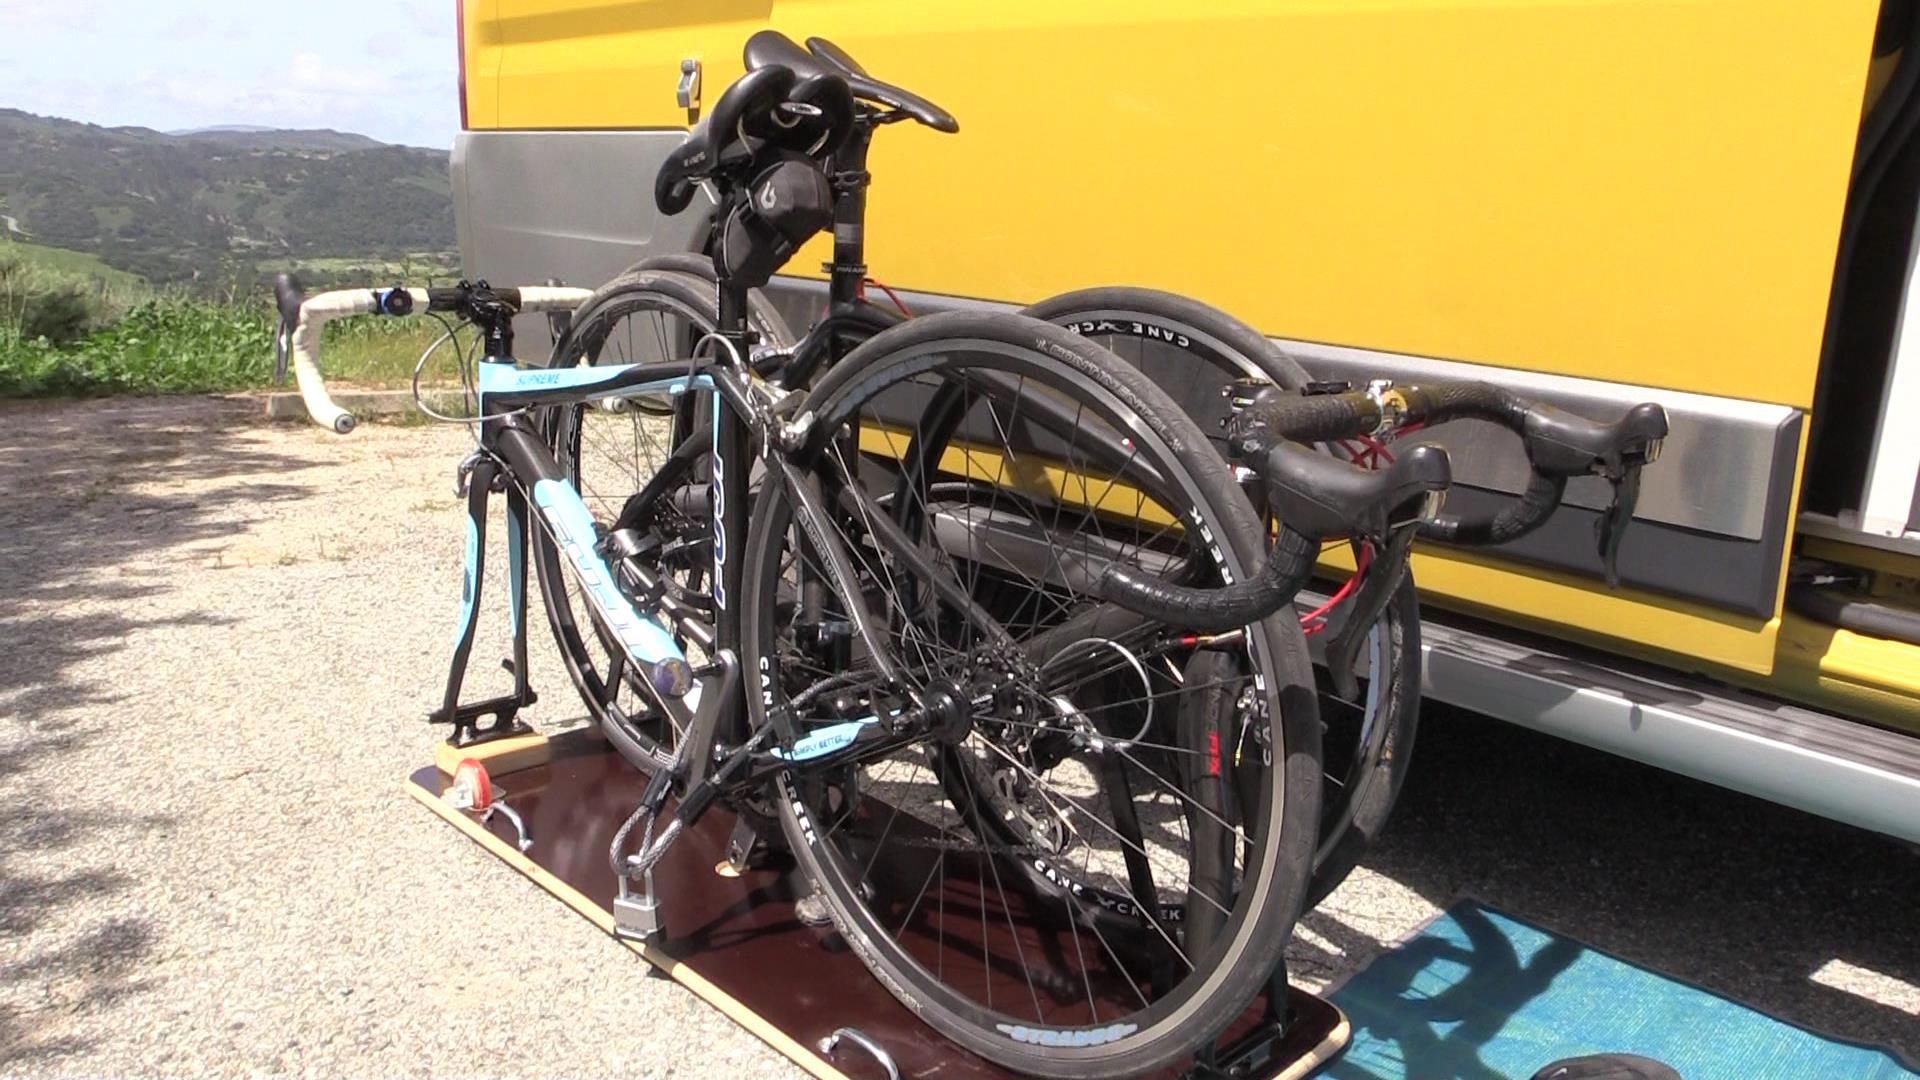
Our road bikes are precious cargo to us. They need to ride inside. So I’ve tried **A LOT** of different ways to transport our bicycles inside RVs over the years. This one is by far the easiest and best solution I’ve come up with. It works great for us, perhaps it will work for you. I present you: The RV Bike Gurney!
The video is pretty self-explanatory on the gurney, but I thought I’d jot down a few notes here that might help you if you decide to try to make one yourself:
- I didn’t explicitly call this out in the video, but obviously this contraption works better with the bikes positioned head-to-tail.
- You want to use wood at least 3/4″ (19mm) thick. There are a couple reasons for this. First, it will keep the gurney from flexing when loaded, and second, you will want to recess the fasteners into the bottom of the gurney so that it doesn’t scrape up the floor of your RV. For the one in the video, I used 3/4″ phenolic faced plywood.
- The fork mounts you see in the video are Saris Fork Mounts. The wheel mounts you see are also from Saris. I have no reason to believe other brands wouldn’t work just as well. These are just pieces I had on hand from previous RV bike transport attempts.
- The roller blade wheels are also something I just had on hand (back from when I played roller hockey). They’re nothing terribly special. But you do need to pay attention to the diameter of the wheels. The diameter needs to be large enough to clear the bottom of the gurney. But not so high that the gurney rides high off the ground.
- The aluminum angle is just something from the local home center. It’s just cut, filed, drilled, and screwed down to the board. The axles for the wheels are really just a pair of 1/4 -20 bolts. I wouldn’t skate on them, but they work just fine for this application.
- Cutting the through-holes for the wheels will probably be your most challenging part. I did these with a template and a router.
- I only added two wheels because I did not want the gurney sliding around while we were driving. I didn’t mention this in the video, but on the end opposite the wheels, I have some rubber stops mounted to keep the gurney from sliding unintentionally.
- Take your time getting the positioning of your bikes right before screwing everything down. You want the bikes very compact, but not so compact that you damage them getting them on and off the gurney. For ours, I was able to get the rear wheels inside the handlebars of the opposite bikes. It’s not too bad to get them on – but I wouldn’t want to have to do it in a hurry.
- It’s not ideal, but in a pinch, one person can load and unload the gurney. Two caveats: First, your wingspan must be big enough to grab both sets of handlebars. Second, it works better if you haven’t removed the lawyer lips from your front forks.
- When using the gurney for storage outside the RV, it really does lock up both rear triangles and both front wheels. We’re more likely to take the bikes outside when we land now that we have a super-easy way to lock them up.
And that’s going to about do it. If you have any questions, ask away below. Thanks!


On the gurney, how do you keep the rear wheels of the bikes from come up (move vertically away from the 3/4 plate) when you hit a bump in road? And how to prevent the rear wheels from moving side to side?
Good question. We never had a problem with the bikes bouncing around too much, so I never did much about it.
I did cut some lengths of foam pipe insulation which I would put around parts I thought might bang together.
And I had a plan to just staple some two-sided Velcro right where the rear wheels touched – but I never went ahead with it.
Ooooh! I found a better answer.
These weren’t available back then, but building one today, I’d look at these: https://amzn.to/3VIkT6o
What is the rack on the back of the RV?
That’s a bike rack by Fiamma.
(Sometimes, we roll with 4 bikes…)
James,
We’re downsizing from our 40ft Winnebago Journey to a class B. Your gurney looks like a solution for our bikes (similar situation as yours, I race and she rides – a Trek Project 1, enough said there).
So, I’m interested in your solution for your road bike (the ones on the gurney) in the NPF, Parky. Still using the gurney with bikes between the beds or another solution (In one photo, it looks like you have a bike behind the passenger seat forks toward roof and back wheel on the floor)?
Thanks
I’ve only been able to figure out how to get one bike inside Parky comfortably.
As you’ve guessed, I use the two posts for the passenger’s seat headrest. I drilled two holes in a piece of wood that same distance apart, and mounted a fork mount to it.
The back wheel rests on the floor.
You can’t use the slider door while the bike is on there. But there are four others in the van…
We have a custom tandem that we want to haul and keep inside. Have you run across anyone doing that in a Class B?
Oh wow. Never seen a tandem inside a class B.
Seen plenty in vans, but none that were regular class B motorhomes.
Usually I see the tandems strapped across the back at a diagonal.
Hello James.
This is James in Dubai. Curious what brand of trailer you purchased for your bike hauling.
Thankd
No problem. It’s from here: http://minigotrailer.com/
Hi, have you had any problems with the gurney sliding around or moving when, for example, stopping suddenly? How do you keep it in place?
Thanks, Pete
Actually, no. We haven’t had any issues like that.
It does move slightly. But the rubber feet on the front keep that to a minimum.
Also – our RV has a cabinet that sticks out – directly in front of the gurney. That keeps things from getting too far out of hand.
In fact, I had to raise the fork mount for Stef’s bike so the handle bars would clear that cabinet. It’s a tight fit.
James,
Do you leave your bikes locked up outside at night? I wish the Travato offered three slide out trays for four bikes and tools / gear with a platform bed above.
Thanks for the blog and videos. We really enjoy and lean a lot watching you and Stef.
If you’re talking about the road bikes on the gurney, generally no. We bring them inside at night and if we are going to be away from the vehicle for a long time. We leave them out if we think it’s safe, and we want the extra walking room inside.
Hi James, great info you are providing. However, in my long research, I have yet to find a decent rack mounted means to haul two mountain bikes on my 5th wheel trailer. The logical place is at the rear, with a hitch that is welded/secured to the I-Beam framework. Currently, there is a 1 1/4″ receiver that is attached this way. I have found that there are many hitch mfg’rs with 1 1/4″ racks but none will recommend a particular hitch (except, from Yakima). Liability issues, I suspect. I’ve read many horror stories of bike racks (Cheap?) flying off the back end of the trailer bumpers and causing some major problems.
Any ideas?
Thank you
Ron
Good Question.
I suspect that any bike rack that works with a 1 1/4 receiver would work.
HOWEVER – what you want to do is make sure that receiver is solidly attached to the frame.
The horror stories you hear have to do with receivers that are after-the-fact bolted on to just the rear bumpers. Bouncing down the road eventually torques the entire bumper off!
As long as your receiver is properly mounted, you shouldn’t have any trouble.
James,
Do you run into any Winnebago owners with recumbent trikes? I have an AZUB T-Tris that can fold into a fairly compact bundle and was wondering how my fellow trike pilots carry theirs.
BTW, nice engineering job on the gurney, If I could fit my trike into the back of a Winnebago without folding it, I’d build a gurney to hold it in place.
A second question if I may: Have you hear anything more about Winnebago’s release of that neat 4×4 MB concept you explored last year. I’m still anxiously awaiting its release.
Thanks,
Bill
I’ve not encountered any Travato owners with recumbents, but that doesn’t mean they’re not out there.
You could try asking on the Travato Owner’s Group on Facebook and see if anyone chirps up.
As far as the 4×4… I hear it’s still coming out this summer, but I don’t have any concrete release dates or anything.
Thanks James,
I’m swapping my AZUB for an HP Velotechnik Gekko 20 tomorrow and it packs even smaller. The reason I asked about the Winnebago 4×4 concept is that I recall it having a huge storage bay under the bed that would swallow my trike and folding kayak!
Thanks again,
Bill
The garage in the back was a thing of beauty… 🙂
Very cool way to hold 2 bikes secure in the RV. It would also work well in a mini van or a SUV. Have you though about adding 2 more wheels to the other end for wheeling it around outside of the RV?
By slotting the base and mounting the wheels so they don’t touch when the base is in the full horizon positional it won’t roll around when you are driving.
It would make it easier for one person to load it also. All you would have to do is wheel it over and set the front wheels in the RV and then pick up the back and roll it in.
That’s pretty much how I load it into the rig by myself now anyway. Get the front wheels in, and then it’s a piece of cake.
If I make another, I may tinker a bit with wheel placement. But I don’t think I’ll add additional wheels.
That’s a real neat contraption. I think I would copy your idea if both our bikes were light. But since Mylène’s ebike weight 45 lbs, the total weight would be a bit too high for my liking. I’ll stick with the fixes fork mounts I installed a couple weeks ago. Do I need to tie down the rear wheels to keep them from bouncing around on rough roads, or is just the fork mount enough?
PS: What”s a lawyer lip?
We do not have the rear wheels secured. They stay in place just fine.
“Lawyer Lips” are the little nubs of material on the ends of the front fork dropouts that keep the wheel in the fork even if you don’t have it secured very well.
https://www.flickr.com/photos/andygates/2449422995
I had also considered this option. Permanent built in slide. But it added $1000 to the price tag, plus the necessity to sleep with the bed 2 inches higher.
https://www.facebook.com/elegancevr/photos/a.701374686606916.1073741826.377317789012609/977274082350307/?type=3&theater
Interesting. Does the tray remove from the runners? Or is it stuck inside the vehicle at all times?
One of the things I like about ours is that we can take it completely out of the rig and there’s nothing left there.
Yes the sliding bed is removable. But the rails would still be in the RV.