
Winnebago bills the Travato as a 3 season coach, and that’s fine. But Lance, our Travato, was built with a few tweaks to extend his useful camping calendar into the winter. He’s got heating pads on the Grey and Black (sink and shower for us) tanks. There’s a heating pad on the pump that’s used to dump the grey tank. Water lines have been brought inside the coach. The window by the bed is double-paned. But I still had the feeling that I could do more.
I figured it out one day when I slammed one of the doors. It sounded, well, “hollow”. As a 3 season coach, the doors in a standard Travato aren’t insulated. I’m talking here about the large sliding door, and the two rear doors. They do have outer and inner panels, with a dead air space in between; and that works well for 3 seasons. But to take Lance out in the winter, I felt like I needed to do more. And so I did.
Now, I’ll say up front that I am NOT an insulation expert, thermal transfer engineer, heat-flow scientist, or whatever. I didn’t even particularly enjoy thermodynamics in college. What I did to our doors is probably not the theoretical maximum that could be achieved. I’m sure the approach could be improved upon. I’m sure someone will tell me how I haven’t left enough dead air space around this or that radiant barrier, or how I’m not using enough material to mitigate conductive losses, blah blah blah. But I’m also pretty sure that I’ve significantly improved things over stock, and I think you’ll agree. Now onward.
Phase 1: Remove the plastic door panels
This actually isn’t too difficult. The first thing you’ll need to do is find a very tiny screwdriver or some other prying implement and pop off the plastic covers that are over the mounting screws.
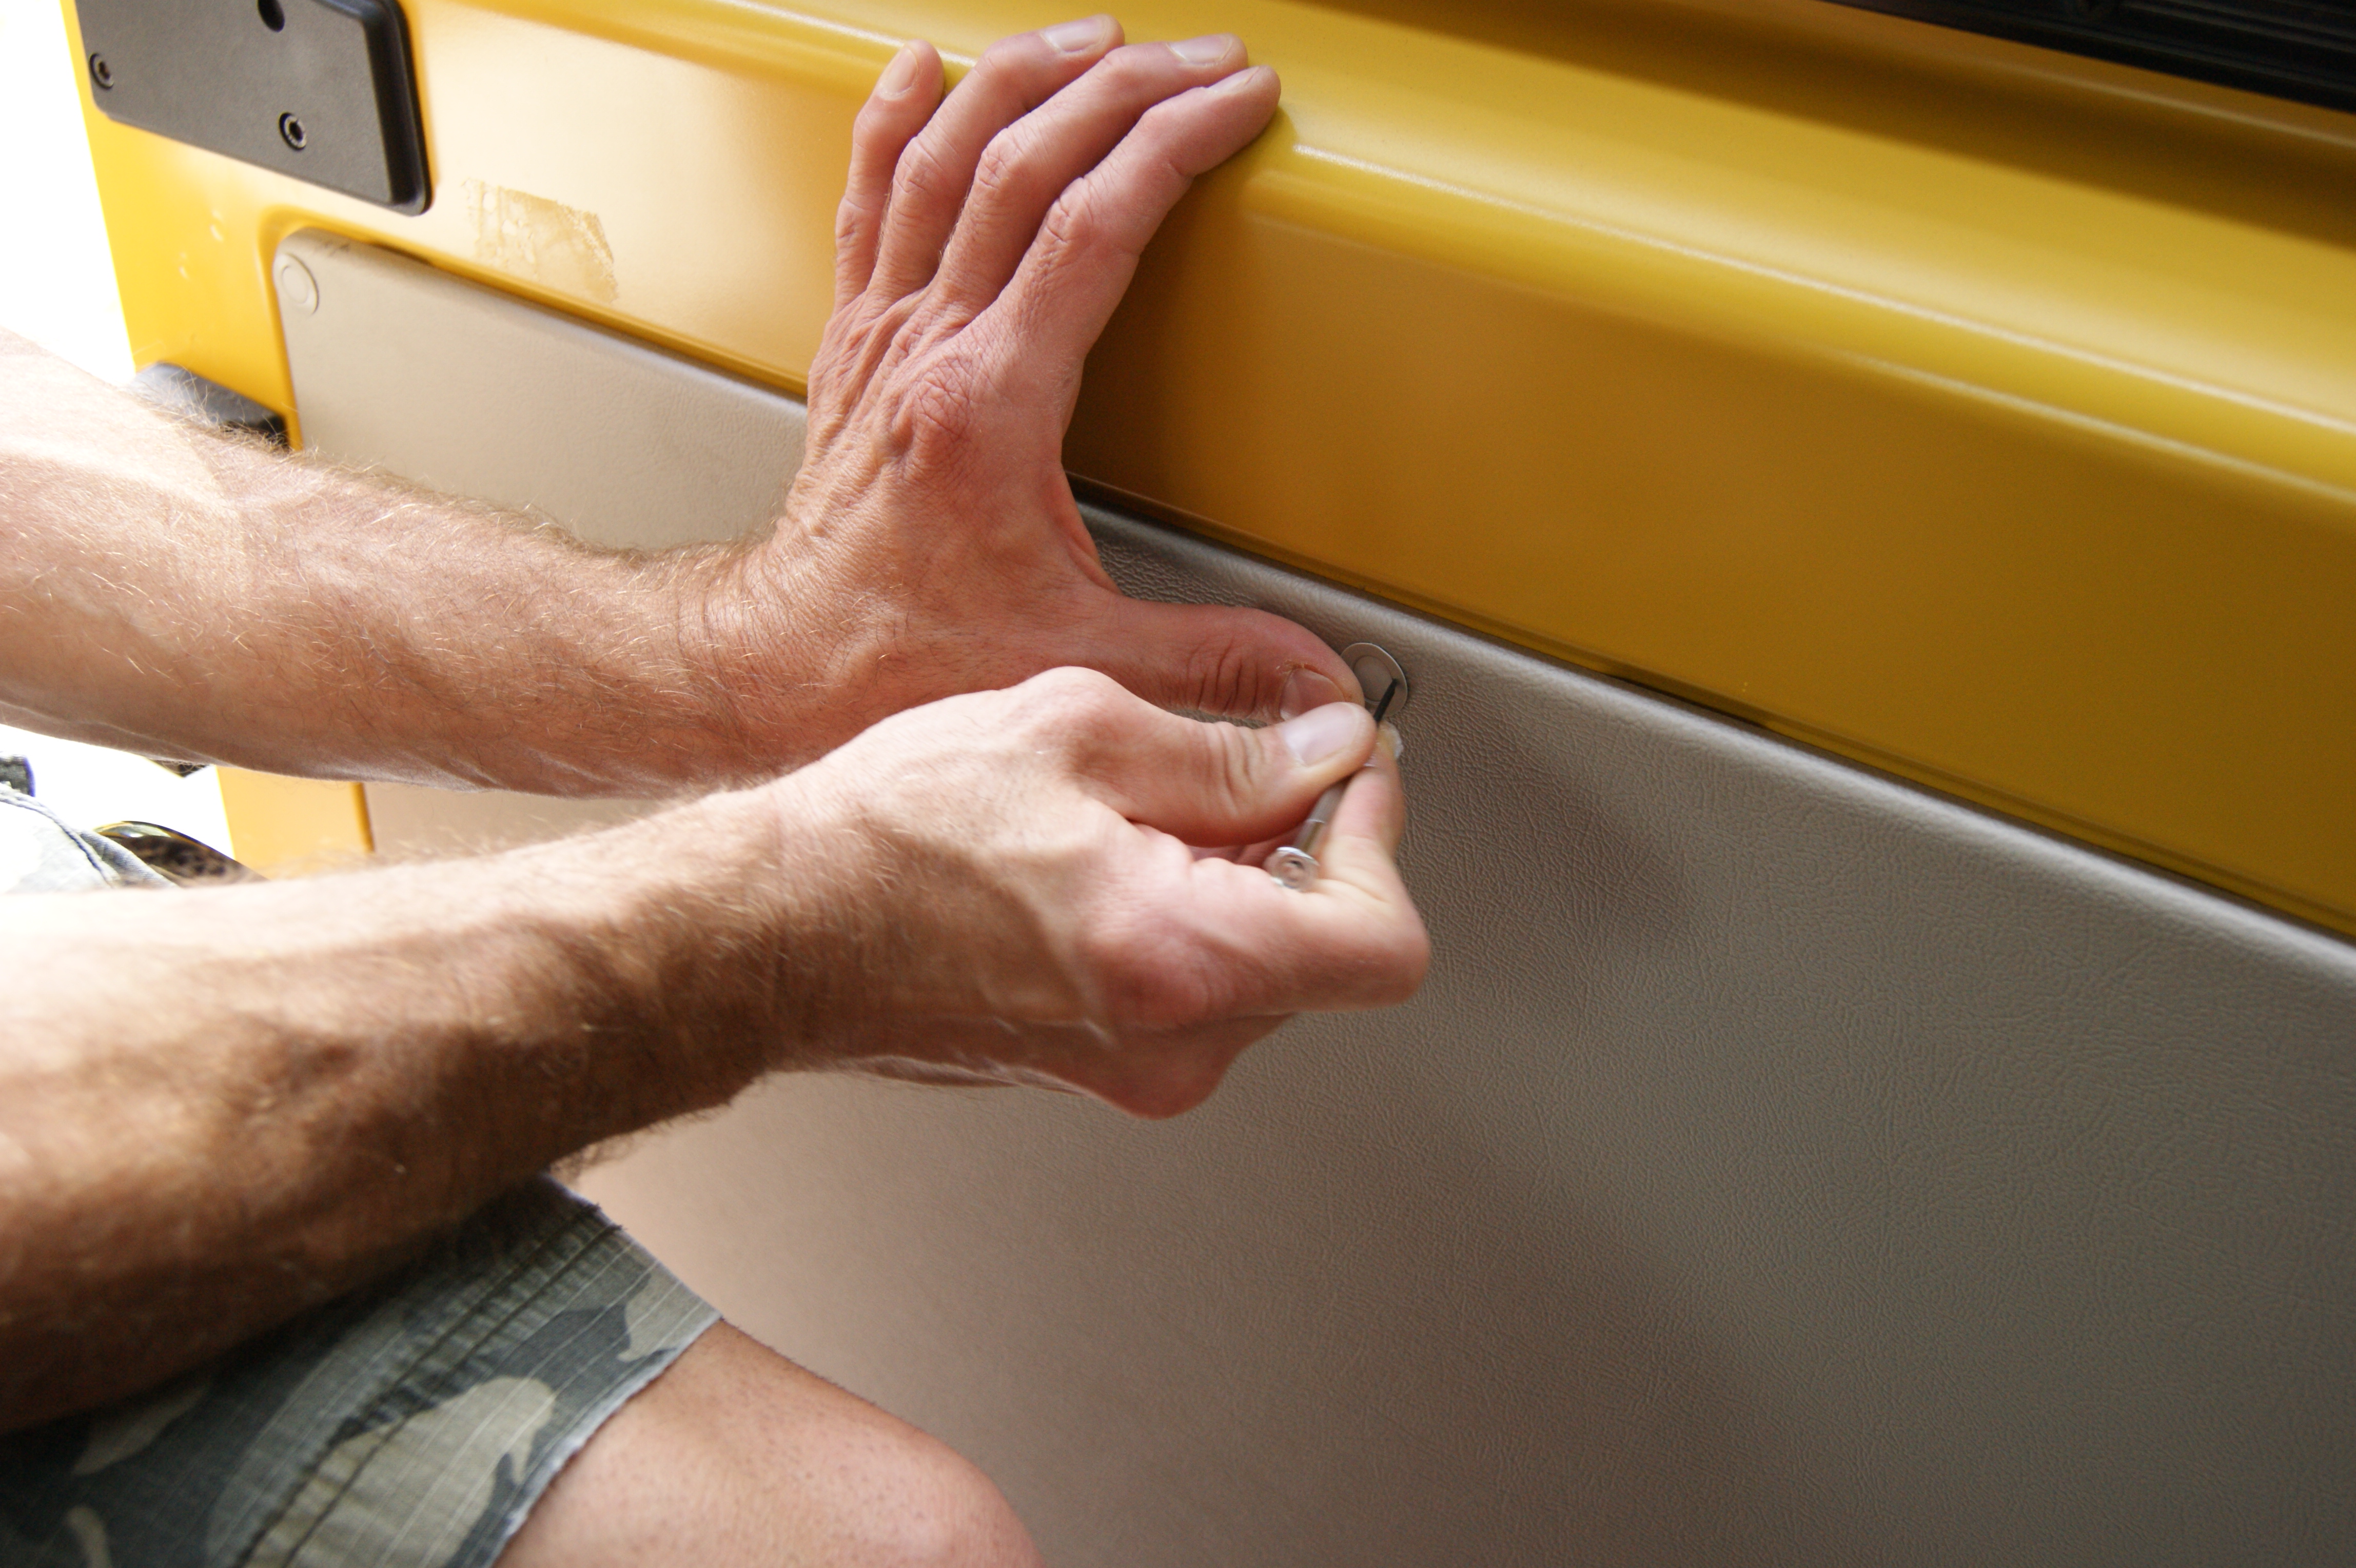
When you’re doing this – it helps to have someone else available. That way, when the tiny plastic circles suddenly spring out of their locations at 43mph, hit your driveway, and bounce randomly and impossibly far away, the extra set of eyes can help you find them. They’re approximately driveway colored. You’ve been warned.
Once the covers are off, simply remove the screws holding the panel down. There’s nothing special about that. However, on the large sliding door, the first 7 screws will come off pretty easily.
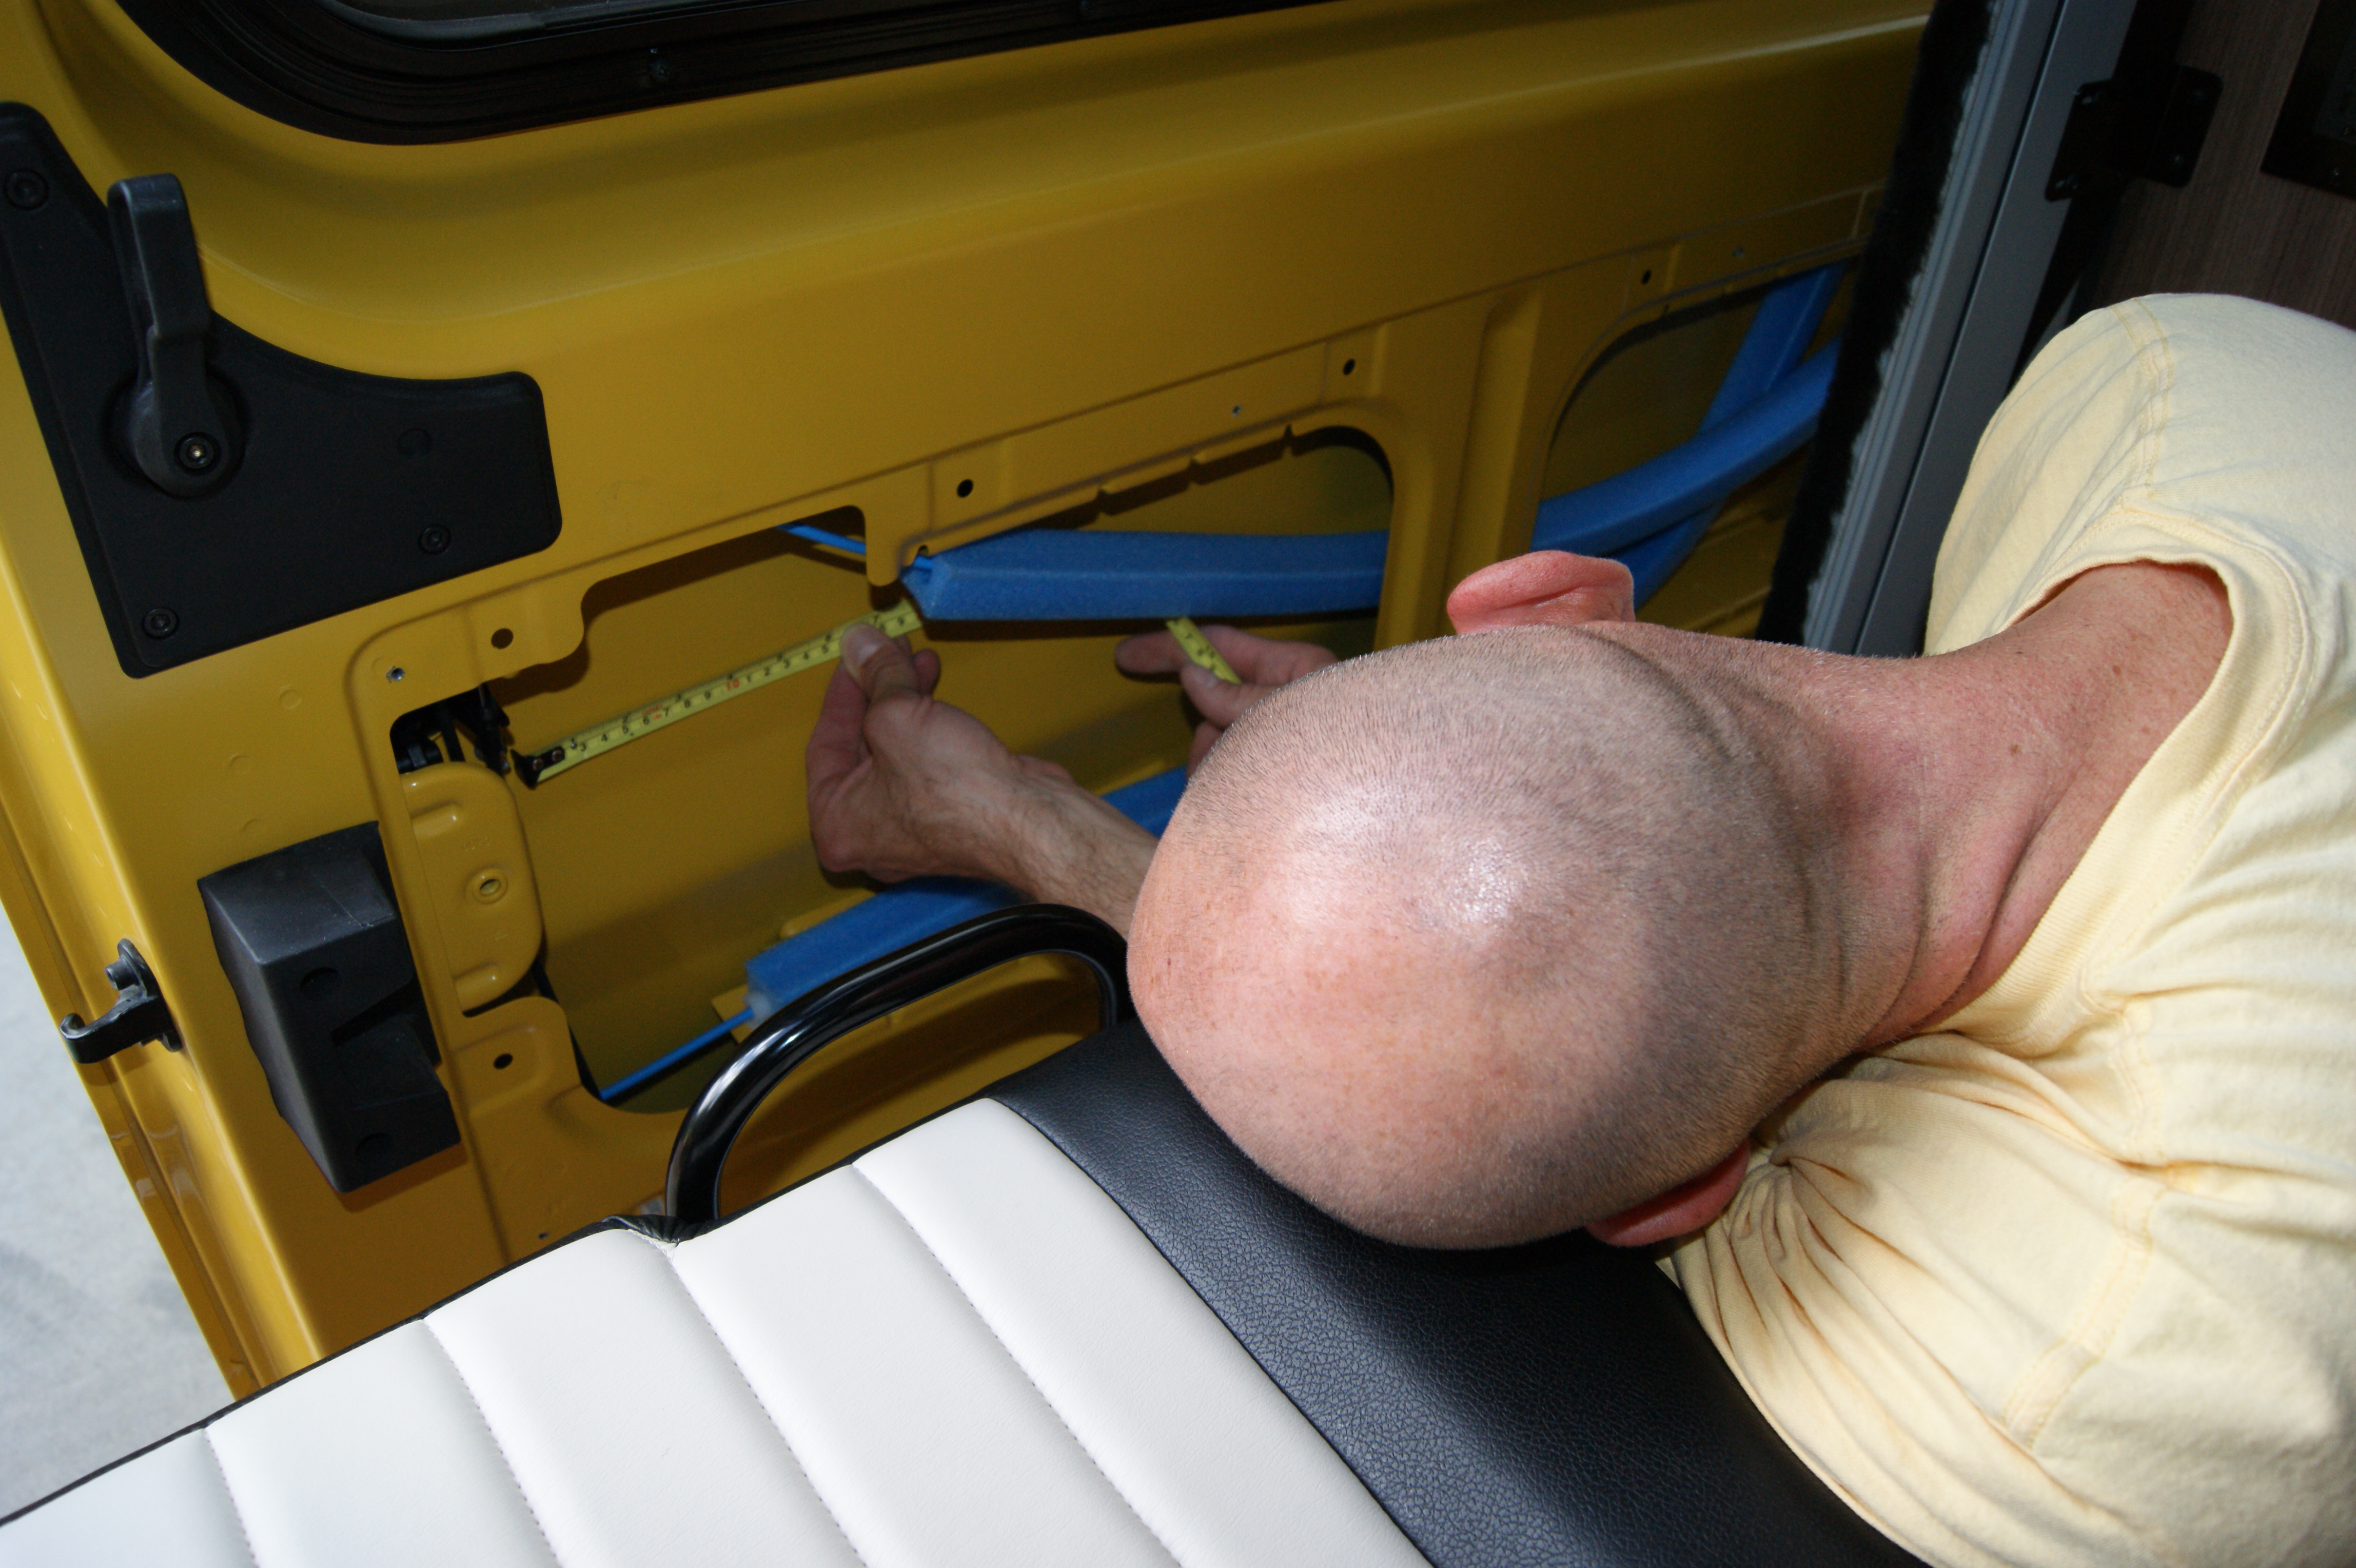
But if you have the screen door option, the last three screws are a bit difficult. I had to use a right angle chuck and a really short bit for my driver to get them out. You can’t get to them with the door closed, or with it open, so you have to squeeze a hand in there like this.
When you’re removing the screws, you might notice that some of them seem to be missing. At first, I thought this was a build mistake. But as I looked at it more, I realized the missing screws were missing on purpose. Had screws been driven in these locations, they would have been in danger of piercing or fraying wires or other door operating hardware. Leaving them out makes sense, so don’t go driving extra screws in thinking you’re doing something good.
![]()
The other thing you’ll want to pay attention to are all those wires and hardware pieces inside the doors. Whatever you do, you don’t want to impede or fray any of those pieces. And also, you should make sure that they remain accessible; because they will likely need to be serviced in the future.
Phase 2: Sound deadening
I like things quiet, and the ProMaster chassis was pretty quiet anyway, but there’s always room for improvement. Big pieces of sheet metal stretched over structural ribs can act as drums, and so I like to do something about them where I can. So the first thing I did was to add some sound-dampening film to the insides of the doors.
There are several products out there for this: Dynamat, FatMat, HushMat, RAAMmat, and more, I’m sure. I’ve actually used no less than three of these different products over the years. Regardless of the chest thumping on various car audio forums, I can tell you that you’ll observe absolutely zero difference in performance regardless of which product you use. They all work well, and they all work about the same.
So if you want to do this, your choice of a product should be based on something other than performance claims. In this case, I went on price. I wound up using FatMat, because it is by far the least expensive in the category. Some folks say it smells worse than some of the other ones. It doesn’t smell bad to me – I can barely detect it. (And I can smell gas leaks that the heating techs with their gas-sniffing-Geiger-counter-thingies can’t find – true story.)
This stuff is very sticky on one side, and has a thick aluminum foil on the other. But it needs a clean surface to stick to, so the first thing you’ll want to do is to clean the inside surface of your door with some denatured alcohol.
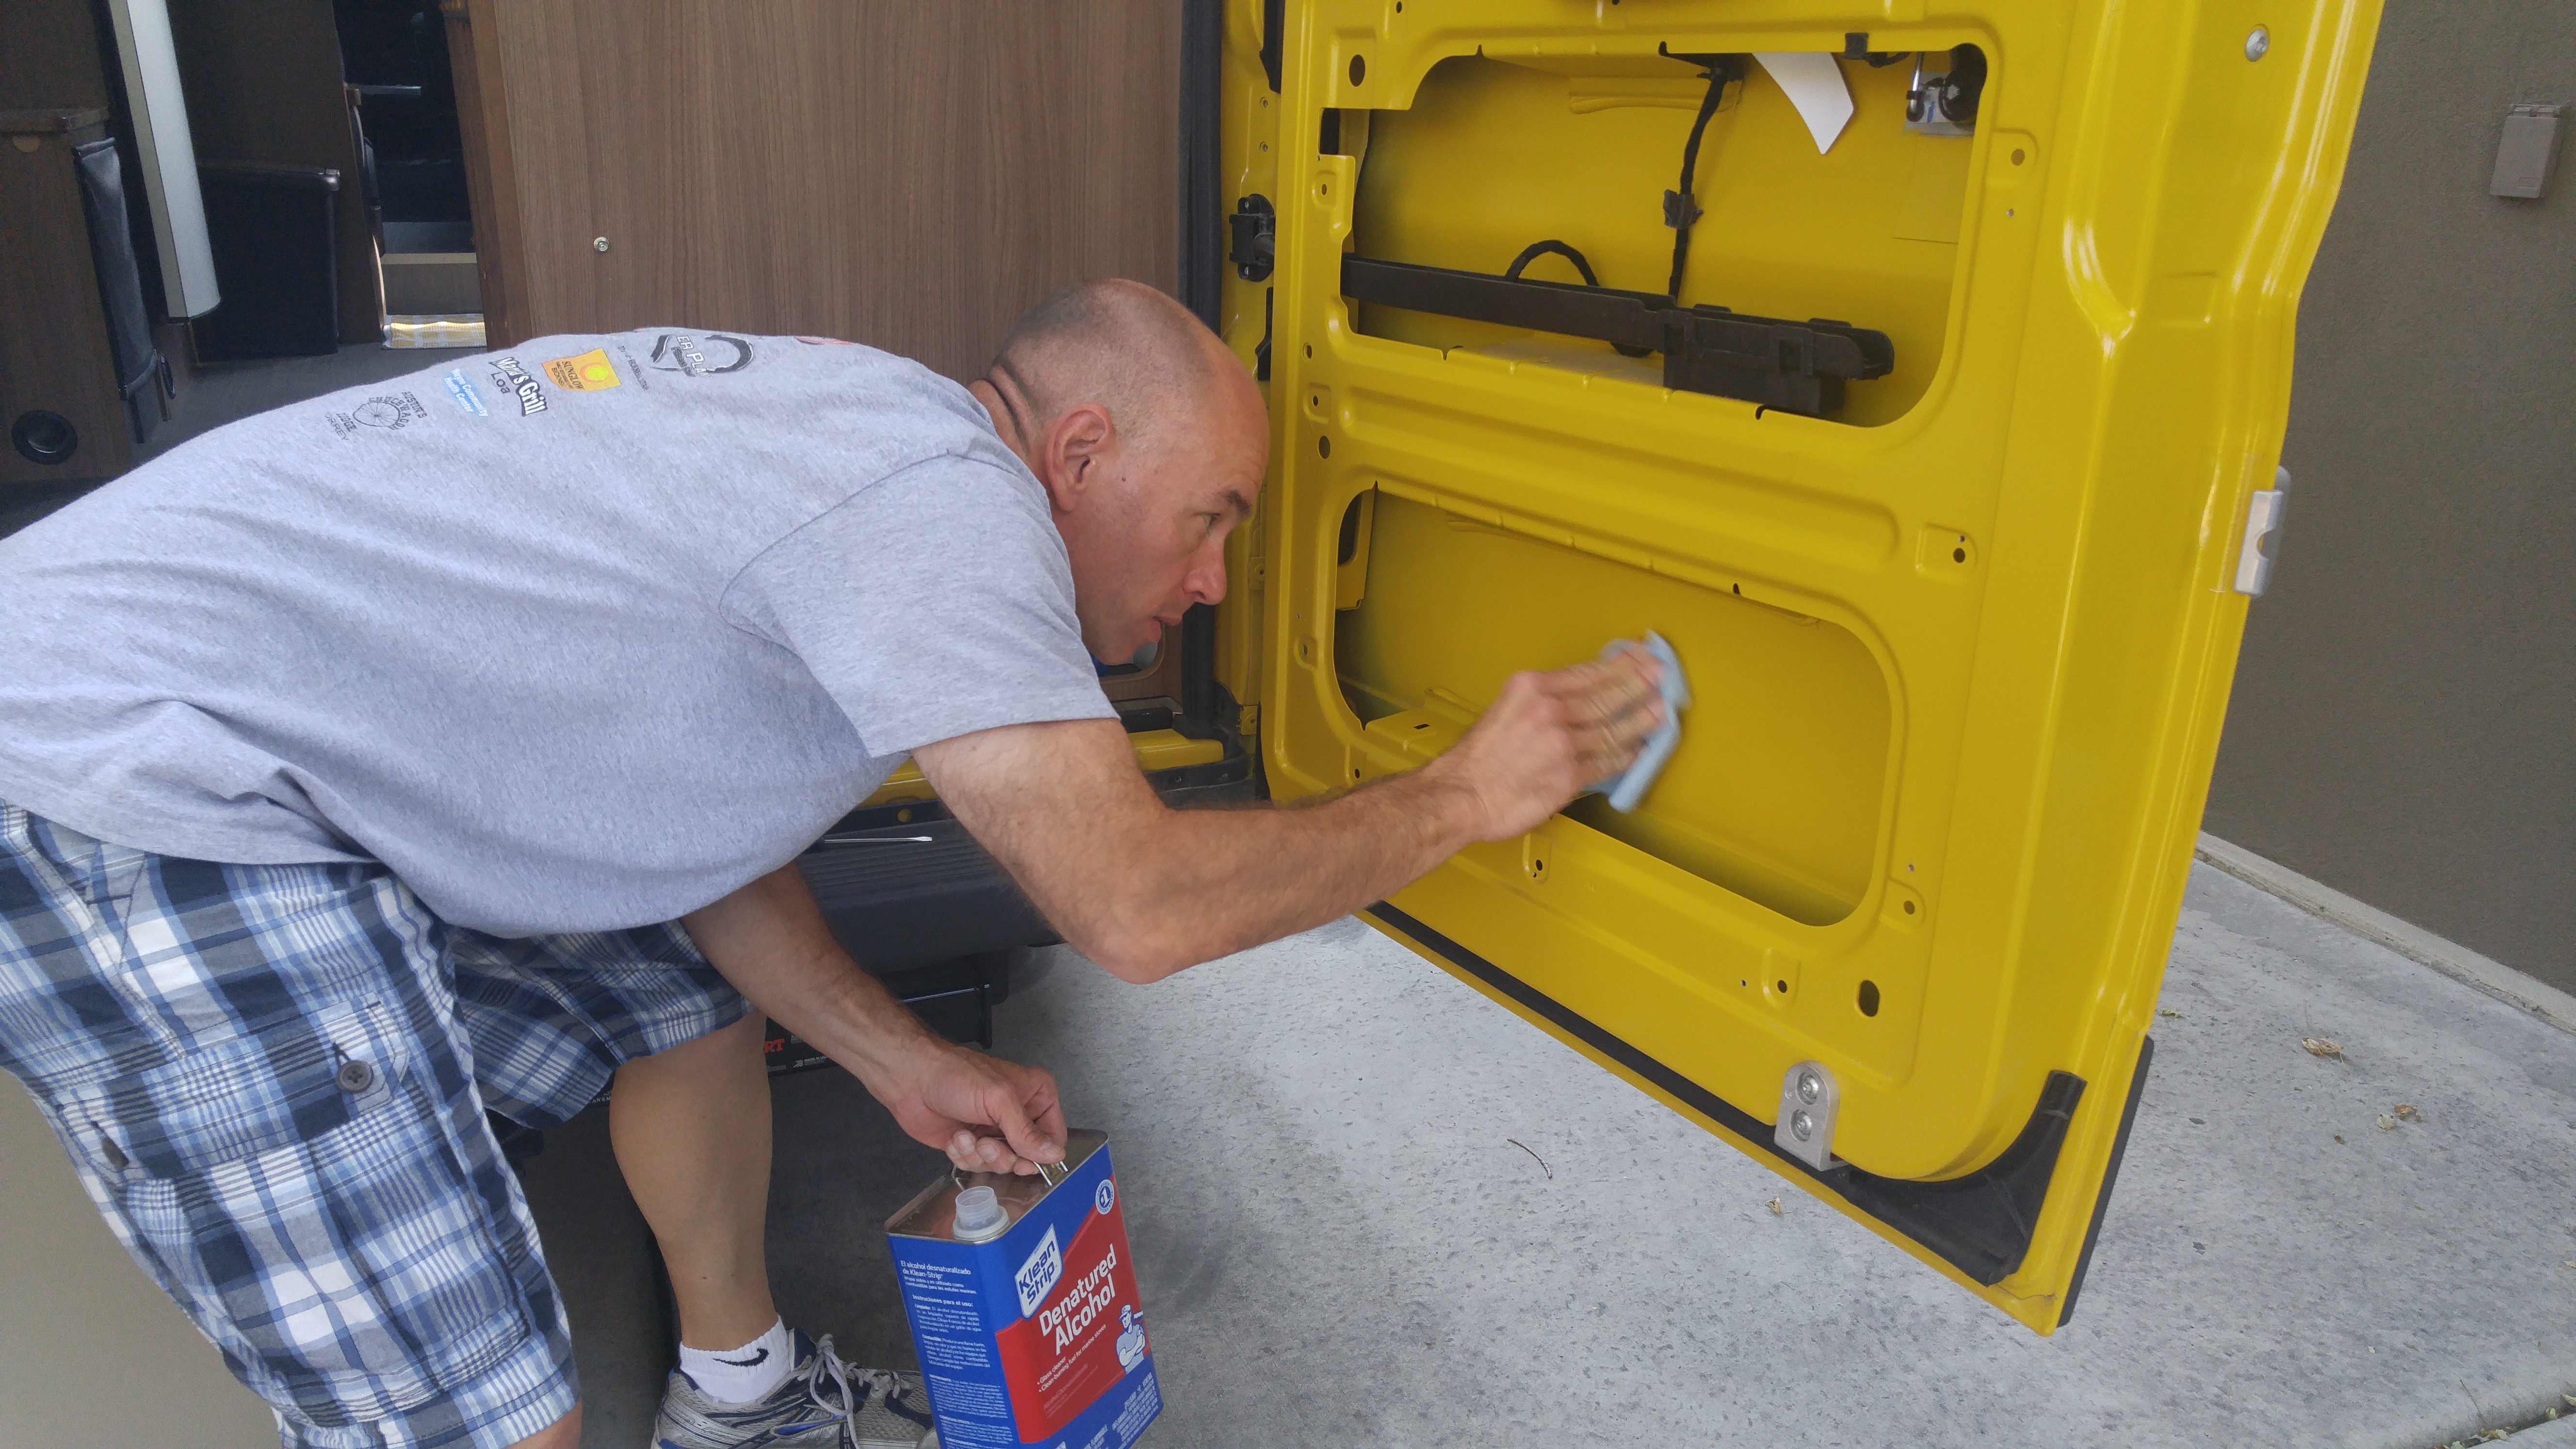
While you’re doing this, hopefully you’ll get a feel for which parts of the door you can actually reach your hand into. There are a number of meal ribs in the doors, and access to some of the parts of the panels can be challenging.
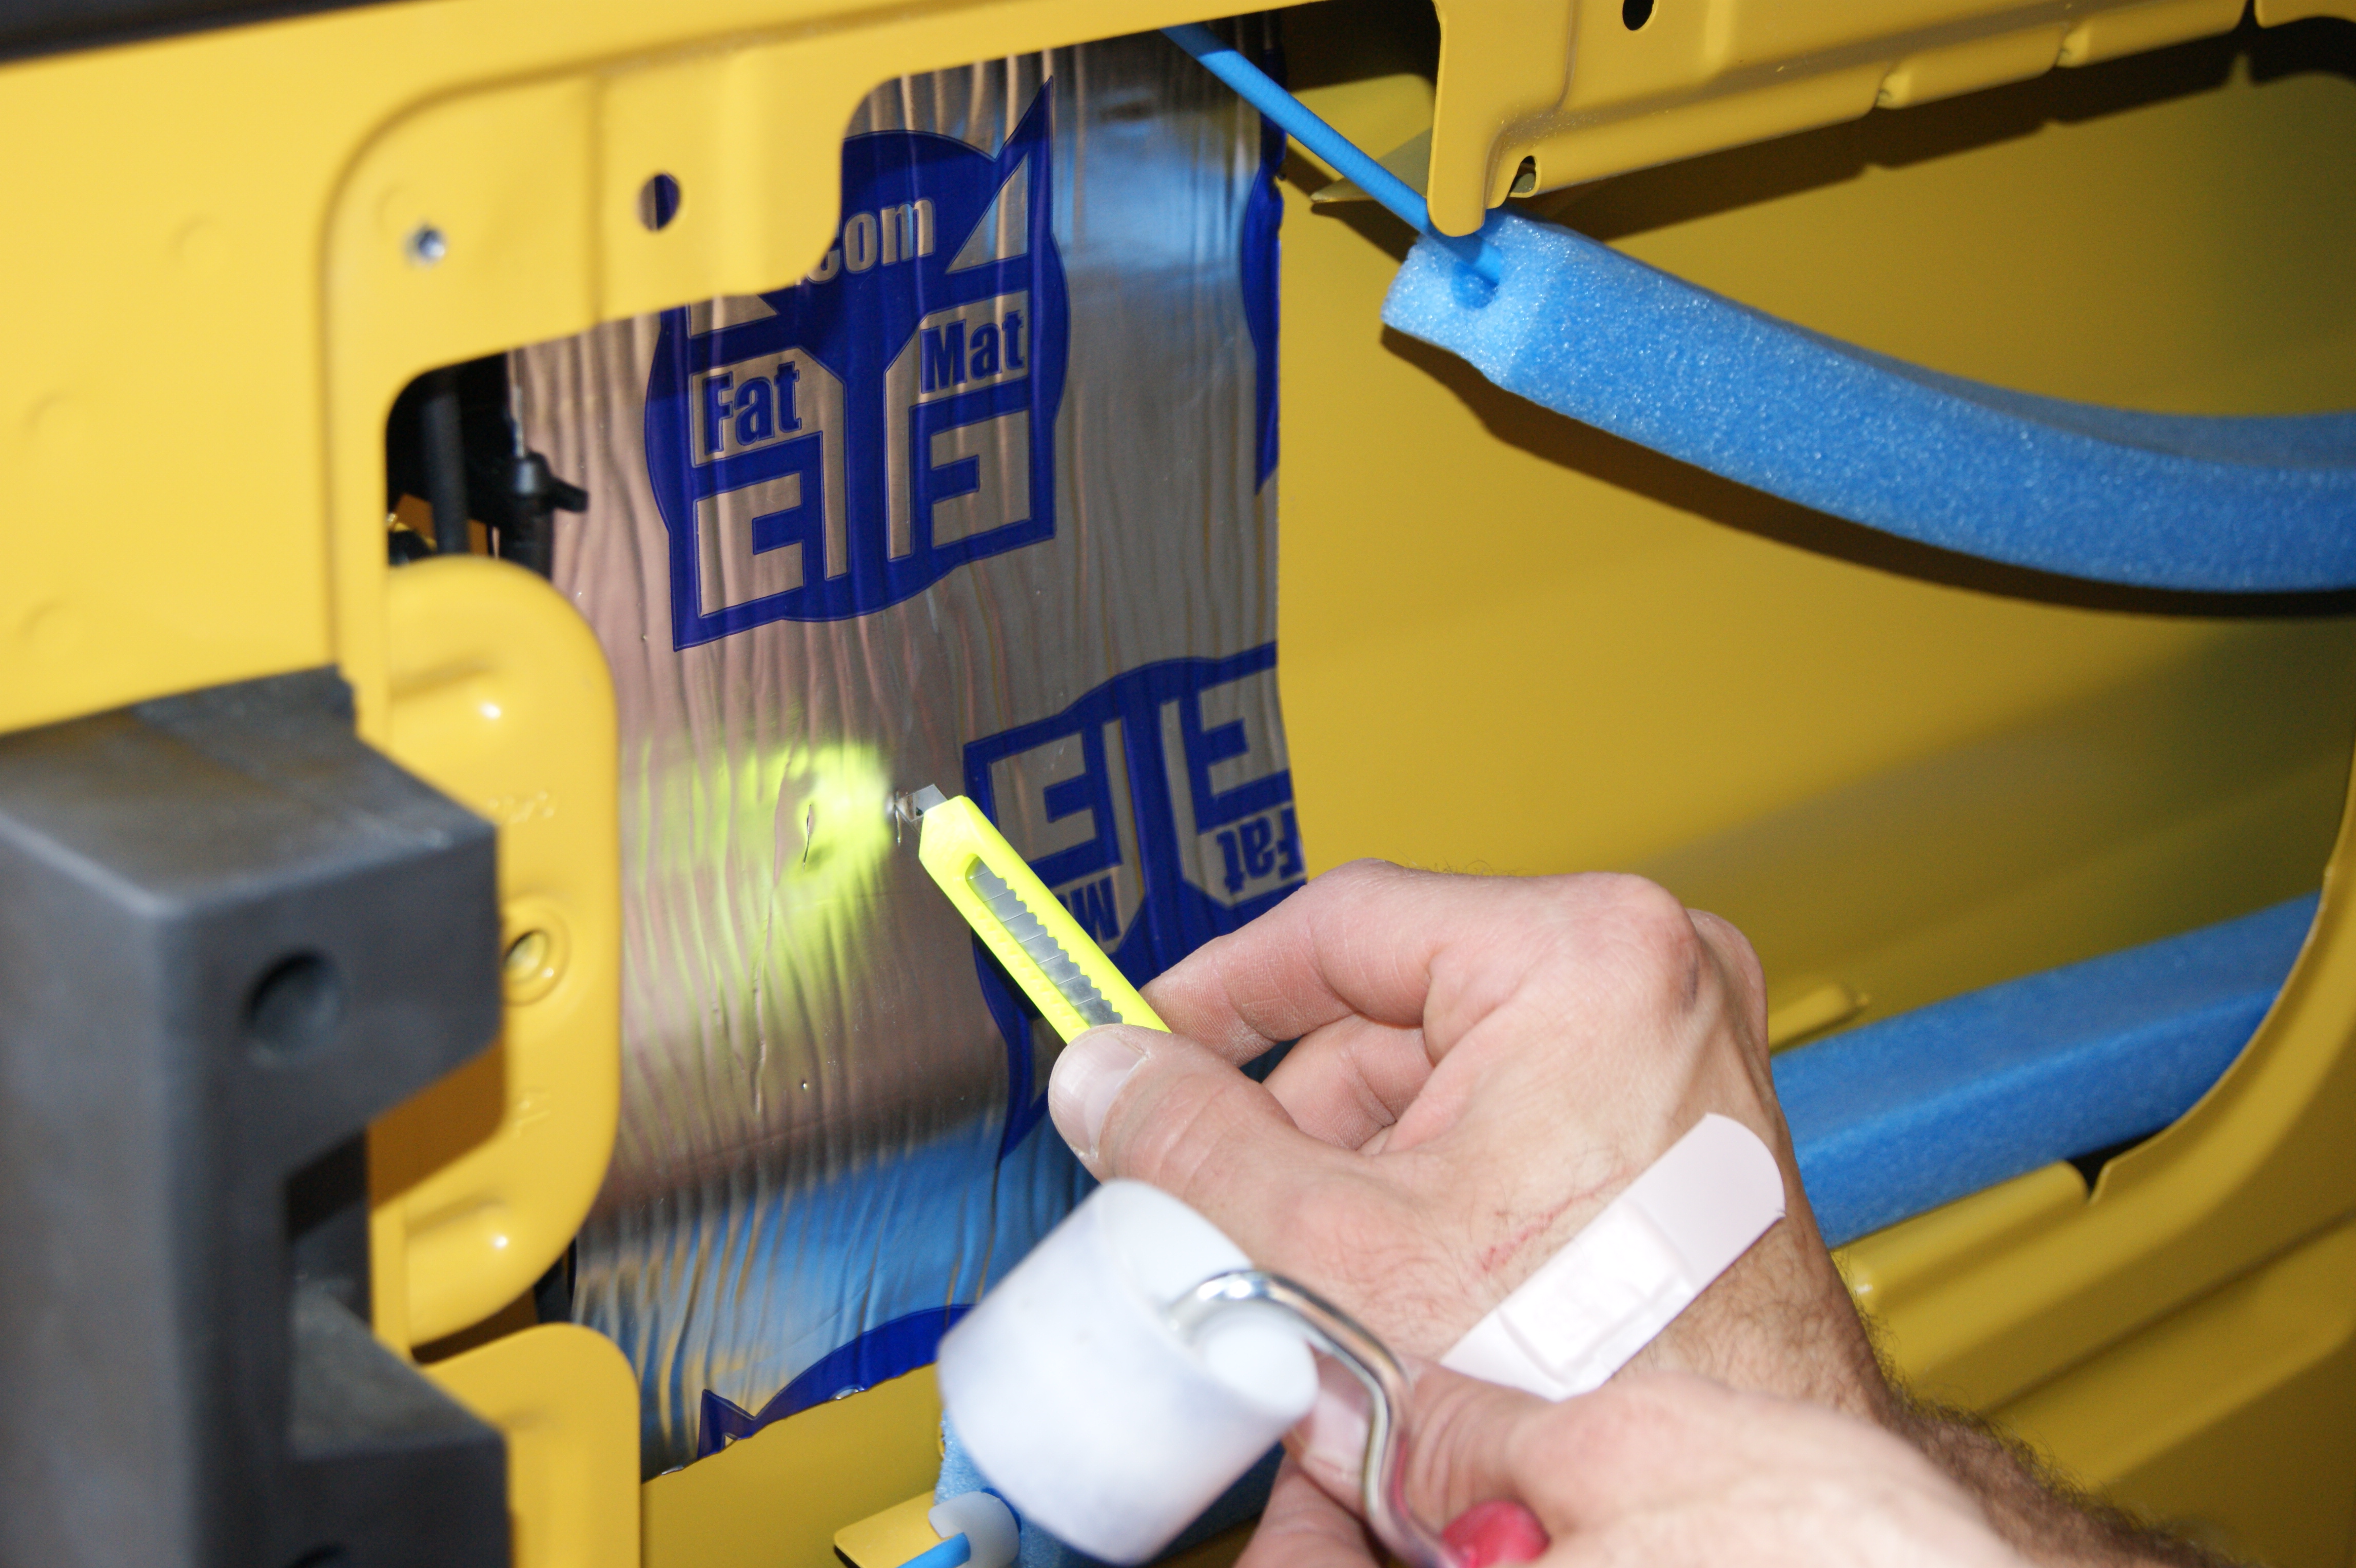
Once the door is clean, it’s time to get to work. Measure out an area of door skin that you’d like to apply the FatMat to.
Take those measurements to your roll of FatMat and cut off a piece with a razor knife.
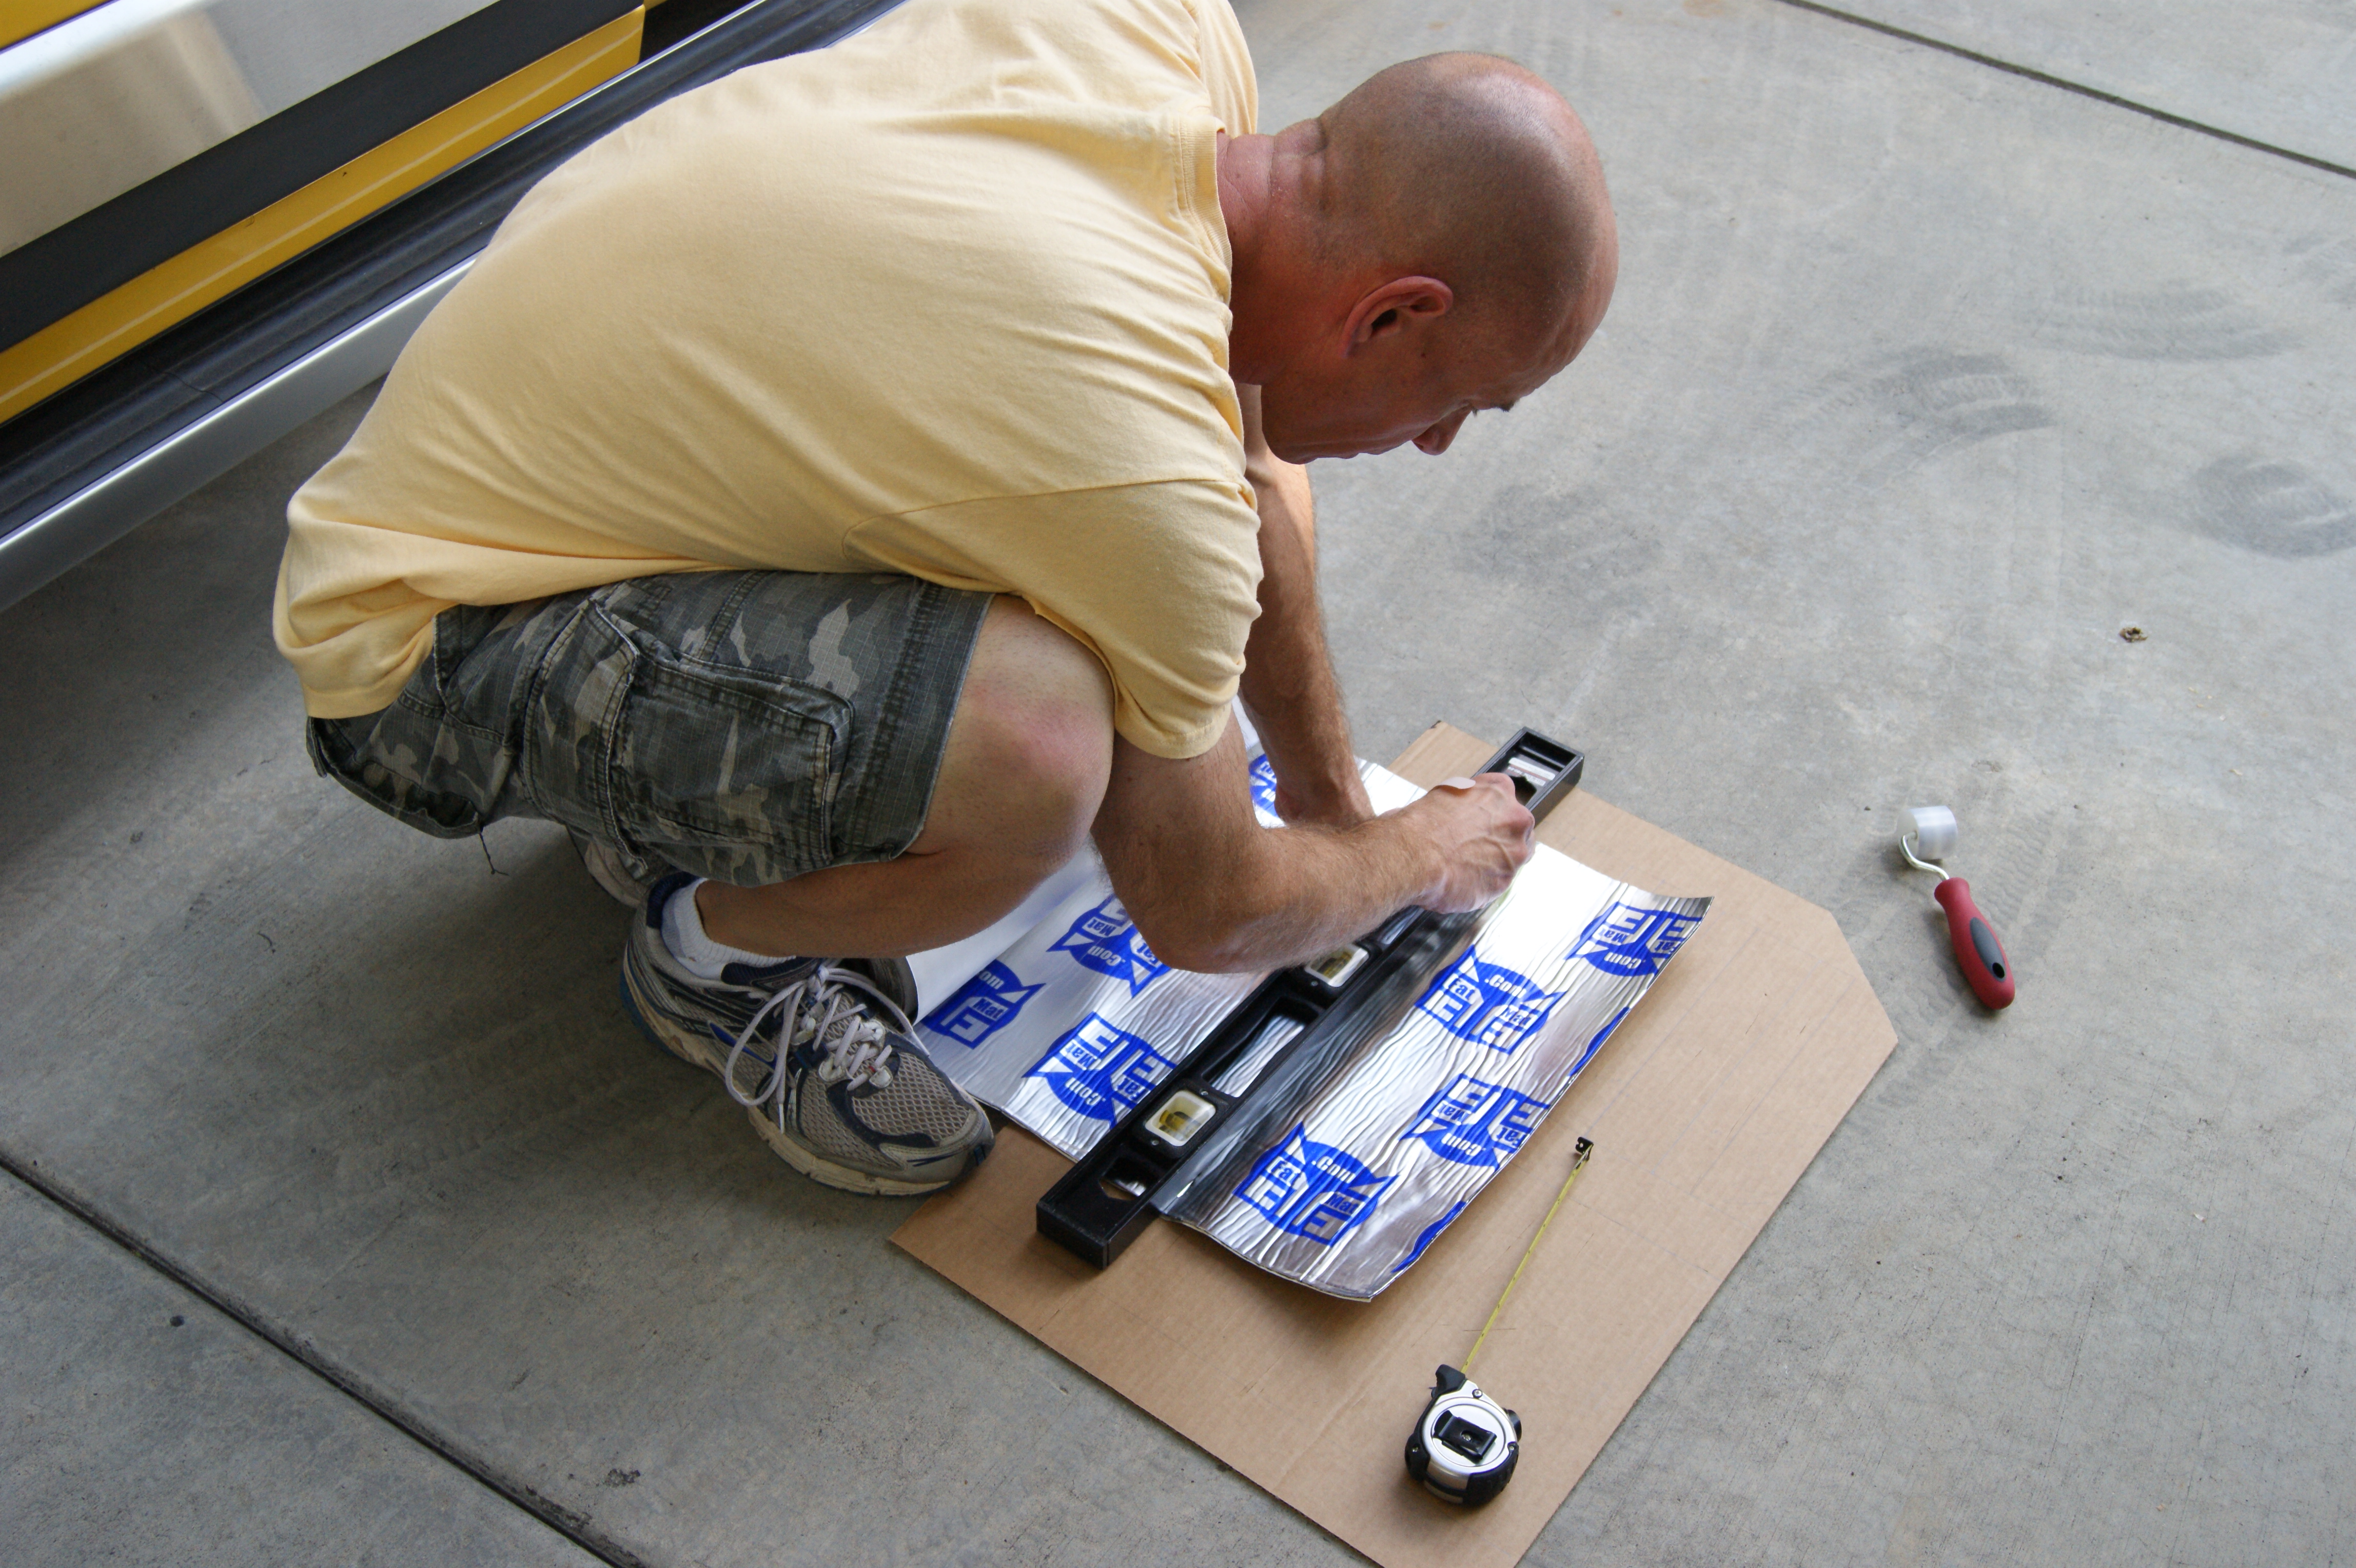
Then remove the paper backing, and adhere the FatMat to the skin of the door.
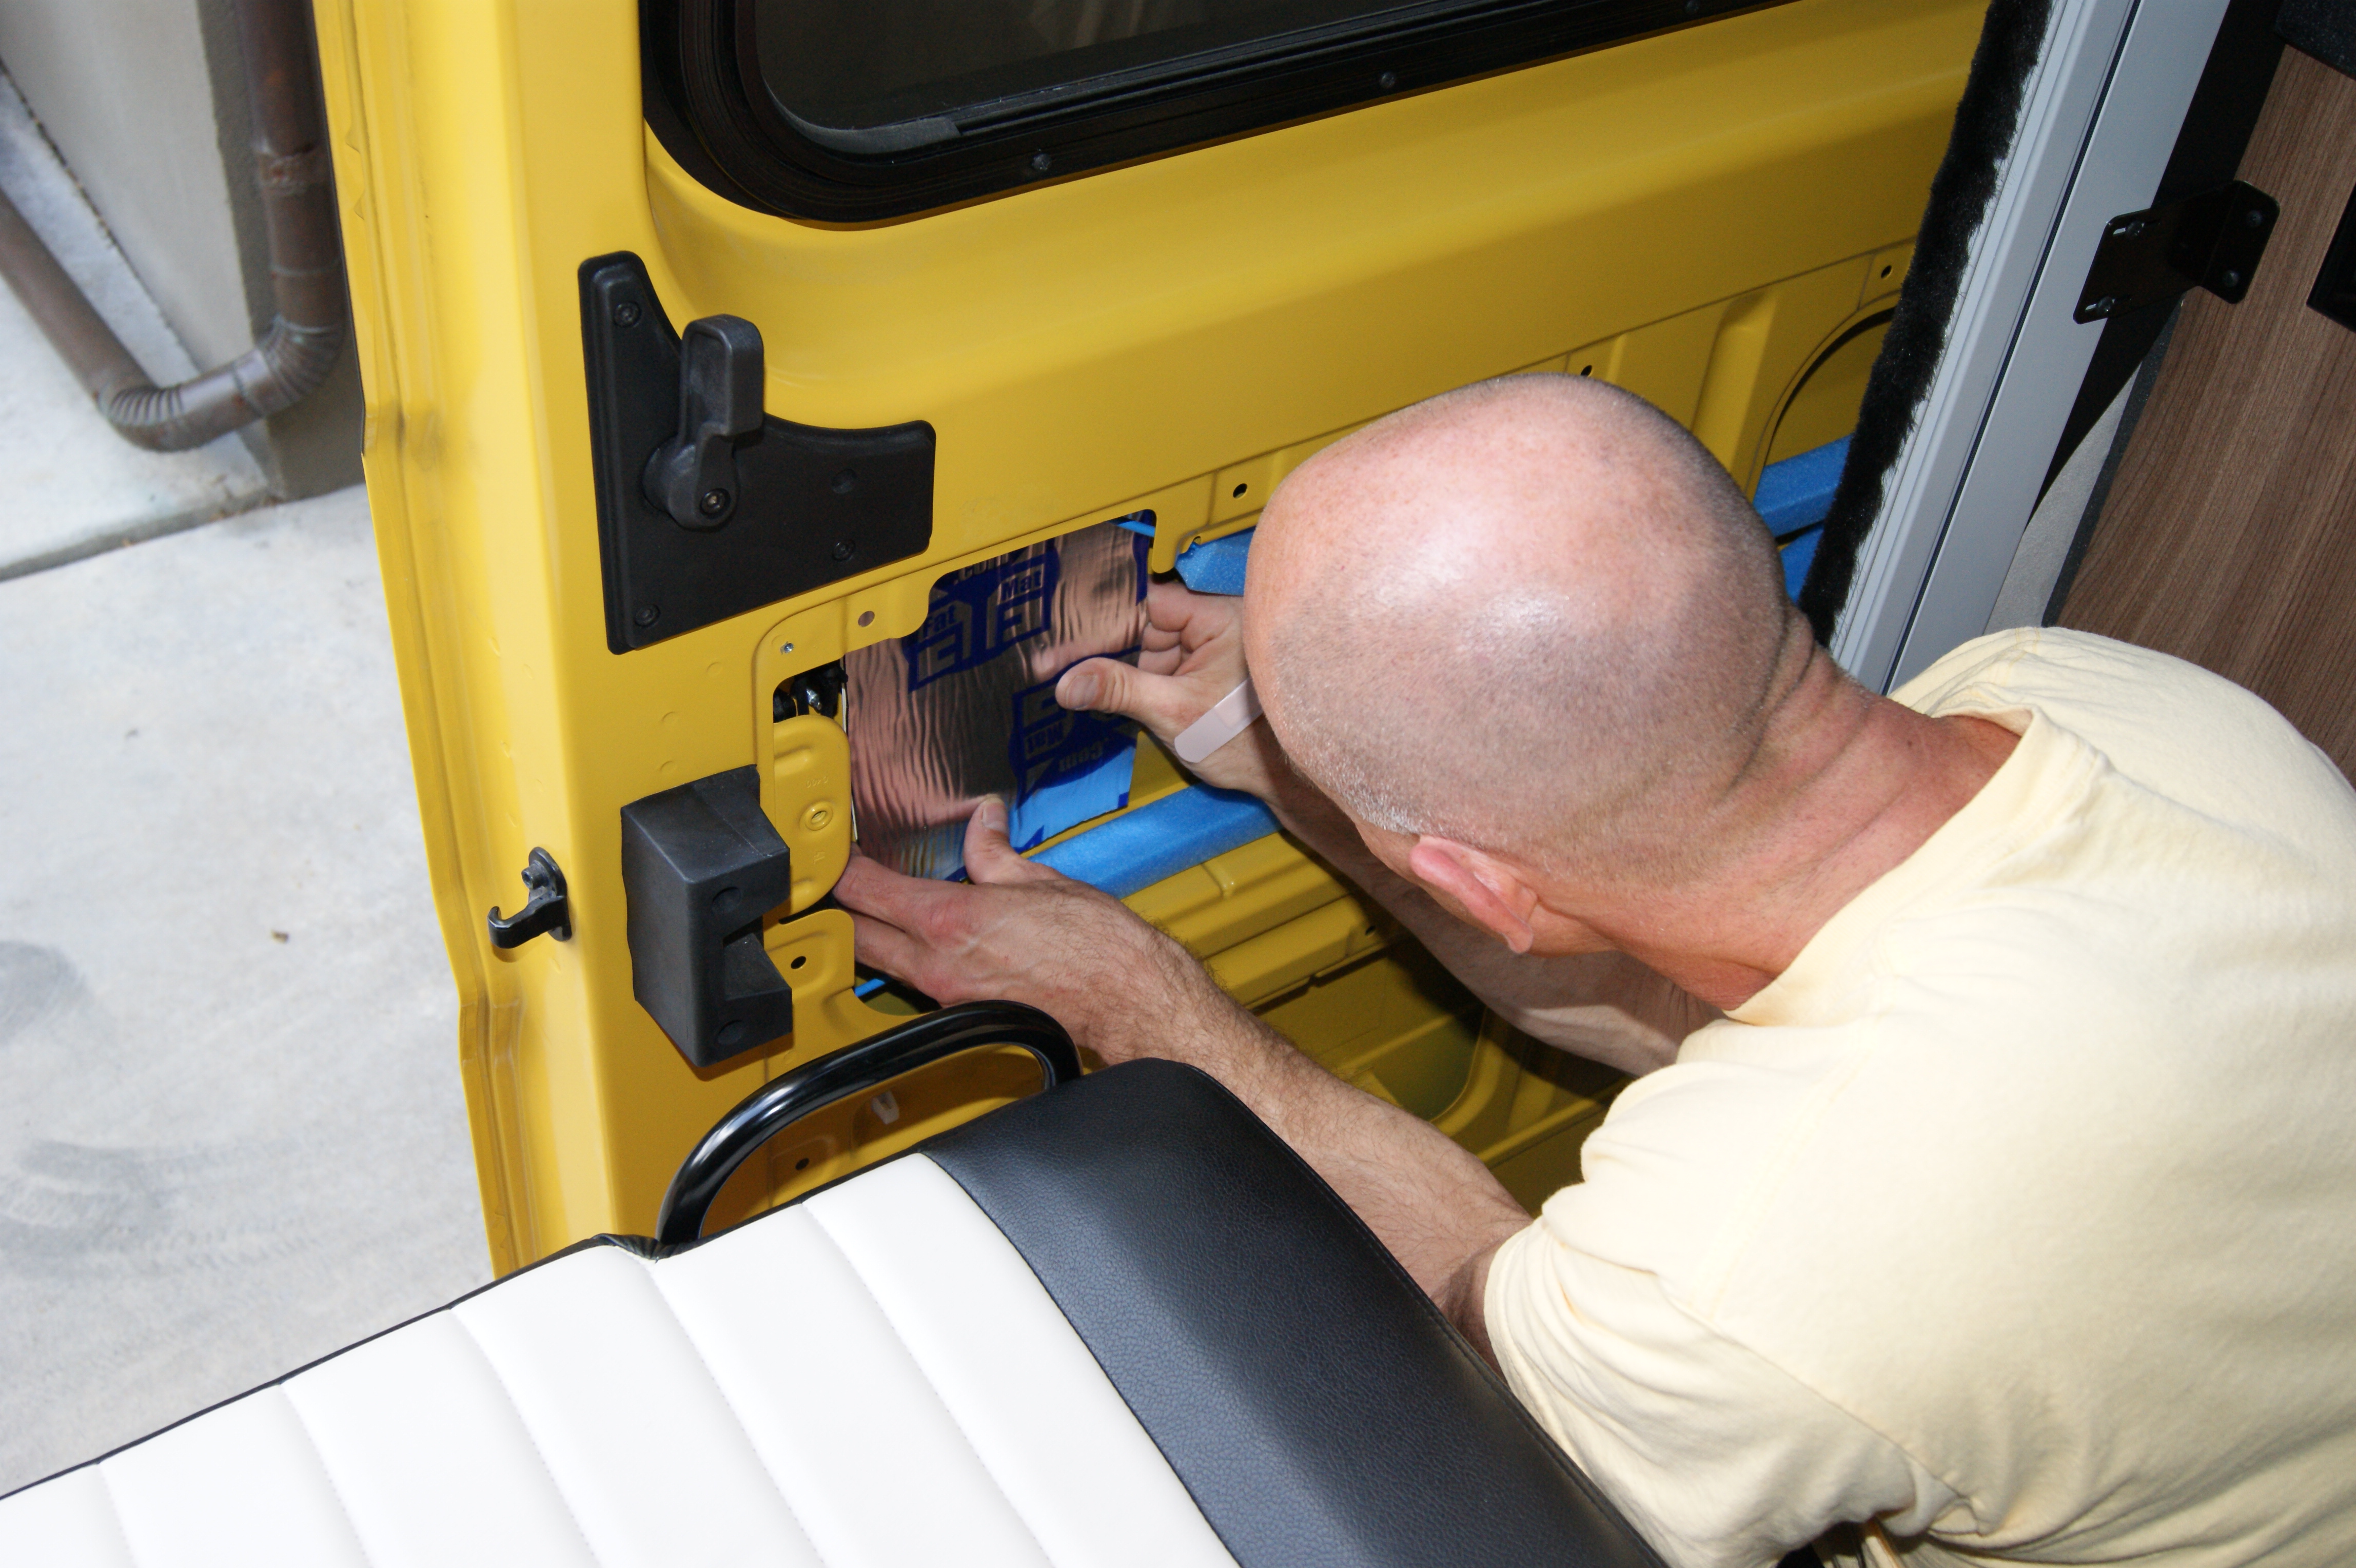
Use a roller or block of wood to press the mat down, to make sure it’s solidly adhered to the door. But don’t press so vigorously that you dent the door…
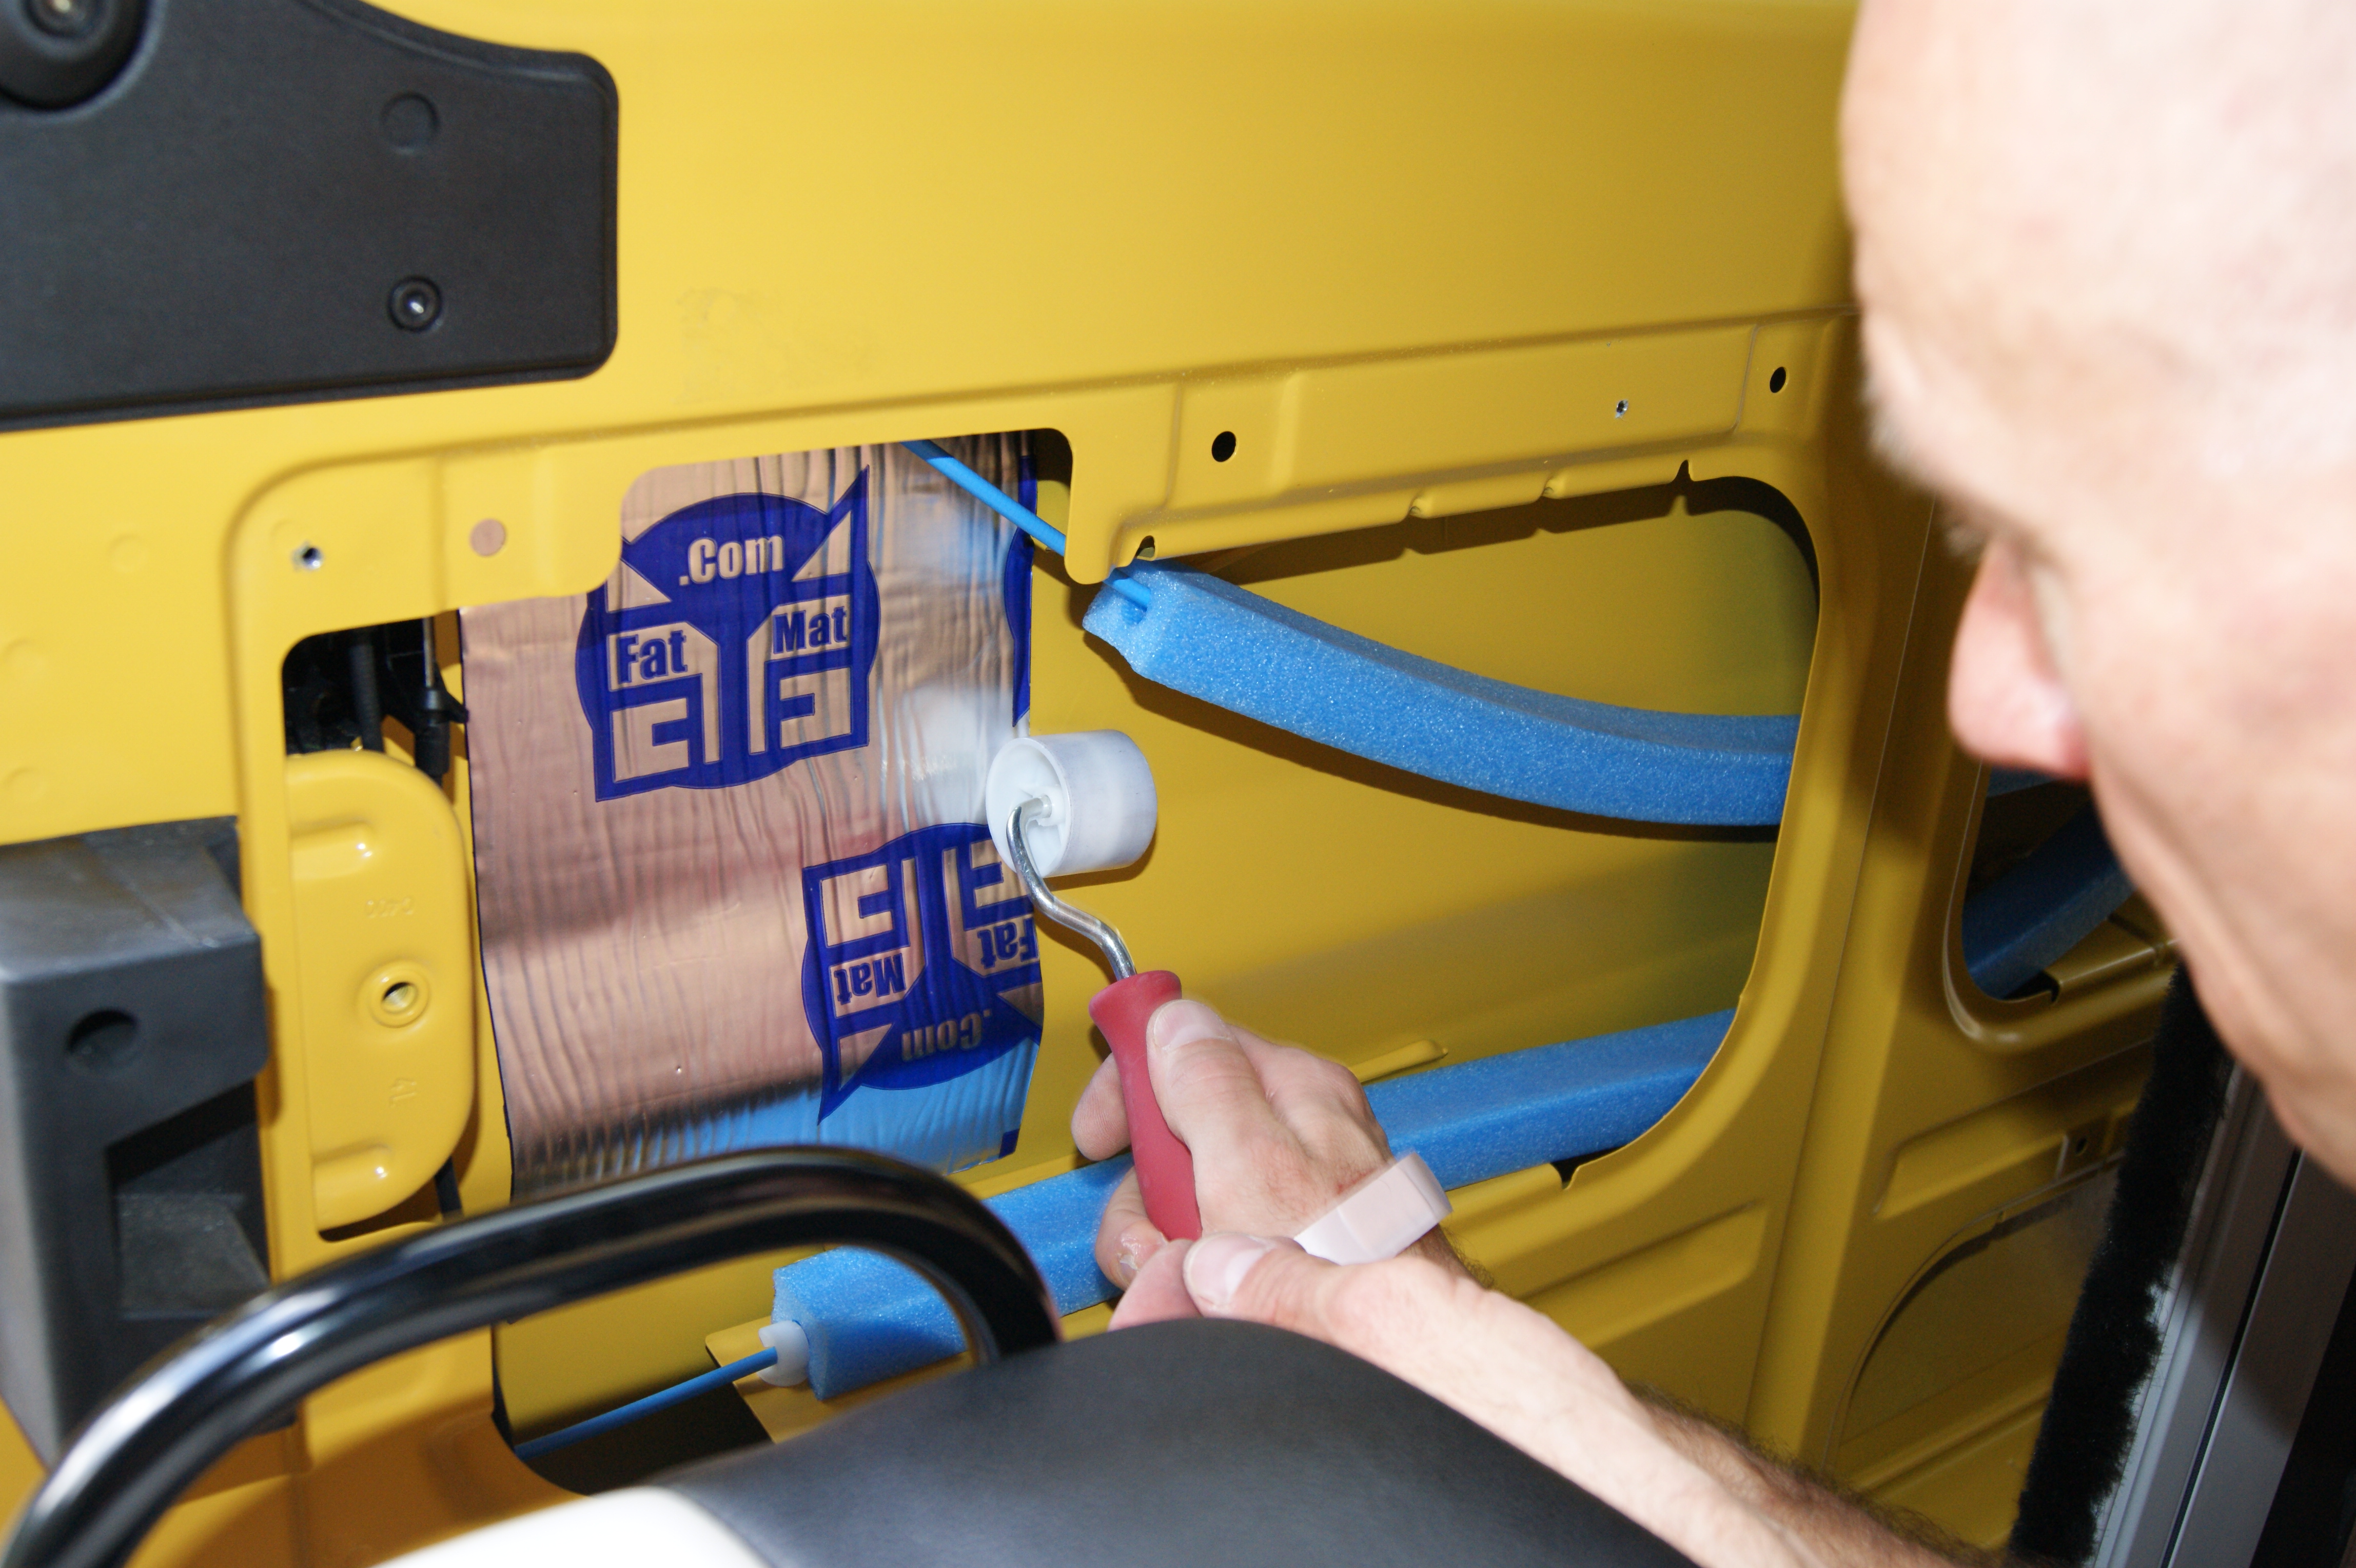
And if you have any air bubbles, slit them with the razor knife and then roll them flat.
Well gee, James. That sounds easy.
But just wait until you try it! You’ll be miserable! It takes a lot longer than you think it does. I’ll share some things I’ve learned along the way that will hopefully make it easier for you:
- You’re going to bleed. Have some bandages ready.
There are several things working against you here.
The first thing is that all the metal edges inside the door aren’t really meant to be show surfaces. So they’re not filed, de-burred, or sanded. They’re just kind of sharp and scratchy, and you have to contort and force your hands against and around them to get to some parts of the door.
The second thing is, in some of the doors, there are screws poking through from the outside. You can’t see all of them, and will inevitably wind up dragging the back of your hand across the tip of a screw.
And finally, there’s the FatMat itself. The foil backing on it is pretty thick. Even though I’m warning you now, you’re going to forget this, and at some point you’ll slide your fingers down the edge of the FatMat to press it down. The thick metal backing will act like a razor, and slice your fingertip open. Just accept it, it’s going to happen. The good news, I guess, is it leaves pretty clean cut.
- Keep the FatMat away from the parts that make the doors work. This stuff is no fun to have to remove, so just plan your pieces so that you can stay clear of strikes, latches, cables, springs, wires, etc. It’s just not worth it to try to get past those things.
- Generally speaking, smaller pieces work better. It may seem like you could deploy a piece of FatMat 18 inches wide and 48 inches long, and that would save you lots of cuts. But in reality, those larger pieces have to be rolled or folded to get into position. Then you have to remove the backing somehow, and unroll or unfold the piece to get it into place. That seldom works well. It’s easier in the long run to just resign yourself to pieces of no bigger than 6” x 8” and just go with that.
- When you get it stuck somewhere you don’t want it – and you will – the residue comes off pretty easily with lacquer thinner. This does not seem to harm the cured paint on the ProMaster.
- You don’t have to be perfect, or have complete coverage. Unless you’re one of those people who writes for audiophile magazines, and pretends that digital data sounds better coming through a $100 HDMI cable (btw – it doesn’t), you’re not going to hear a difference from a few square inches you missed. The really important thing in the install of this stuff is to make sure that you get it solidly adhered to the door.
Well once you’ve got that process down, you just keep doing it until you’ve got as much of the door surface covered as you have the patience for. This can take anywhere from half an hour to six days, depending on your personality.

Once you’ve got that part done, you should notice a big difference in how your doors sound when opening and closing them. This does translate to being quieter on the road. But we’re not done yet. It’s on to…
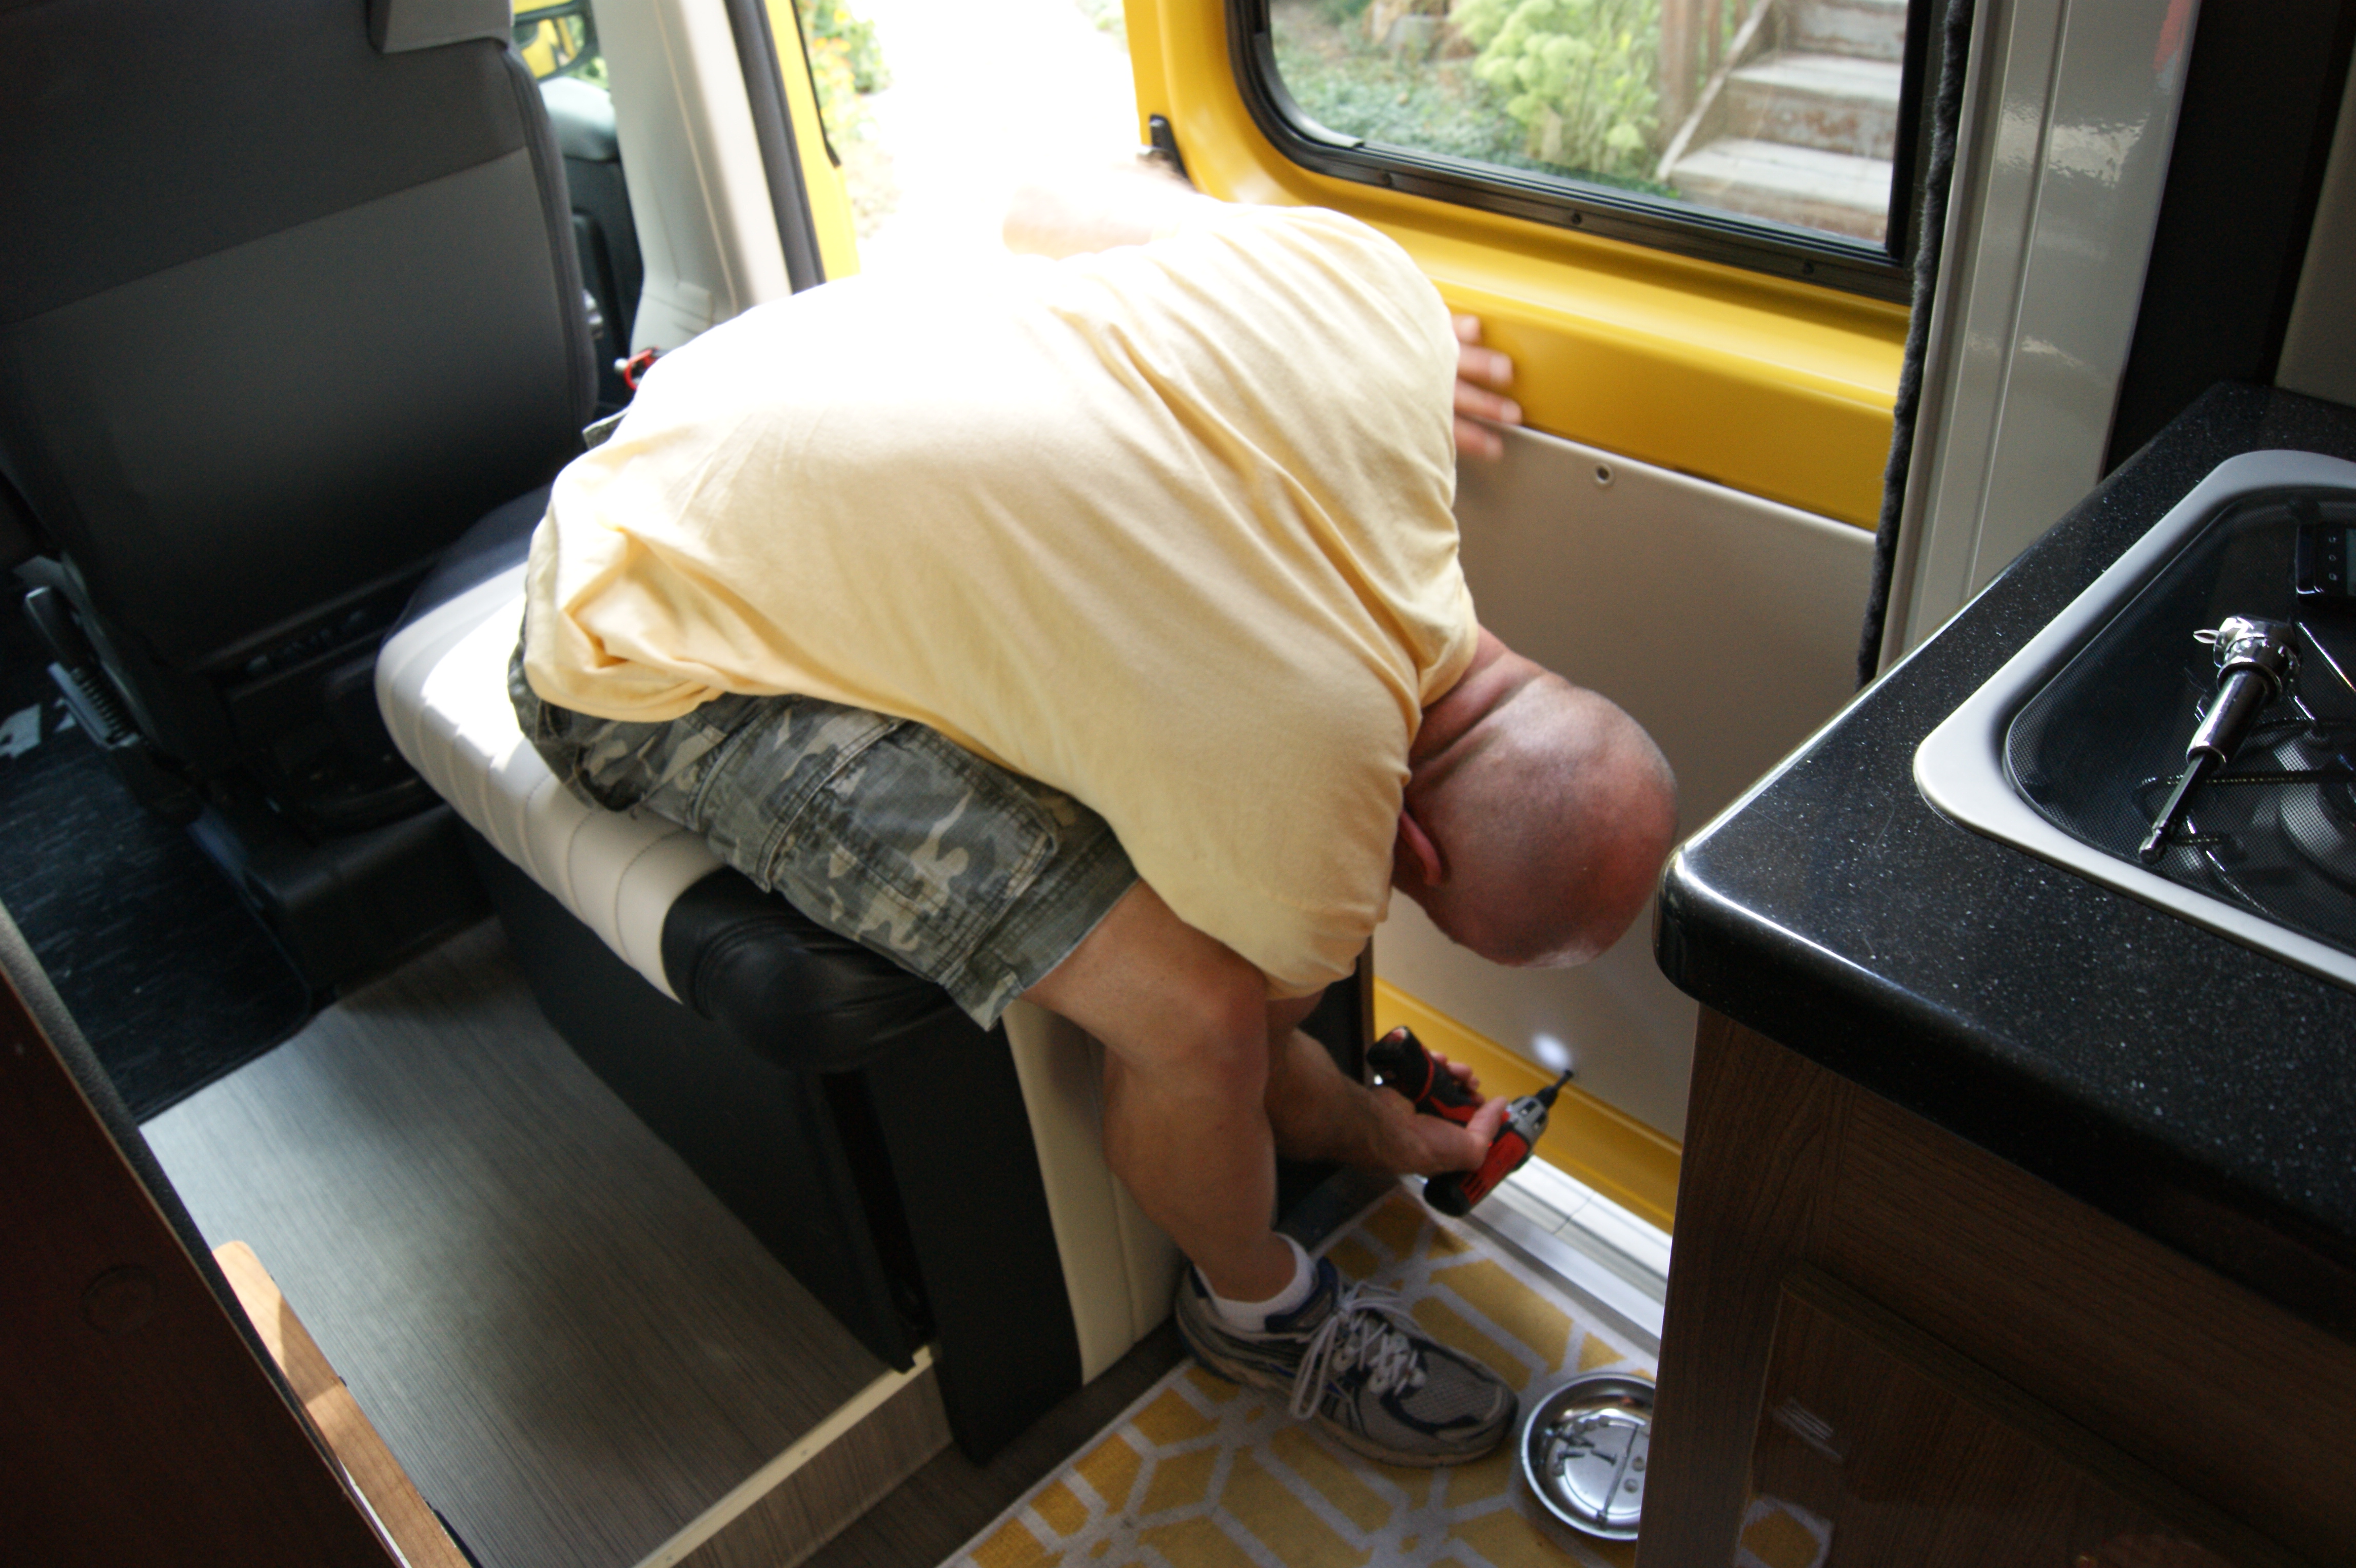
Phase 3: Insulating the interior of the door
With the FatMat on, there’s still quite a bit of space left between the inside and outside of the door panels, and I thought this could use some additional, more traditional insulation. But I didn’t really want to work with fiberglass, and I don’t like the idea of it breaking up and getting into the air in our smaller coach. So I looked for something else.
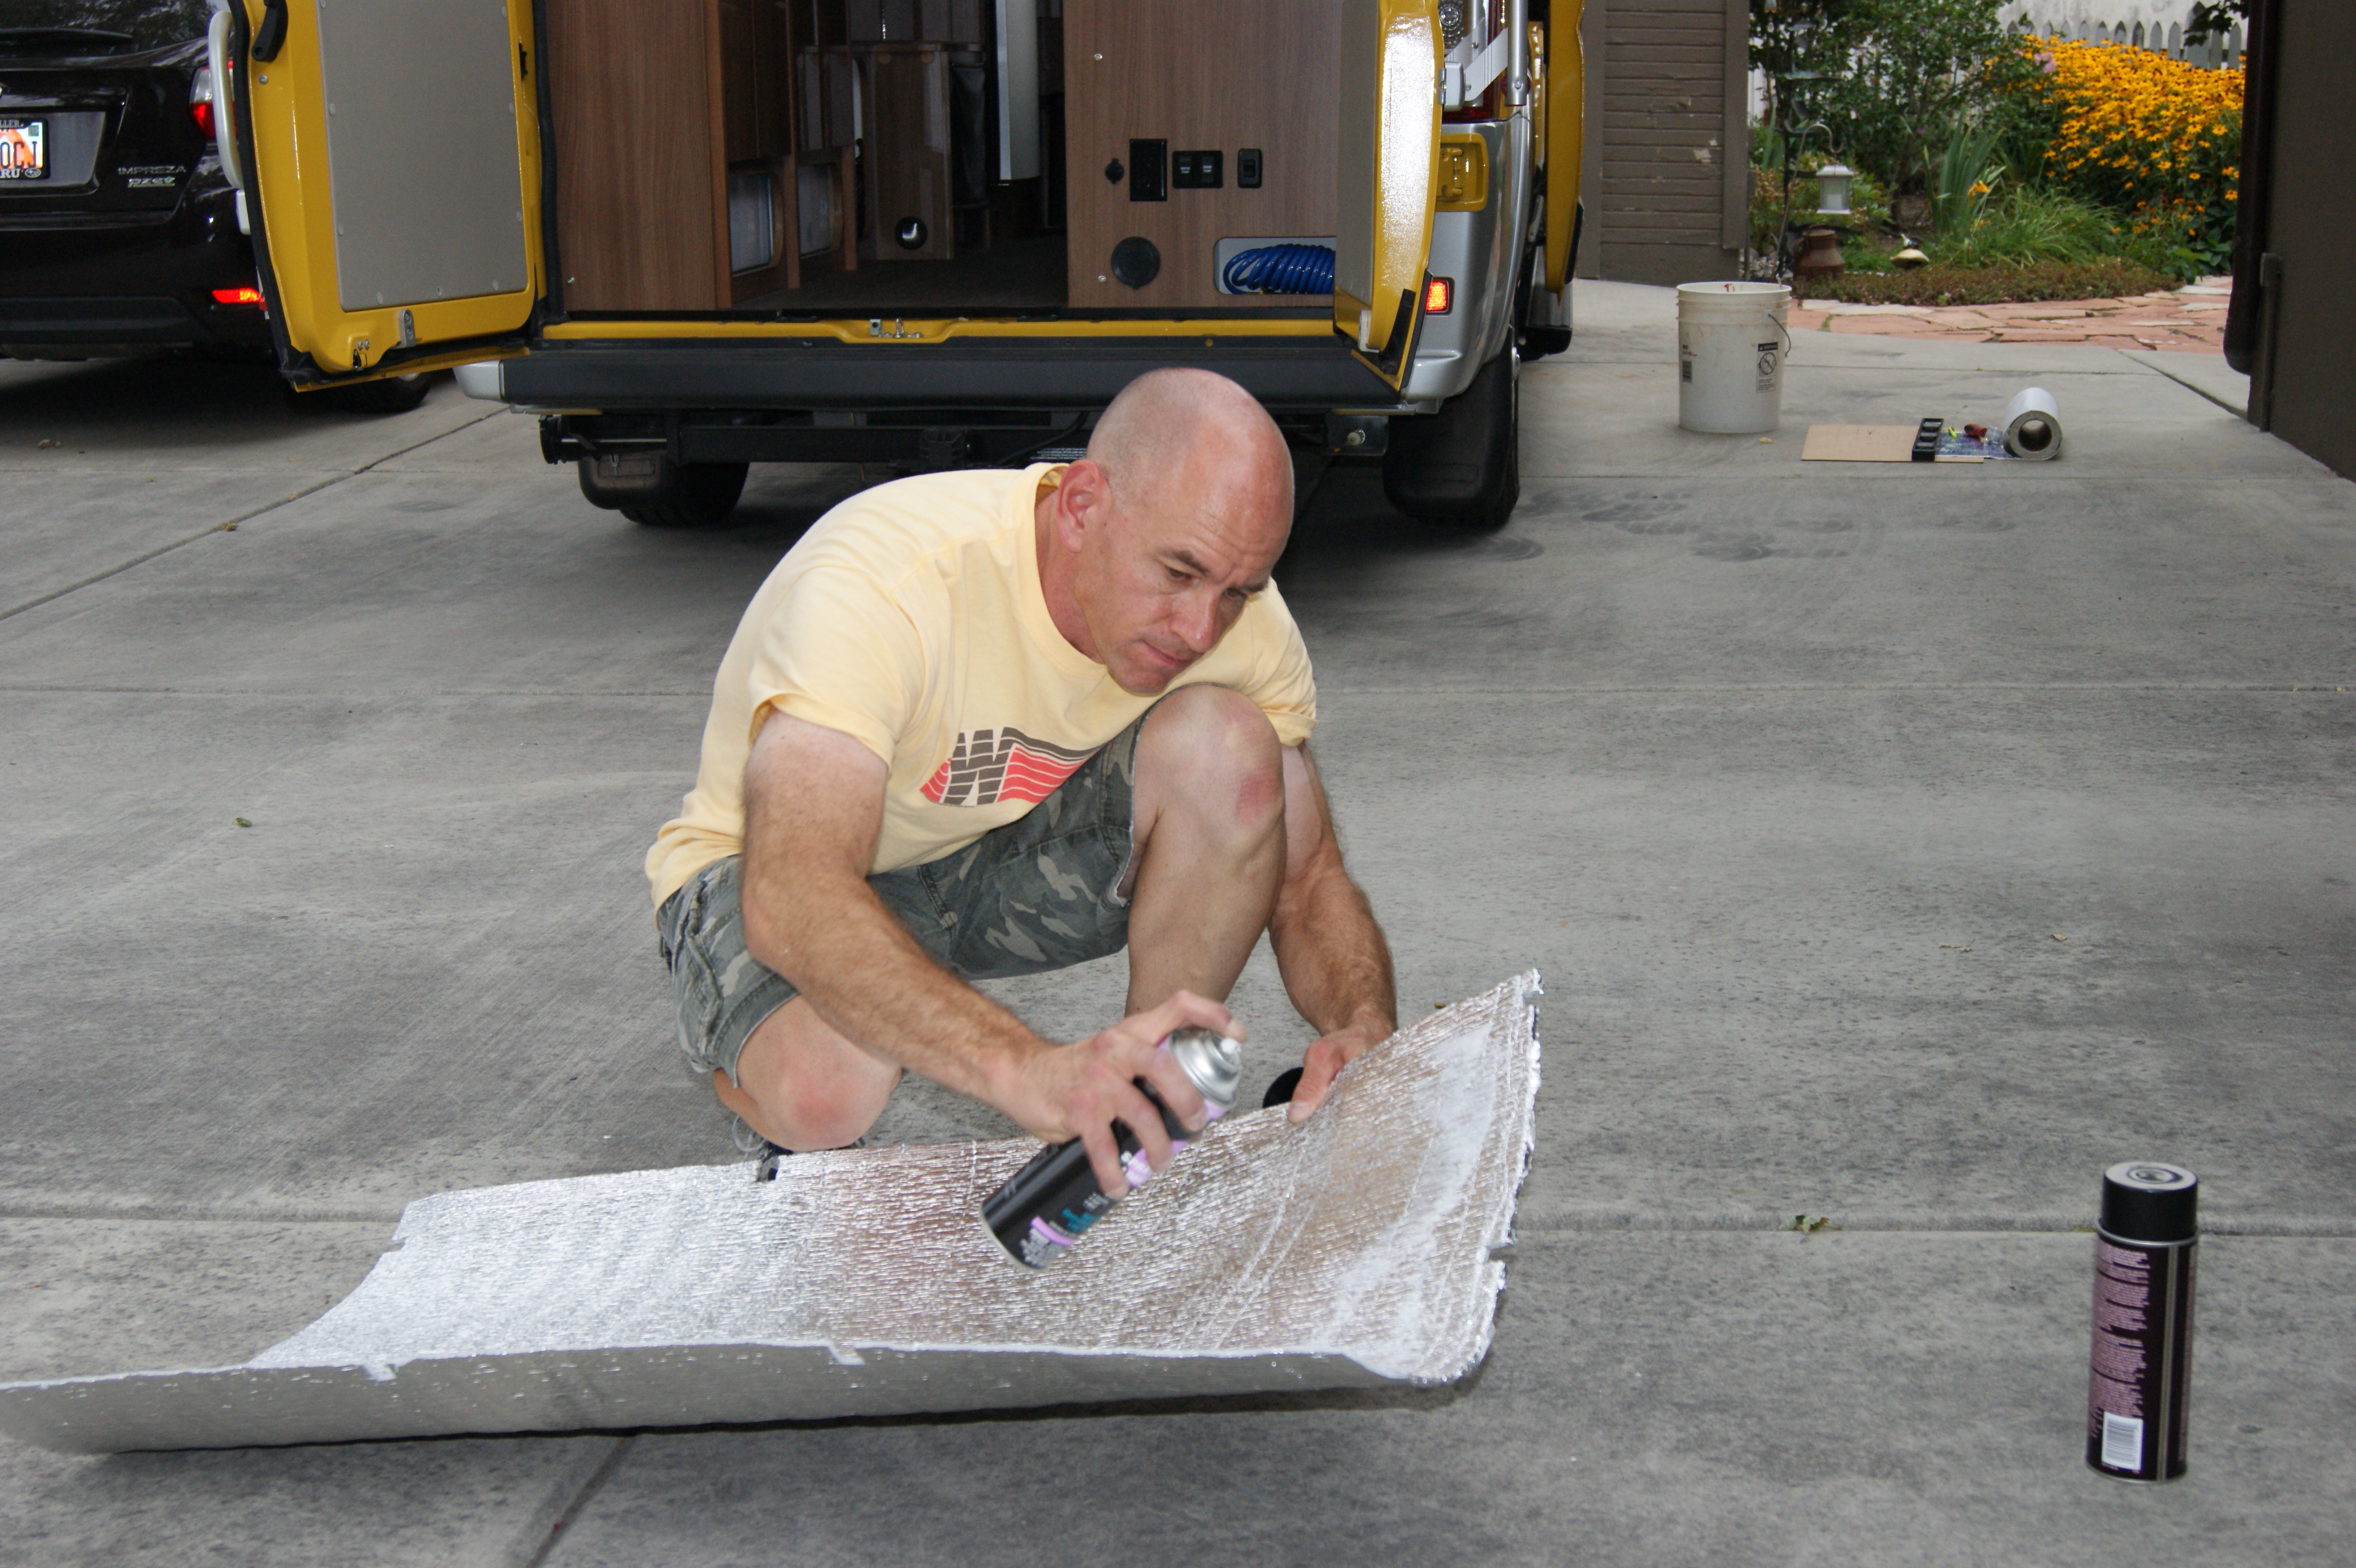
What I wound up with was a foil-backed recycled denim product that you can find at local home centers. This is the stuff I used (though I bought it locally). There are other, thicker denim products available, but none were available locally and immediately. Plus, I didn’t want to stuff so much insulation in the doors that I interfered with the opening and closing of them. This insulation was only about half an inch thick as I unrolled it (it expands to about an inch).

The down side of this product is that it doesn’t exactly “stand up” on its own like a thicker product would. So I used little bits of aluminum tape to hold it in place.

Again, be careful not to impede the mechanical parts inside the door, and keep in mind access for any future repair work. After working with the FatMat, this stuff is just a joy to use. It cuts easily with scissors, doesn’t stick to anything, and it soaks up blood like nobody’s business.
It’s only a foot wide though, so you’ll have to creatively put the pieces in there to get the coverage you want. When you’re all done, the door should look something like this.
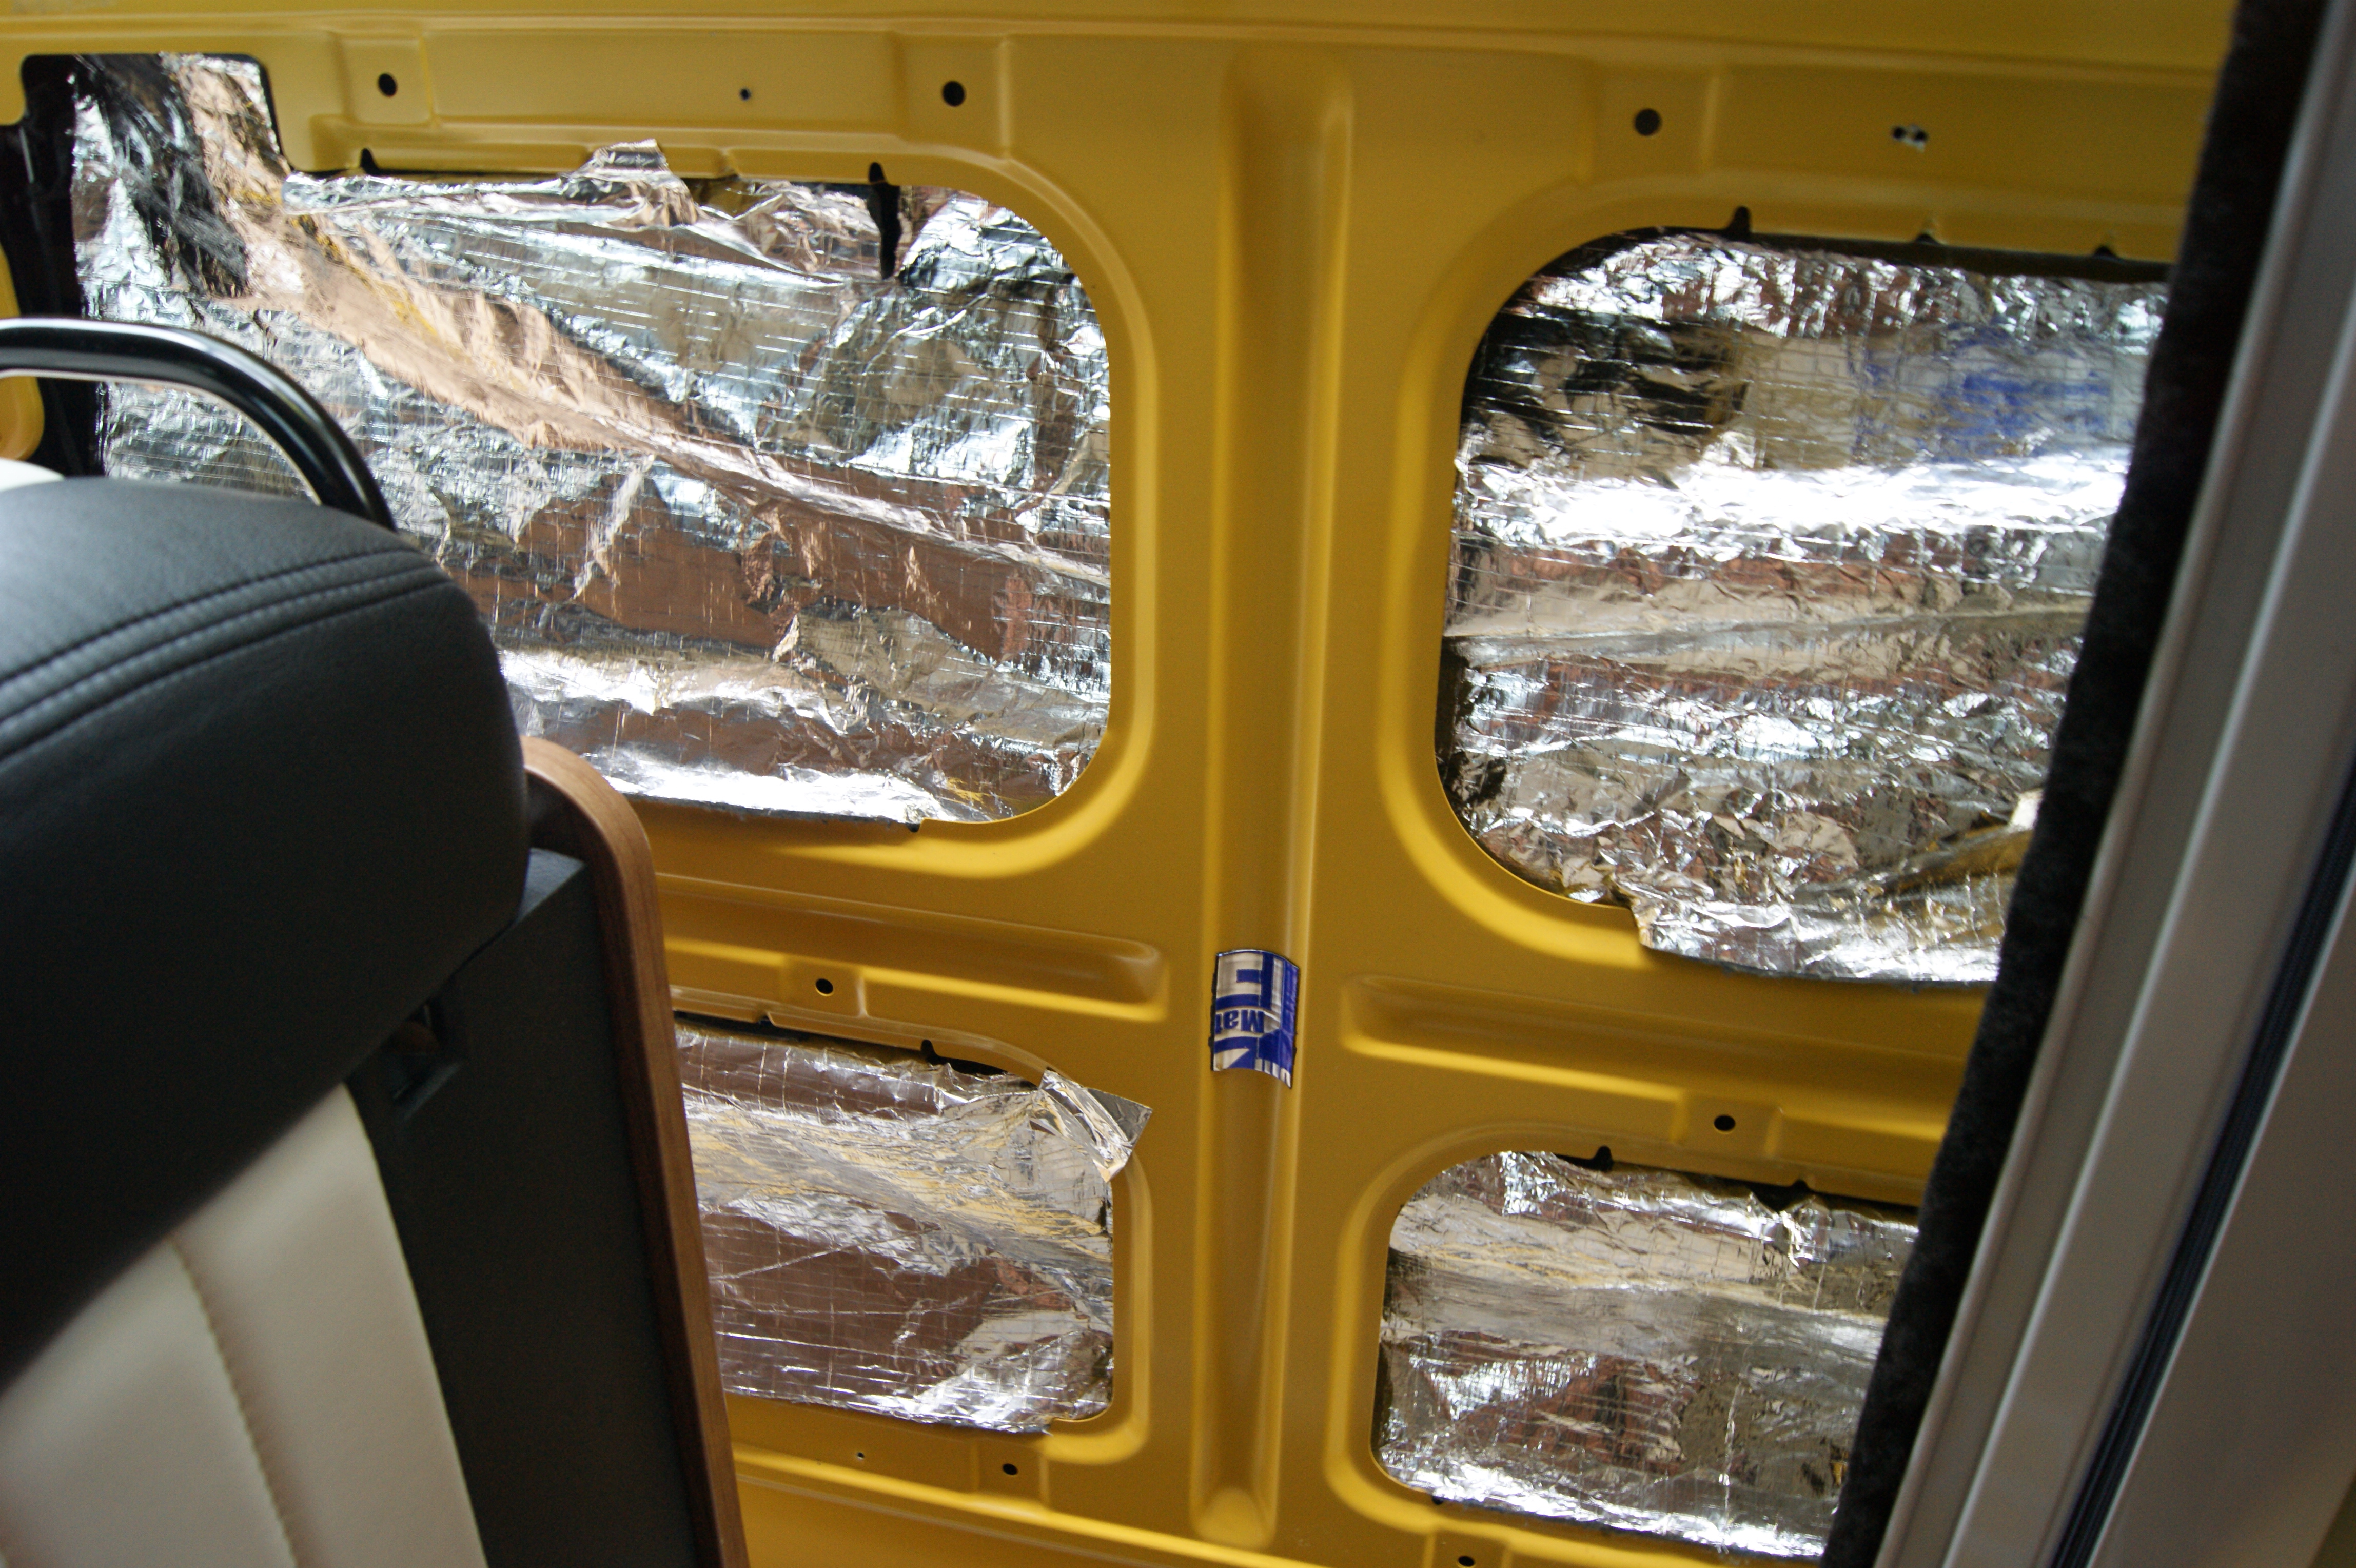
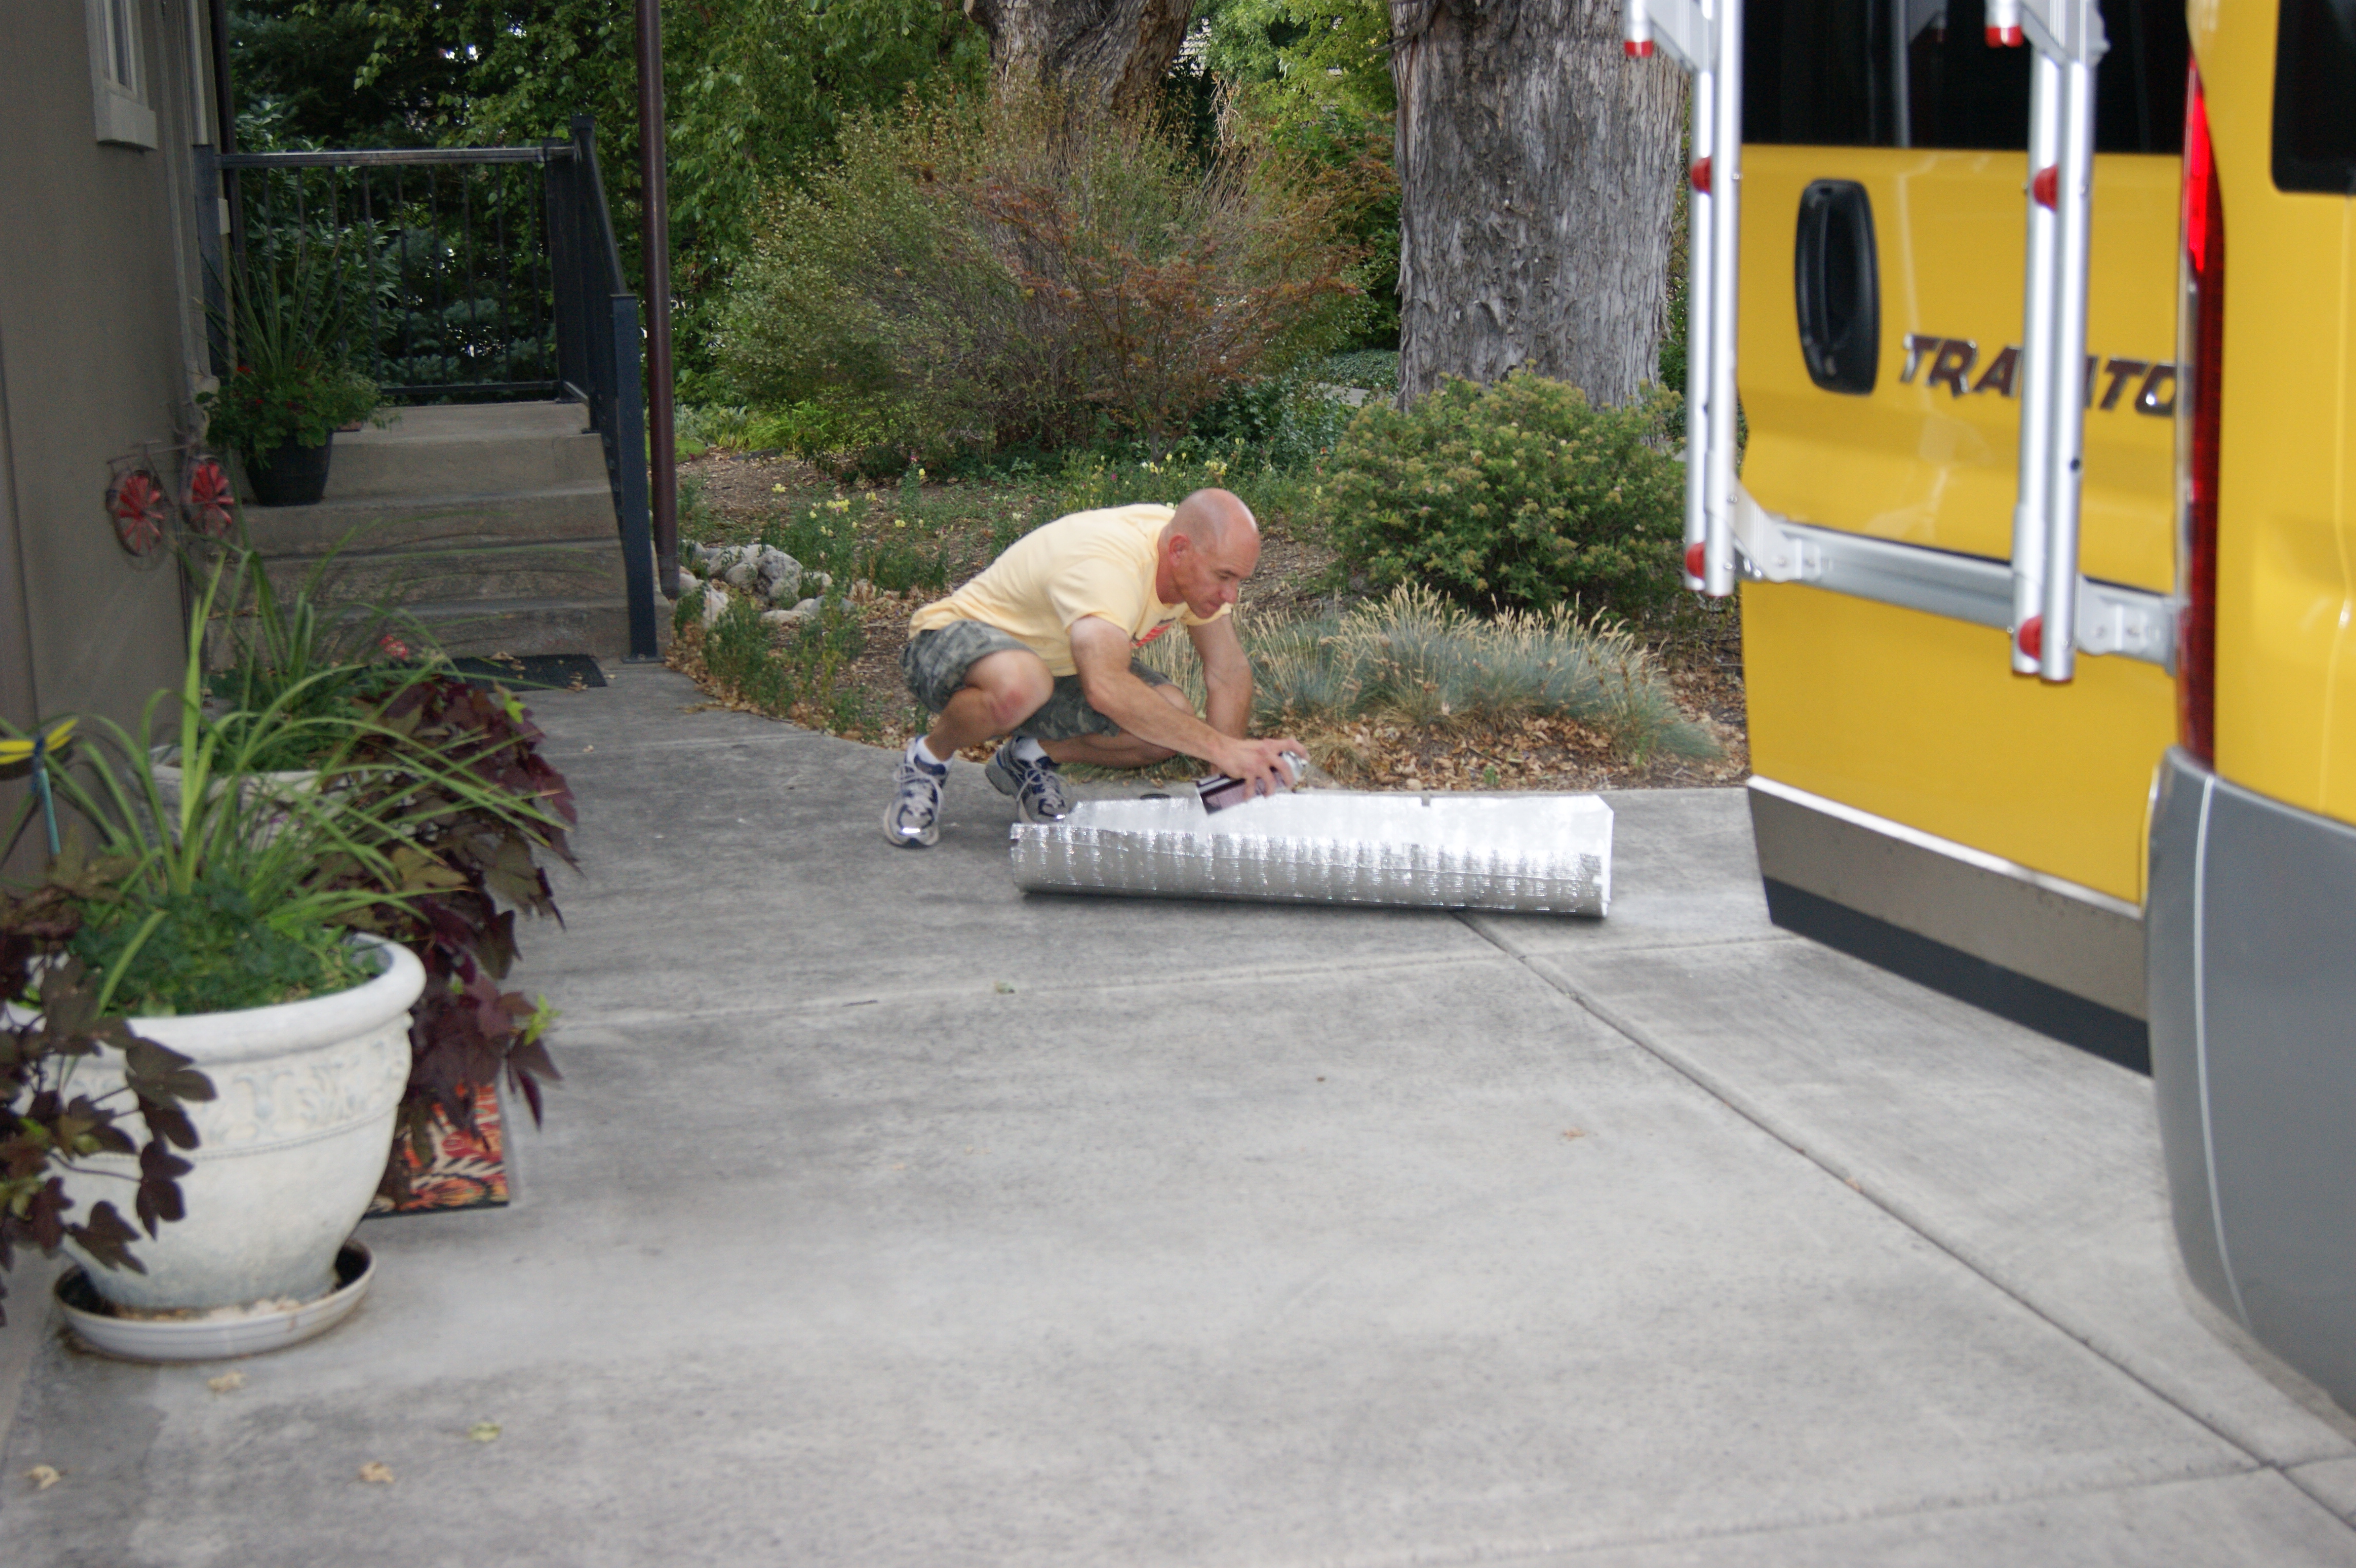
The rear doors are much easier to work with, since you get to stand up and there’s nothing in your way. With the insulation in them, they look like this.
Again, do as much of this as you have the patience for. For reference, to cover the sliding and two rear doors of our Travato, I used 30 square feet of this product.
And now, on to the super-cool
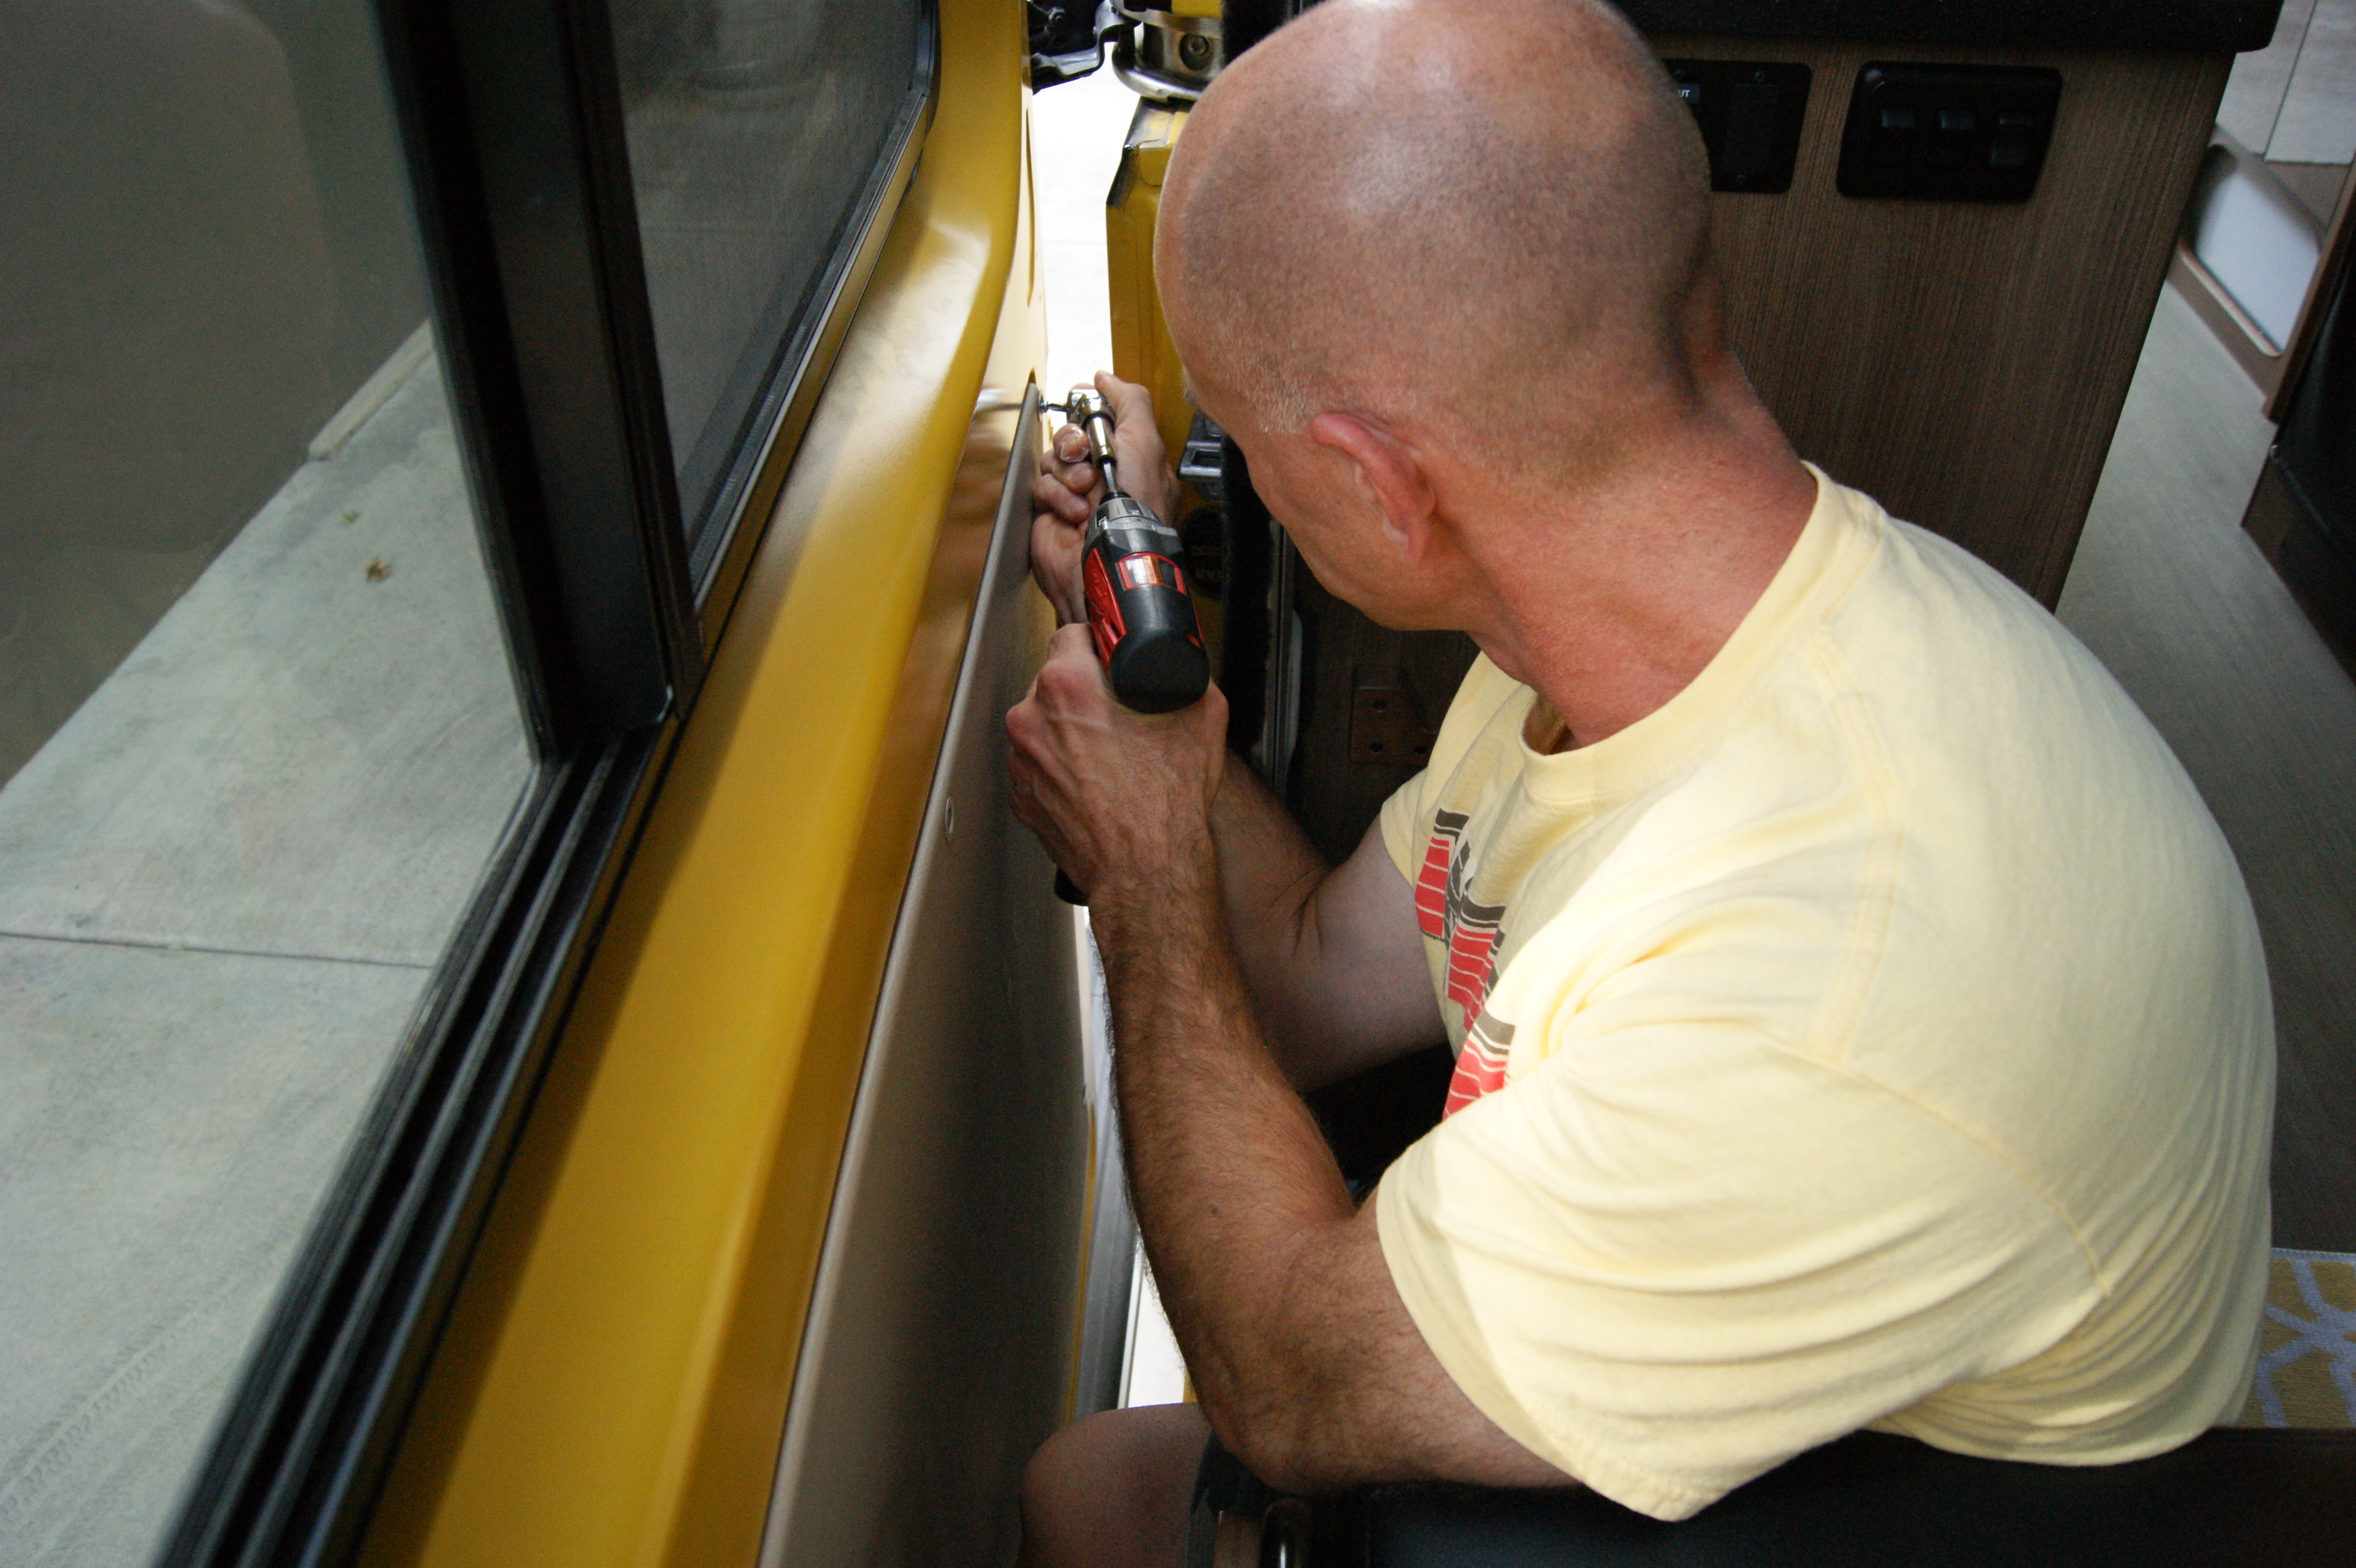
Phase 4: Prodex insulation
If you read the information out there on Prodex, they’d have you believe I was wasting my time with all the other steps, and Prodex was the only thing I needed to use. It has an R-value of 16 for under a quarter of an inch! They put it up in a barn in Phoenix and it started snowing inside! The Heat Miser uses Prodex for his wardrobe!

Prodex is two layers of reflective film around a core of closed-cell polyethylene. It’s good, and it’s thin, but I don’t really believe the claim of R-16. Anyway, I had some Prodex lying around, so I decided to use it to cover the backs of the inside panels we removed in Phase 1. This is even easier than the last two phases.
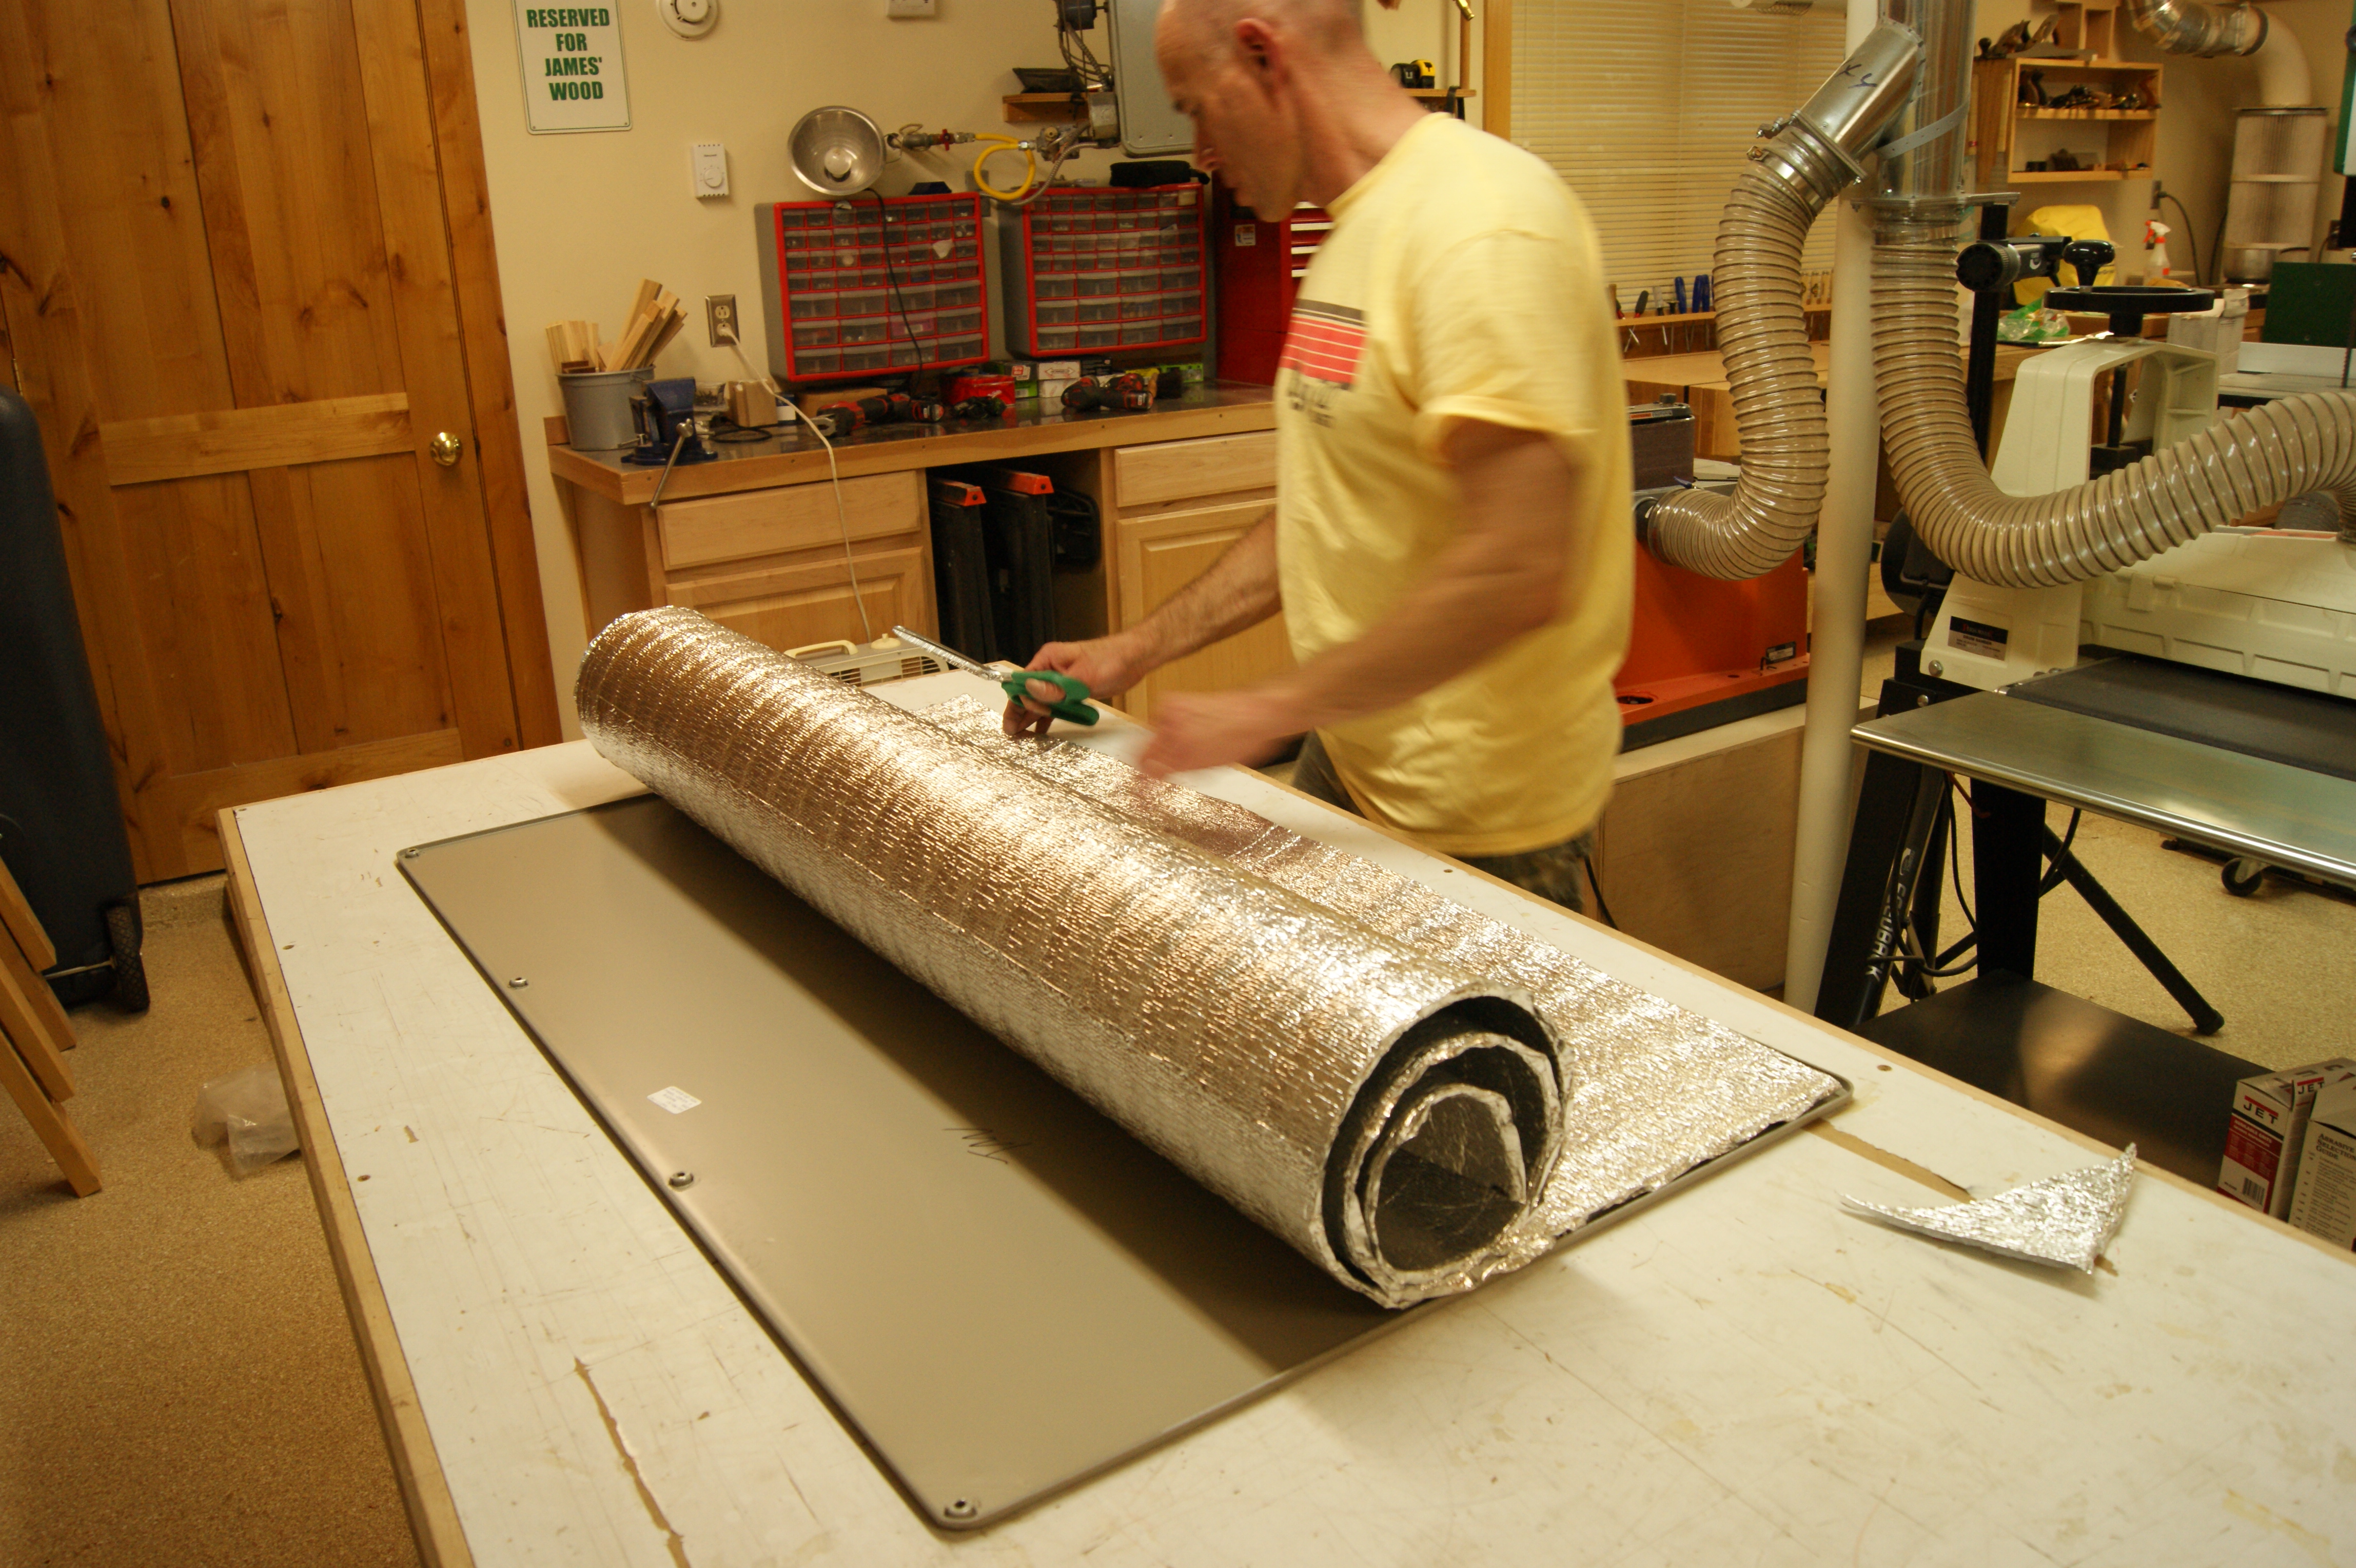
The first thing to do is to roll out the Prodex over the panel (here, I’m working on the large sliding door panel), and cut it roughly to size.
Then, go back and trim it up to fit within the edges of the panel. You’ll also want to cut out around where the screws and trim caps will go later when you reassemble.

Once you’ve got the piece fitted up as you like, take it outside and coat one side of it with spray adhesive. I used V&S 1081 adhesive that I can only find from RAAM Audio.
And when I ran out of that, I used regular old 3M 77 spray adhesive that I got from the local home center. They both seemed to work equally well. They smelled different, but that’s about it.
One thing to make sure of here is that you SPRAY THE CORRECT SIDE OF THE PRODEX! It looks the same on both sides, and the door panels are roughly – but not perfectly – symmetrical. So it’s really easy to spray the wrong side of the Prodex and then realize it doesn’t fit and then have a sticky mess and start yelling and trying to throw it across your shop but you can’t because it’s stuck to you and then your wife starts laughing but that really doesn’t help matters any and then you just wish you were back cutting yourself on the FatMat again.

But I digress. Once you’ve got the Prodex sprayed, simply press it down onto the door panel and you’re done. Then it’s just schlep the panel back out to your pimped out Travato, and start to reinstall.

Phase 5: Reassembly and aftermath
Reattaching the panels is pretty easy, but not completely easy. Just screw them back on.
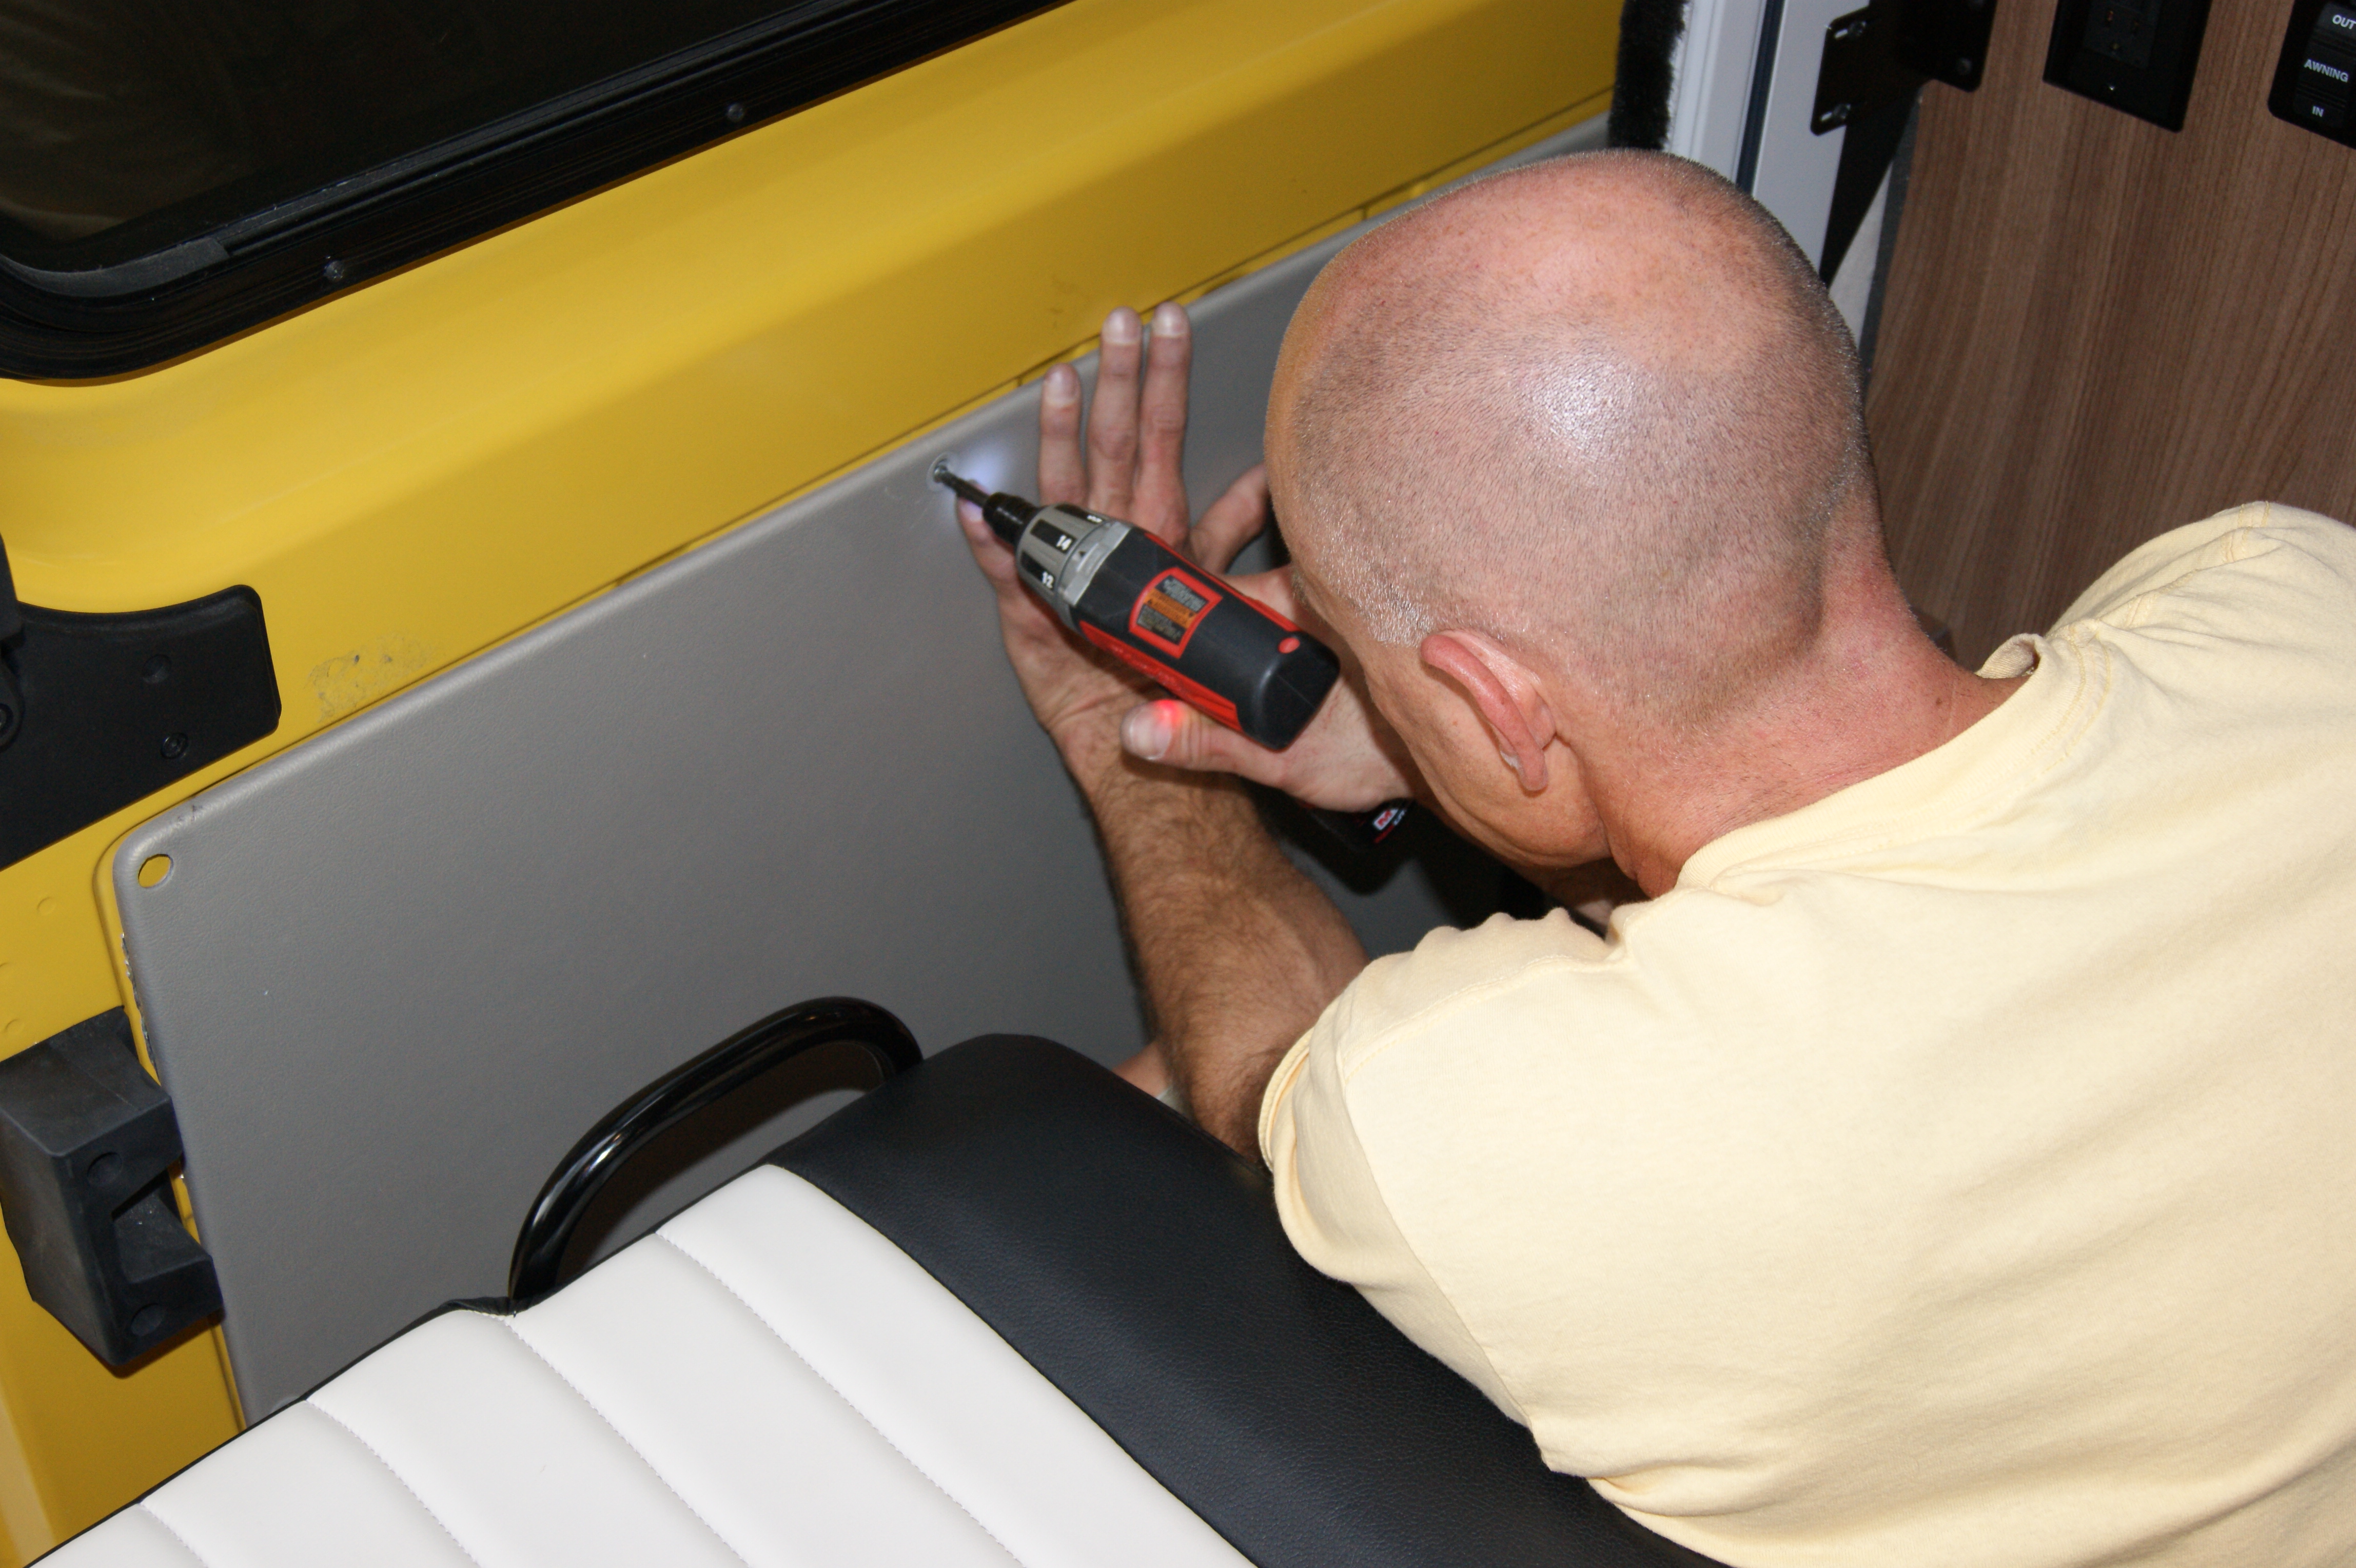
And then pop the little covers back inside. These are actually pretty tough to snap back in. Unless you have steel fingers or something, you’ll have to use a hard surface like the back end of a screwdriver to get them to snap back into place. This is also another opportunity to launch them into the far reaches of your driveway.
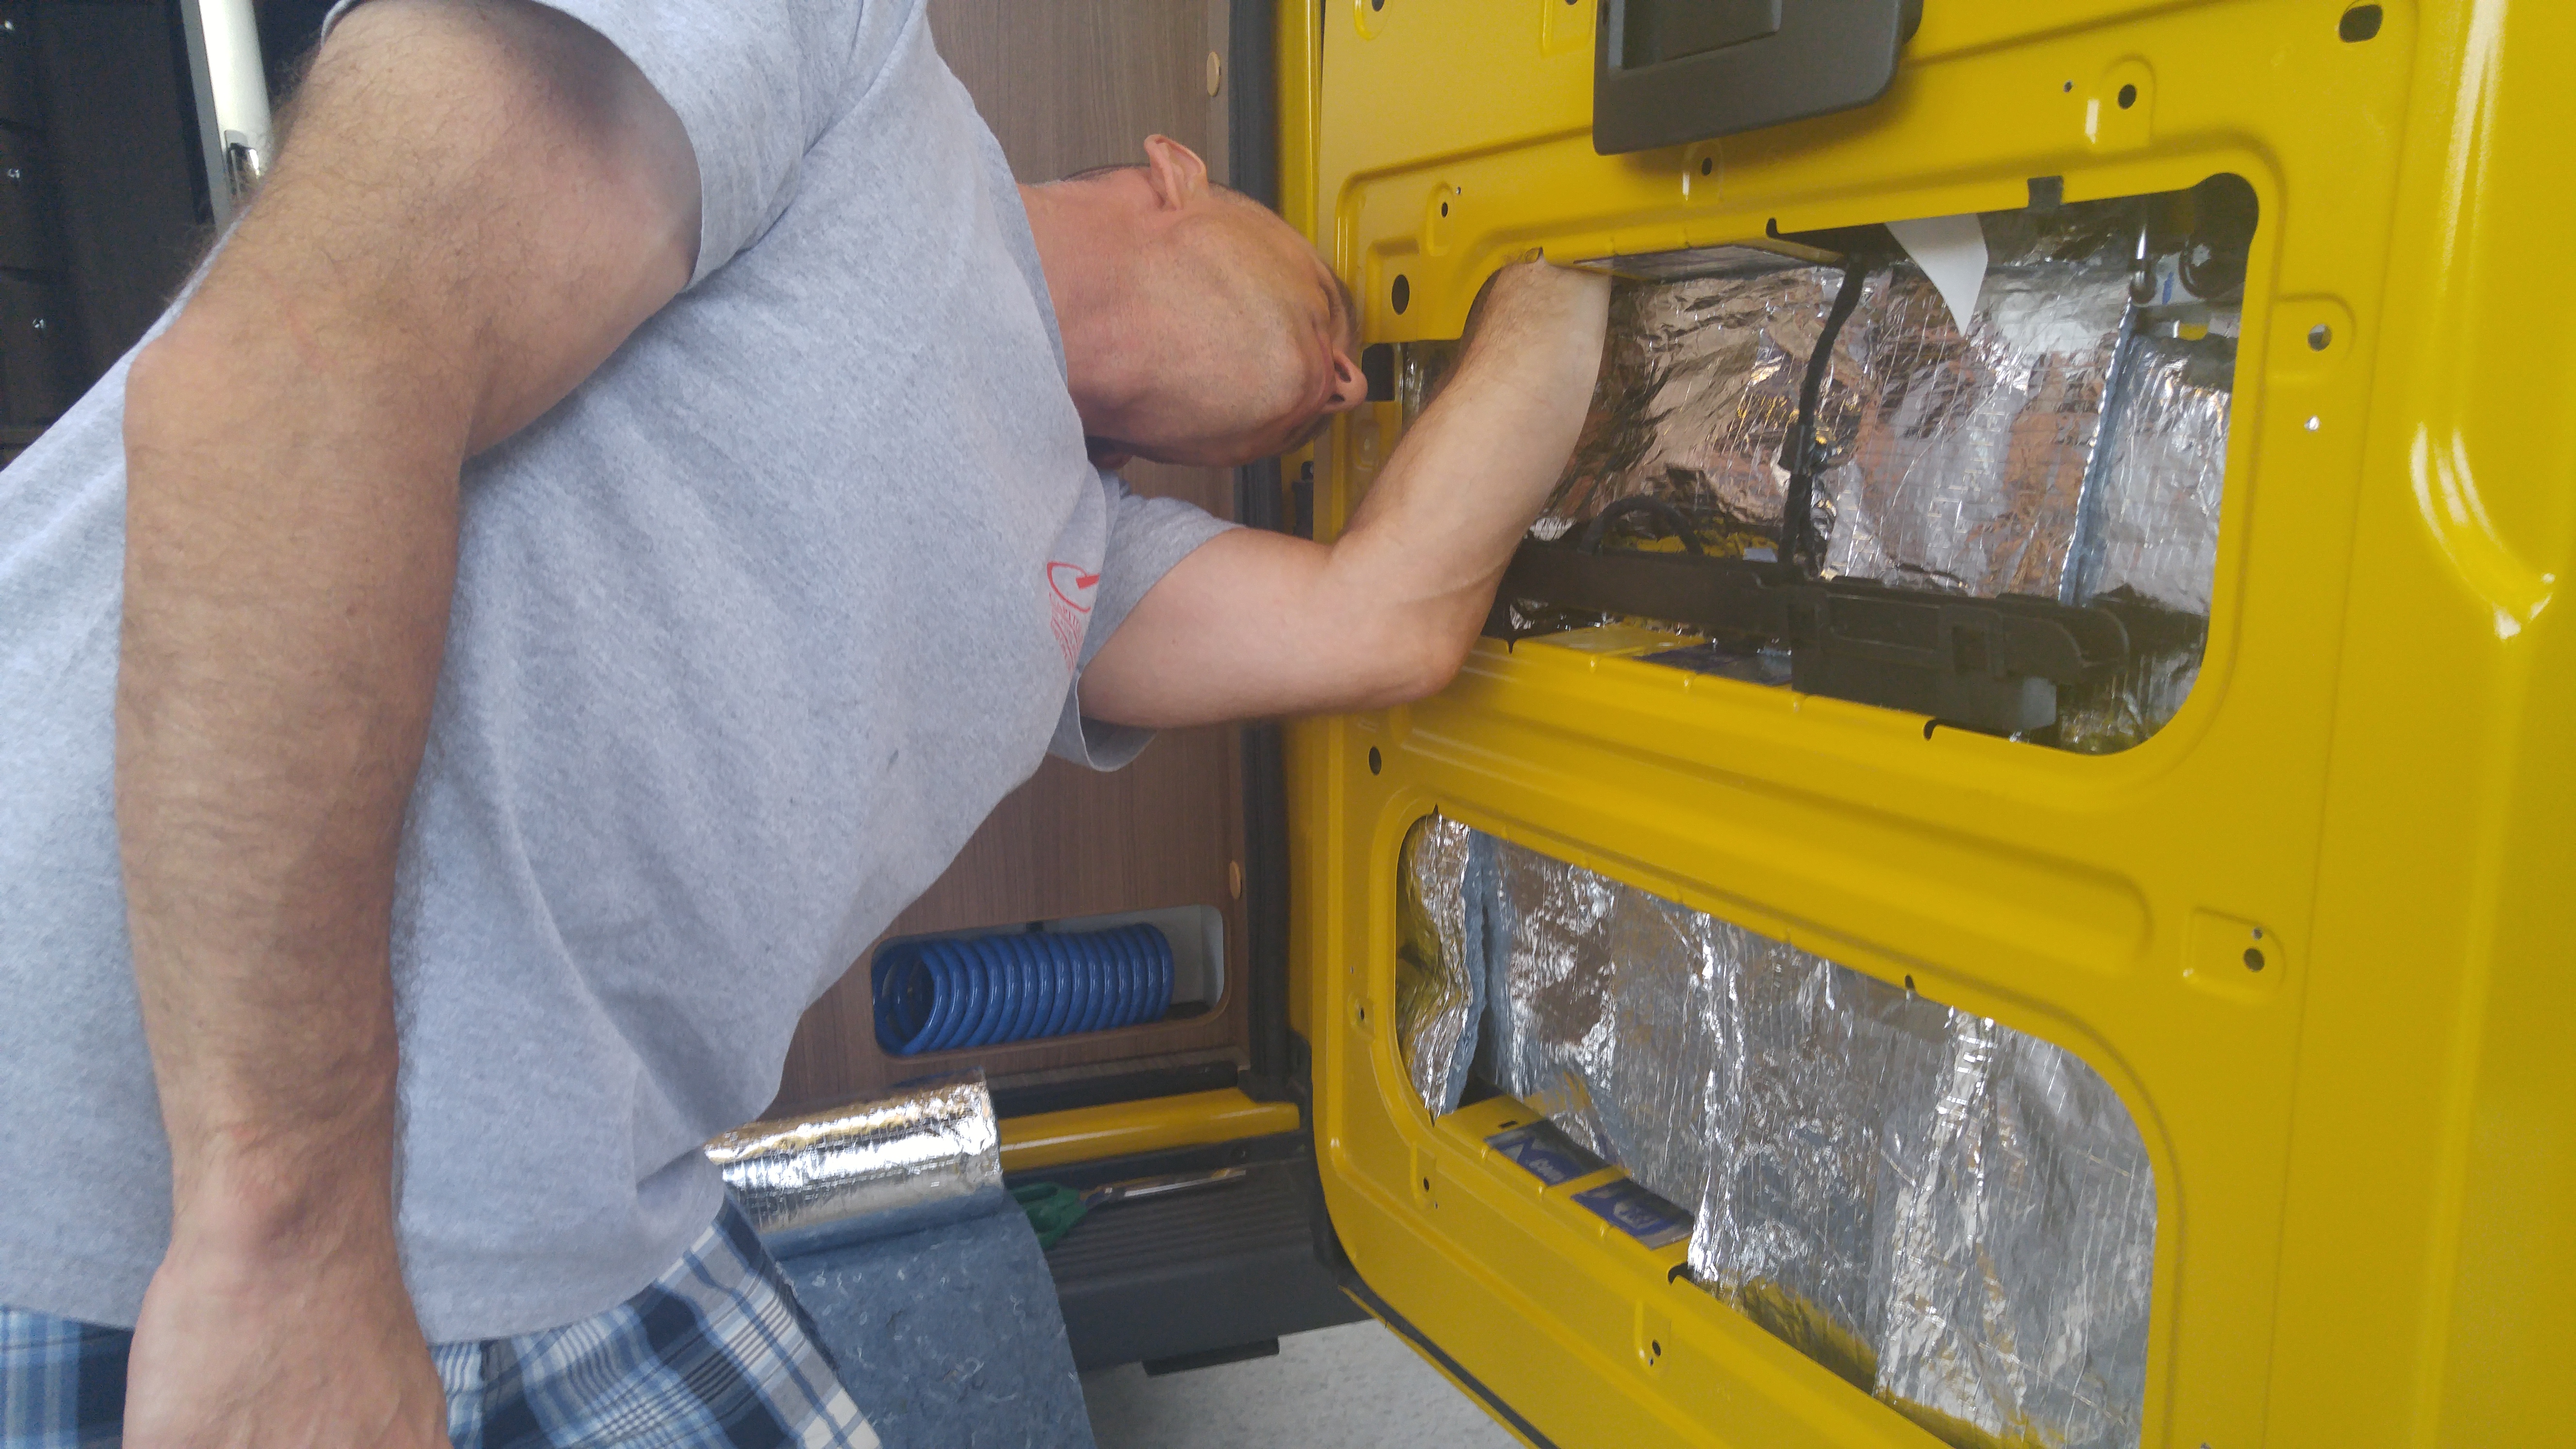
The really good news now, is that the UPPER panels on the doors are much easier to do than the lower panels, because, generally, there’s nothing inside of them.
![]()
The one exception – on the 59G anyway, is the panel over the bed, which will have reading lights attached to it. The easiest way to deal with that panel is to put down the bed and lay the panel on the bed (there was enough slack wire in my Travato for it to reach). But come to think of it, most of you will probably have to put something on your bed to get it high enough.
When it’s all done, it doesn’t look any different at all. Not one bit. It does feel different though. The doors are heavier, and more solid feeling. And it certainly sounds different. Whereas before, Lance’s sliding door sounded like a metal van door, now it sounds like a tank hatch or a blast door or something like that. You’ll just have to catch us out sometime and ask to hear the door.
Time will tell if the insulation is doing its job, and how much quieter we think it is on the road. But my initial impressions are that I’m satisfied.
Would I do it again?
Yes. But I might wear gloves next time. Also, I might not do it in August.
Sound off below if you have any other questions. James out!


Did the Dynamat thing in the sliding door and the cab doors. Made absolutely no difference noise wise. Adding insulation were possible did help with heat retention and the doors sound pretty solid now. Someone mentioned the Travato is quiet, that must be a joke. This van is LOUD, annoyingly loud.
We found that the ProMaster engine was responsible for a lot of the noise.
It just seemed to rev higher than other engines, and so there was a lot of noise there – particularly in mountain driving.
does the prodex as you installed it maybe create too much of a seal? I don’t pretend to know, just a thought. People talk about mold.
Never had any problems with mold!
Nice video and how-to.
Suggest using 3M Thinsulate(TM) and Low-E SSR for future insulation projects. Much easier to install and offers better performance than the products you used. Thinsulate(TM) is hydrophobic so will not absorb moisture like the shoddy (industry term for insulation made from recycled fabrics) used in your video.
Thinsulate(TM) SM600L and SM400L are engineered for vehicles. It’s a superior noise, resonance control product and also provides needed R-value. It is the most popular insulation product used throughout vans by well informed DIY and top professional up-fitters alike.
Please take time to visit us in Hood River, OR if you are in the area. Your attention to the industry is great.
James,
Great article! I can imagine the doors being a significant source of heat loss (or gain) with no insulation. If I try some of this, I’ll wear gloves!
Reflectex, Prodex, and other radiant barrier products have been cited as having exaggerated or misleading insulation claims, where the quoted R values are for an ‘insulation system’ rather than the material itself. Prodex itself has an R value of about 1. These radiant insulation systems typically require significant air gaps on both sides, which you may have achieved in your installation. Apparently, even when radiant barriers are used properly, other forms of insulation still perform better.
I’ve read articles about people using products like Reflectex and Prodex (particularly for window coverings) and being quite happy with the results. It makes sense that radiant barriers might work well for window coverings.
Rigid foam board (R6.5 per inch) might produce better insulating results, but be totally impractical for this specific application.
I’m just curious if you have any follow up thoughts.
My biggest follow up thought is that the windows are now a bigger problem than the doors! Lots of single pane glass in there…
I’ve never used tin foil bubble wrap in the windows, though I know some swear by it. Besides looking awful, it’s just one more thing you’d have to store.
I agree rigid foam board would be a better alternative. IF you’re planning a build, I would try to use it where you can.
Inside a door (with moving parts) is probably not the best place for it though.
Spray foam would be something I would love to try, but lack the skill to apply properly on an already completed RV.
Suggest 3M Thinsulate(TM) SM400L or SM600L acoustic/thermal insulation engineered for vehicles and passes FMVSS-302 flammability standards. For radiant barrier we recommend Low-E SSR. Prodex has mylar skins (like Reflectix) which is flammable and does not pass FMVSS-302. Low-E has aluminum skins on each side of closed cell foam.
Hi James,
this is great!
I just installed the ladder and bike rack to my 59G . Had to remove all the interior panels to get the mounting done and already stuffed Protex (had a roll here) into the spaces . But adding it to the rear of the interior panels is a awesome idea. Will do that next. I wonder if you can help out: I recall that the Travato that comes with bike rack and ladder has a tether cable installed on the inside between door and rear column. Is this steel cable simply attached with self tapping screws? Mind posting a picture of it and let me know how long the cable is? Thanks so much. Stefan
It’s not self tapping screws. Winnebago has made a bracket that mounts to part of the hinge. They’ve attached about a 6 inch cable (but that’s just a guess).
It’s dark now, or I’d go take a picture for you. If I remember tomorrow, I will.
While looking at your picture of the rear doors with the panels removed, I wondered if the lower compartment in the doors could be used for storage? Maybe a spot for the water hose or electric cord.
I suppose you could try to store something there if you really wanted to. I know of at least one individual who has converted the upper part of his sliding door to storage.
For now, I like mine as an insulated airspace. But if I ever really need the storage, it could be an option.
Aside from the doors, what is your opinion of the rest of the Travato insulation (walls, ceiling, floor). Since you visited the plant, did you have a chance to see the insulation being installed? If yes, can you describe it?
I am curious about the wattage of the heating pads used on your tanks. I would assume in full winter use that the power required to avoid freezing would be quite a bit, especially for off grid use. But I’m just guessing.
As always, entertaining and informative. Thanks James!
Glad you liked it!
So, how hard would it be to convert a standard Travato into a 4 season camper? Could I just insulate the pipes and add tank heaters, or do I need to re-route all the lines inside?
I think it would be easier on the 59k than the 59G. I recall seeing fewer water lines underneath the 59K.
You’d need tank heaters, yes. Double check for outside pipes, and heat them if you find them, yes.
That’s a minimum.
I haven’t been through a winter with Lance yet, so I don’t know what I don’t know. There may be cold spots or something that need to be addressed. We’re in uncharted territory.
Although – if you’re willing to forego using the water system in the winter (you just bring along your drinking water, flush the commode with RV antifreeze, that kind of thing), then there’s nothing at all to stop you from using a stock Travato as a 4 season camper. It’s only when you want to shower in a van when it’s below freezing outside that things get difficult.
James – Before you go off and add more sound deadening and insulation, what about taking some sound readings with your handy decibel meter for some before/after data? Maybe stationary – closing doors and maybe on the road. Do you think you could get consistent readings to make the comparisons work?
I thought about doing that for the doors, but there were just too may variables for me to get anything I thought would be reliable.
I also thought about taking heat-camera pictures when I had one rear door done and the other stock – but the price of a heat camera kind of turned me off that idea
I may still try to do something like that when I do the cab doors and headliner. Maybe just run it out on the highway. It would be on different days, different traffic and wind conditions, but it might be interesting to see. Thanks for the suggestion!
I see no reason to go thru this much work. The van is fairly quiet as it is. Just stuffing some fiberglass, rock-sill or other type insulation in those gaps would have given more than sufficient insulation.
Also, there are other spots that need to be done – under the kitchen cabinet against the outer wall, the wheel well and the outer wall of the under-bed cabinet, the outer wall of the dinette area, and the over cab cubby under the headliner. You can get to all of these to stuff some kind of insulation – dynamating those areas would be tough.
Well, strictly speaking – none of it needed to be done. So I suppose it all depends on how much seems like enough to you.
We had our last RV out in temps of -2 (in transit mostly, but still), so marginal gains seem worth chasing to me.
The sound deadener was the most time consuming part. And while I agree the Travato is pretty darn quiet to begin with, you should hear (or not hear) the doors now.
And I know of at least one make of RV that uses hush mat, denim insulation, and a vapor barrier, so I don’t think I’m that far off base…
But anyway, besides the parts you mention, there are also the front doors that I’ll be looking at. Ours has a window by the kitchen cabinet, and there is already insulation below that window. (There is a rib near that space that I suppose I could fill.) The wheel well in the back, and the headliner are probably the biggest targets of the things you list.
Nice write up as usual James, foibles and all. I can understand what you are saying about the noise of the doors shutting. Our Sprinter ERA sounds like a tin can rattle trap when you close any of the doors, especially the slider…
A thought. Think about doing the 2 front doors. It’ll be a bigger job in that there’s more stuff in there, but makes a big difference too….
Thanks, Bob.
You can bet I’ll be doing the front doors. I have to be more careful than most, as ours has a JBL sound system that Winnebago installed. But I do intend to get to the doors. Was just tackling the easier parts first.
Nice mod!
Just did the same thing to our VW EVC sliding door – old original “panel” (it covered entire door, window edges, etc. ) was hanging on with 2 clips and 1 screw, rattling while driving down the highway. Ripped it off and replaced it with 1/8″ baltic birch ply. Used FatMat + insulation first, though no cut fingers for me ;~)
Sounds like a BMW or Mercedes when you close it now.
Nice – the sound of the door is a hard thing to describe to people; but if you had two identical vehicles – one done and one raw, it would be obvious.
(Also – I’m slightly jealous of your intact fingers…)
Oh, I have the scars, too, from previous times dealing with sheet metal. Been there, done that.
The other thing to watch for are those razor knives/box cutters, like the one that came with the FatMat. Nasty Things. BEFORE you cut, check where your left hand is (if you are cutting with the right). If it is between you and your cutting hand, think again. Very easy for the blade to jump off the straight edge into your hand/fingers. A WIDE -THICK straight edge, like you are using in the photo above helps, but…….
Agreed. There’s a reason I no longer use my thin metal ruler for stuff like this!
“Sounds like a Mercedes now…” Hopefully it doesn’t sound like the Mercedes owned by “bob” above…. “Our Sprinter ERA sounds like a tin can rattle trap when you close any of the doors”….. :-D. Lol
(I realize you probably meant their cars, but the comments just read funny together)
((Interesting post))