If you saw the first video I did on ‘George’, our 4×6 bike-hauling trailer, then you already know I’m in full-on ‘re-modding the mods’ mode.
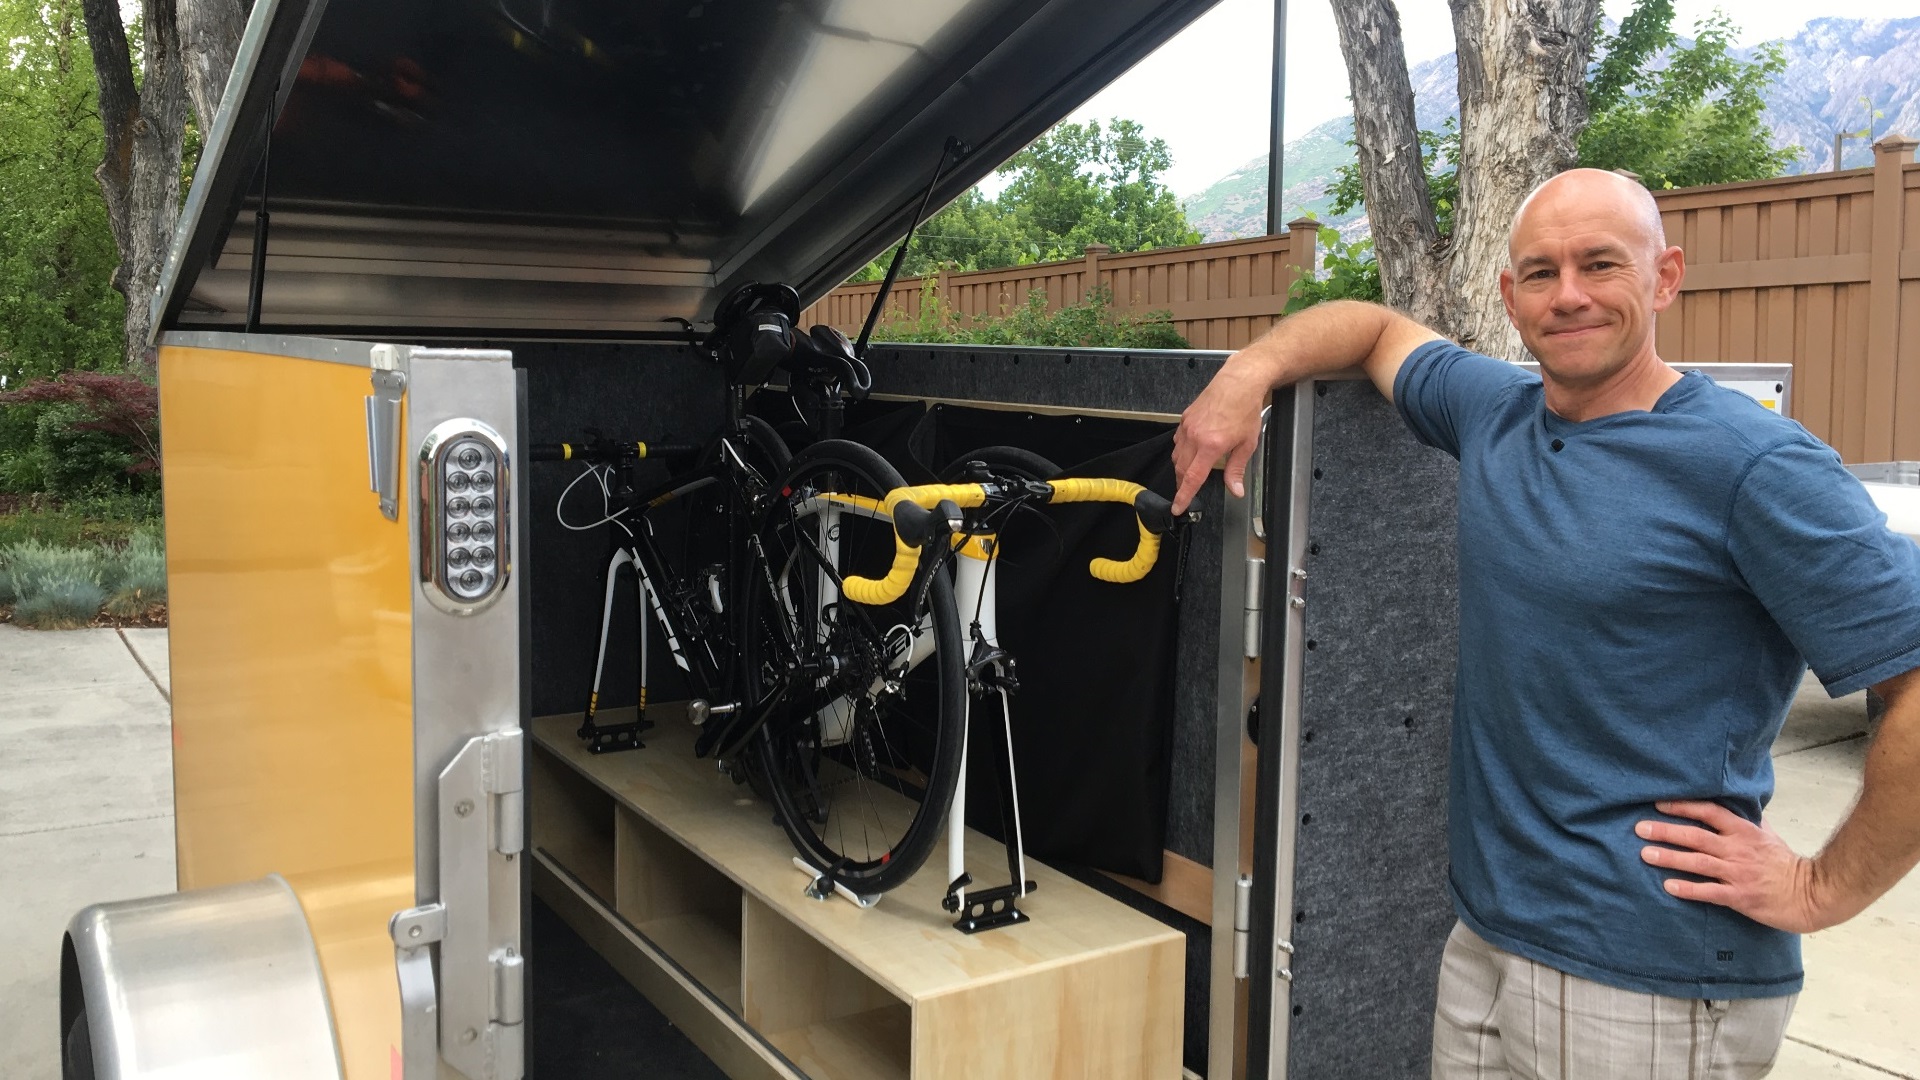
I used this long weekend to replace something I had built in our trailer that had been bothering me for a while. I tore out the bicycle storage platform and replaced it with a much better (and cooler) sliding storage tray. You can check it out in the following video:
I decided *not* to go into too much detail on the plans or construction methods for this tray for a number of reasons. First… I didn’t really have a plan! I just got the parts and started building. That’s not really the best way to go about things, but it worked out in this case. Also – unless you have the same bikes and trailer that we do, exact plans won’t do you too much good. For this project, it was more about the idea that I wanted to get across.
But having said that, there are a number of things that I do want to point out in case you want to try something like this on your own.
The Drawer Slides
The drawer slides are really the heart of the whole thing. The ones I used are 60 inch heavy-duty, 500 pound rated slides that I purchased from Amazon.com. These are the kinds of drawer slides you might find on one of the large belly storage trays in a luxury class A rig. I honestly bought them thinking that this would not be the last project that I used these drawer slides on. If we sell the trailer some day, I’m taking the slides with me. If we ever get our European-inspired small class C rig – I’m going to build a tray for that and install these in it. Please don’t tell Stef how much they cost – because in my mind, I’m amortizing the cost of these slides over several projects. That’s how my mind works when it comes to shop time… I can say though, that they are a really heavy duty and well-made drawer slide.

Everything else in this installation depends on those drawer slides and where and how they are mounted. So, as you see in the video, I get those fixed into position first.
Pocket Screws Galore!
All the assembly you see in the video was done with pocket screws. There is no glue. This makes things very fast to put together, and very quick to correct if you need to change something. Pocket hole joinery is also surprisingly strong, more than adequate to hold a pair of carbon fiber road bikes.

I use a simple pocket hole jig by Kreg. I’ve had it for years, and it’s dead simple to use. You can see the holes and the jig in operation in the video. For simple and quick RV projects, you can’t do much better than this. I do go through a lot of pocket hole screws, though.
Pre-Finished Plywood
I knew I wanted a finish on the tray (to make it easier to clean up grease). But I also knew that having to spray on 3 coats of polyurethane was going to be a real time-suck. So when I saw this pre-finished plywood at the local home center, it was a done deal.

Now granted, by my regular standards, this plywood is junk. It’s ugly, for starters. It wasn’t terribly flat. It also has lots of voids in the material as I found out while working with it. I would never use this stuff for a furniture-grade project. BUT… it was only 45 bucks for the whole 4’x8′ sheet! If you’re quickly putting together a cabinet that’s going to live in a cargo trailer, this stuff is just the ticket.
Wheel Bags
Once I remembered that I kind of know how to sew, the wheel storage for this project became easy. All I had to do was buy the material and sew up a couple of envelope bags. This was cheaper and faster than buying wheel bags. In fact, I was done buying the material and making the bags before lunch. But if you don’t know how to sew, or just don’t want to, you could do this just as well with a purchased bicycle wheel bag. You would just need to buy a larger bag so that there was sufficient slack in the bag once it was mounted to a wall. (Otherwise, the wheels would be too hard to put in them.)

I haven’t used this bag personally, but if you were going to order bags to complete the project, this one looks like it would do the trick.
So there you have it. If you’ll be at one of the rallies we’re at this summer, you can see the tray in action. And even if we don’t meet up in person, hopefully this gives you a couple good ideas to springboard a project like this for yourself.
AND THERE’S MORE!
To see the NEXT part of the Pimp My Trailer series… CLICK HERE!!!


Hi James
Sorry, my English is not perfect, I’m from Switzerland. Such a good idea! I’m converting my van and I’m planning to do the same system. Are you still happy with it? Is it not a problem that the whole thing is a bit heavy? And would you choose the same wood again? Would you do it the same way again?
I really love that you have the storage in there too.
Thanks for the inspiration and information 🙂
Isabelle
Your English is just fine!
The weight of the tray has not been a problem – the slides are designed for high weights.
And yes, I would do it again. It makes getting the bikes out so much easier!
Best of luck in Europe!
Hello James
thanks for the lesson, but where can I find “Pimp My Trailer 1” I´m interested to know what parts you used to hold the bike in place.
Best regards from Sweden.
Well, here’s “Pimp My Trailer 1”, but it won’t get you the information you’re asking. That was a project to add a bike repair stand to the trailer.
The bikes are held in place with fork mounts on the front forks. There are several you can choose from, but the ones we used are linked here.
To hold the back wheels (to keep them from bouncing about), I cut a piece of PVC pipe in half lengthwise to make two channels.
Those channels are screwed down to the bike platform to make cups that the wheels rest in.
Then the wheels are held down in the cups with some bungee cords.
I love your design James and I put that cool slider in my “someday” waiting list at Amazon. Thanks man!
Right on!
(I have one of those “someday” Amazon lists too.)
Hi it seems that you were not alone having such idea for bikes. Someone you know just did the same thing on their 2019 Motorhome. https://youtu.be/vQwoaT06GAk
Nice job James, looks like you are starting to really like your trailer. Look forward to riding with you two again sometime.
Well I certainly like the extra space once we’ve landed. (Backing that thing up… not so much.)
You coming to GNR? We’ll have the trailer there, and yes, there will be some riding!
What’s Russ been up to regarding the demise of the Trend and rumored demise of the Paseo? And a gas Sprinter? Surely these facts are going to collide to make a new model of something… your garage van may be closer than you think.
I haven’t heard of any new rigs on the imminent horizon (and likely couldn’t say if I had).
I’m with you though – not making those models will free up capacity for a future model…
I was enjoying watching the video of James until I heard the words, “I don’t have any plan, I’m just making this up as I go” and then I realized it must be an imposter! 😉 Love the design, James! Wheel bags were genius! Do you have room between the bike tray and the rear door for a handle on the end of the bike tray?
I promise… it’s really me!
Not much room between the tray and the door. Maybe an inch. I have plans for that inch though… 😉
If I need a handle, I can either add one to the top, or cut a hole in the wood itself.
I just had a thought…
That trailer might make a great mount for solar panels? You could put them on that flat roof. When you set up camp you would be able to put the trailer in the sunniest place and the RV in the shadiest place. Keep the RV cool but have lots of solar power.
If I needed more solar, sure, that would be a great place to mount them. But pretty much by the time we’ve parked anywhere, the batteries are 100% full anyway…
The most I’d be able to get on the trailer would be about another 300 watts anyway. Compared to the size of our battery, that isn’t much.
That makes sense. Those extra solar panels on the trailer would only add complexity. I like to keep life as simple as possible ☺
#1 – Just curious why you built a rather tall box to hold the bikes. Will you use the three compartments to store cycling gear? #2 – isn’t the Winnebago with the cargo area in back and the drop-down bed a vehicle well-suited for traveling with a lot of bikes? I’m just thinking the trailer sort of defeats the purpose of a Class B.
You’re correct about the tall box. With the bikes close to the floor, there was about a foot of empty space near the ceiling. The taller box lets us use that space for storage, and since it rolls out with the bikes, it will be easy to access.
And we don’t take the trailer all the time. We frequently travel with four bikes in just the Travato. But then we had a cat move in. We couldn’t make room for four bikes and a cat (mostly the litter box) all inside the van, so something had to go. (We might could have made it all fit, but then nobody would have any room to move, and the white cat would be covered in chain grease from the bikes.) It does somewhat defeat the purpose of the class B, but when you’re out in it for a month or more, the extra space is pretty nice. Once we drop the trailer at camp however, we’re back to being a Class B.
The website will soon be called “The Fit RV, featuring the Fit Trailer”.
Nice addition to the trailer. When you travel with all four bikes, do you put the others in the RV? Or will you eventually upgrade the slider?
I like the DT Swiss triple wheel bag. I manage to fit one fat bike 26 x 4 wheel, one 700 x 38 ebike wheel and one 700 x 23\25 road bike wheel. But the fat needs to be partially deflated and the skewers need to be off. Since most purchased bags are padded material, you can kind of fit in in any handy slot and the wheels are protected.
For now, when we travel with four bikes, the two mountain bikes are on the rack on the back of the Travato.
We could (I’ve checked) fit our regular bike storage tray (which normally rides in the RV) inside the other half of the trailer, for a total of four bikes in the trailer.
I’ve got a DT Swiss bag that I rather like, but it only holds one wheel. For the trailer, I wanted something affixed to the wall.
Viewing the US RV market from Europe I’m just amazed that there are no small Class Cs or B+ motorhomes with decent storage for bicycles. I think there is such a big gap in the market for this. The motorhome with bicycle is such a superb combination.
Your trailer is an excellent solution and if I were in the US that’s what I’d do. Now that you got the trailer I wonder if you are considering a Leisure Travel Vans motorhome or similar?
We’ve been talking about bicycle storage in RVs for years!
Honestly, what we’re really waiting for is someone… **anyone** over here to make a European-style floor plan with a garage. It’s long overdue here and whomever comes out with it first will have a runaway hit on their hands.
We’re not really considering anything else at this time. Just waiting…
I’ve just heard a rumour that Hymer are planning on introducing some of their Class A motorhomes to the USA in 2019 and some of these will have the big garage at the back for bicycles. Rumour comes from someone high up in Hymer, but is not first hand from me.
A European “Class A” is about the size of a medium C over here. I doubt they would expect much success with a direct import of an existing European model. It will be interesting to see if/what they come up with!
A couple of questions… 1) How are you securing the rear wheel on the bikes? It looks like a little tray (cut from PVC maybe?) with some kinda bungee thingy. 2) What kind of material did you use for the wheel bags?
Good questions!
Yes, the rear wheel is in a tray of sorts that is a piece of PVC cut in half. I’ve got some elastic cords with balls on them which keep the wheels in the trays while going down the road.
The wheel bags are made of ripstop nylon that I got at the local JoAnn Fabric.
Adding a Sliding Bike Tray to Our RV’s Trailer! OK
1 ❤❤❤❤❤ ⚙️⛓ Outstanding, thank you so much for sharing. RV Journey